1. Pengenalan
This manual provides detailed instructions for the installation, operation, maintenance, and troubleshooting of your TMEZON 4-channel 1080P HD-TVI Digital Video Recorder (DVR) and accompanying 4-camera CCTV security system. This system is designed for both indoor and outdoor surveillance, offering high-definition video recording and remote monitoring capabilities.

Image: Comparison illustrating the enhanced clarity of 1080P resolution over 720P, highlighting the high-definition capability of the system.
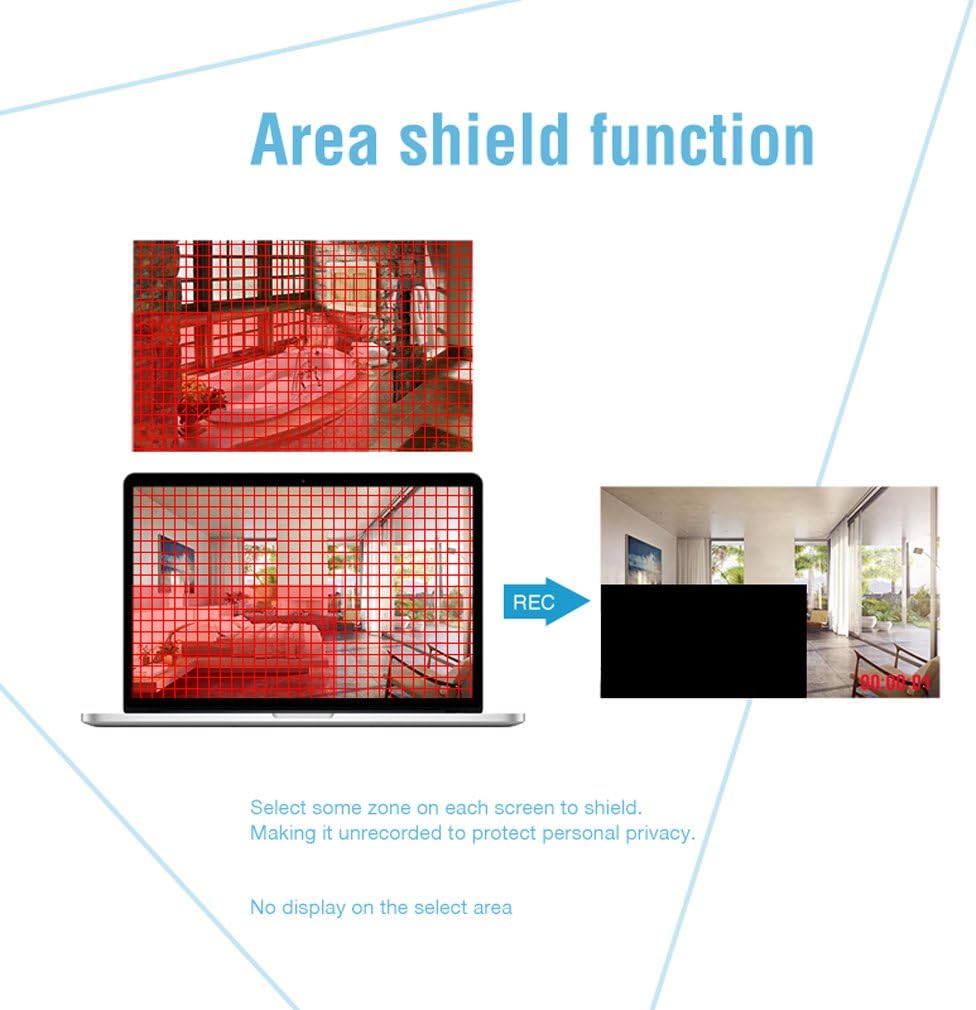
Image: An outdoor camera demonstrating its night vision and rainproof design, suitable for various weather conditions.
2. Kandungan Pakej
Sahkan bahawa semua item yang disenaraikan di bawah disertakan dalam pakej anda. Jika ada item yang hilang atau rosak, sila hubungi sokongan pelanggan.
- 1 x 4-Channel HD-TVI DVR
- 4 x 1080P Weatherproof CCTV Cameras
- 4 x 18.3m BNC Cables
- 1 x Tetikus USB
- 1 x 4-Way Power Splitter Cable
- 1 x Power Adapter for DVR
- Skru Pemasangan dan Palam Dinding
- Manual Pengguna (dokumen ini)

Image: Visual representation of the complete package contents, including the DVR, cameras, cables, mouse, and power accessories.
3. Maklumat Keselamatan
- Baca semua arahan dengan teliti sebelum pemasangan dan operasi.
- Use only the power adapters provided with the system.
- Ensure proper ventilation for the DVR to prevent overheating.
- Avoid placing the DVR in direct sunlight, near heat sources, or in areas with high humidity.
- Jangan cuba membuka atau mengubah suai produk. Ini akan membatalkan jaminan.
- Keep cables organized and secured to prevent tripping hazards and accidental disconnections.
- For outdoor camera installation, ensure all connections are waterproofed and protected from environmental elements.
- Consult a qualified professional for complex installations or wiring.
4. Persediaan
4.1 Hard Disk Drive (HDD) Installation (HDD Not Included)
This system requires a 3.5-inch SATA HDD (500GB to 2TB) for video recording. Follow these steps to install the HDD:
- Cabut palam DVR daripada sumber kuasa.
- Tanggalkan penutup atas DVR dengan membuka skru di bahagian belakang dan sisi.
- Connect the SATA data cable and power cable from the DVR to the HDD.
- Secure the HDD to the bottom of the DVR casing using the provided screws.
- Pasang semula penutup atas dan pasangkannya dengan skru.
4.2 Menyambungkan DVR
Connect the DVR to your monitor, power, and network as follows:
- Output Video: Connect the DVR to a monitor or TV using an HDMI or VGA cable.
- Rangkaian: Connect the DVR to your router using an Ethernet cable for remote access.
- USB: Connect the included USB mouse to a USB port on the DVR for navigation.
- Kuasa: Connect the power adapter to the DVR and then to a power outlet.

Imej: Belakang view of the DVR, detailing connection points for cameras, monitor, network, and peripherals.
4.3 Pemasangan Kamera
Mount the cameras in desired locations, ensuring optimal viewing angles and coverage. The cameras feature a 3-axis mounting bracket for flexible adjustment.
- Pemasangan: Cameras can be wall-mounted or ceiling-mounted. Use the provided screws and wall plugs.
- Pelarasan Sudut: Adjust the camera angle using the 3-axis bracket to cover the desired area. Ensure the bracket screws are tightened after adjustment to prevent movement.
- Sambungan Kabel: Connect each camera to the DVR using the provided BNC cables. Ensure connections are secure.

Imej: Cthamples of camera mounting options (wall and ceiling) and the flexibility of the 3-axis mounting bracket for precise positioning.
5. Arahan Operasi
5.1 Persediaan Awal
Upon first power-on, the DVR will guide you through an initial setup wizard. This includes setting the language, date/time, and creating a password for the administrator account. It is crucial to set a strong password for security.
5.2 Langsung View
After initial setup, the system will display the live feed from all connected cameras on the monitor. You can switch between single-camera view dan grid berbilang kamera view using the DVR interface.
5.3 Rakaman
The DVR supports various recording modes:
- Rakaman Berterusan: Rekod 24/7.
- Rakaman Pengesanan Gerak: Merakam hanya apabila gerakan dikesan.
- Rakaman Berjadual: Records during specific time periods.
Recording settings can be configured in the DVR's menu. The DVR can be set to automatically overwrite older footage when the HDD is full.
5.4 Pengesanan Gerakan dan Makluman
Configure motion detection to trigger recording and send alerts when unexpected activity occurs. You can customize detection zones to minimize false alarms.
- Zon Boleh Disesuaikan: Tentukan kawasan tertentu dalam kamera view where motion detection is active.
- Makluman: Receive push notifications on your smartphone via the app or email alerts when motion is detected.
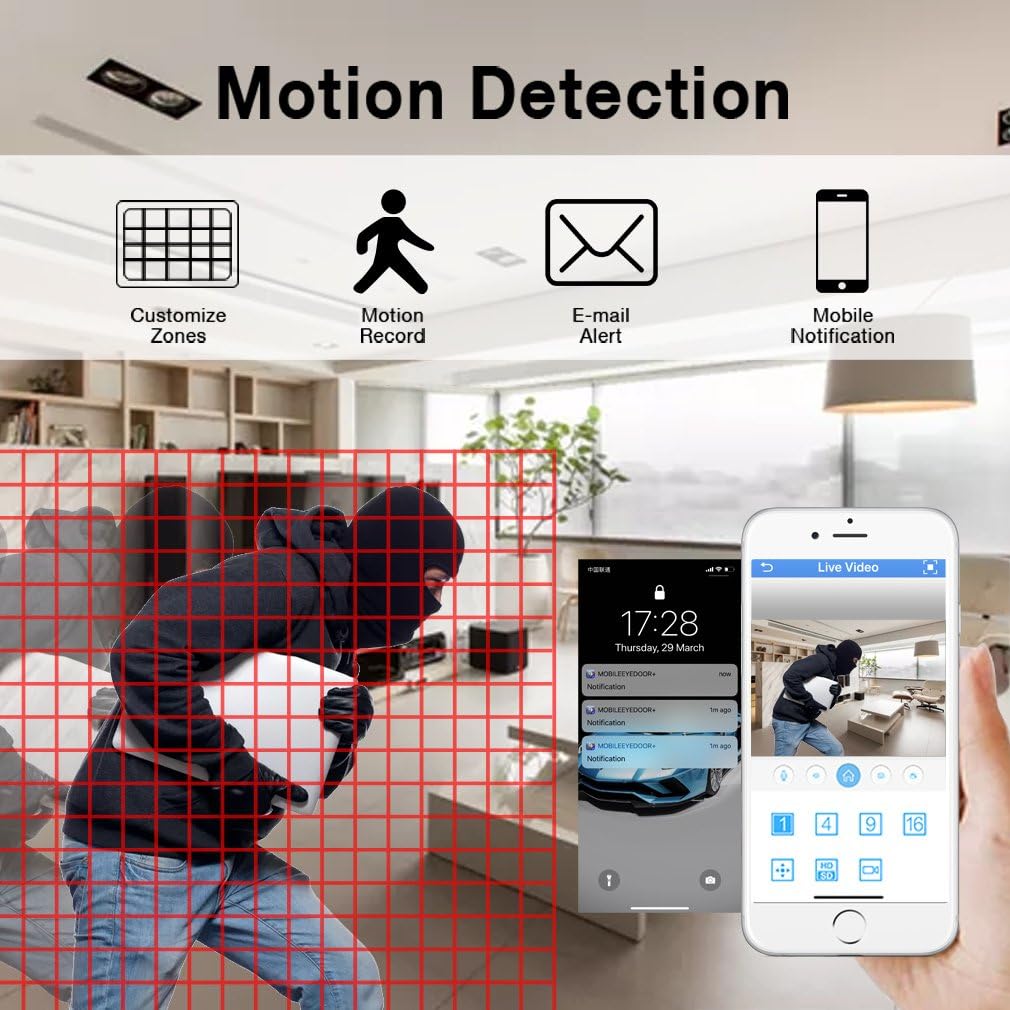
Image: Motion detection interface, demonstrating how to set custom zones and receive alerts on a mobile device.
5.5 Akses Jauh
Monitor your property from anywhere using the free mobile application "XMEYE" on your smartphone or tablet, or via PC software.
- Apl Mudah Alih: Download the "XMEYE" app from your device's app store. Register an account and add your DVR using its unique ID.
- Akses PC: Install the client software on your computer for remote viewing dan pengurusan.
- Ketersambungan: Ensure your DVR is connected to the internet. Remote access is supported over WiFi, 2G, 3G, or 4G networks.

Image: Remote access capabilities, allowing live viewing and playback on smartphones, tablets, and personal computers.
5.6 Playback and Backup
Akses foo yang dirakamtage and back up important video files.
- Main balik: Navigate to the playback menu on the DVR to review recorded video by date and time.
- sandaran: Connect a USB memory stick or external hard drive to the DVR's USB port to transfer and back up video files.
5.7 Privacy Masking (Area Shield Function)
To protect personal privacy, you can define specific areas within the camera's view yang tidak akan dirakam atau dipaparkan.

Image: The area shield function, showing how to select and mask specific zones to ensure privacy by preventing their recording.
5.8 Day and Night Monitoring
The cameras are equipped with automatic IR-cut filters, providing clear images both day and night.

Image: Day and night monitoring, illustrating the system's ability to capture clear video in varying light conditions.
6. Penyelenggaraan
- Pembersihan: Regularly clean camera lenses and DVR surfaces with a soft, dry cloth. Avoid abrasive cleaners.
- Kemas kini Firmware: Check the TMEZON weblaman web atau hubungi sokongan untuk kemas kini perisian tegar yang tersedia bagi memastikan prestasi dan keselamatan yang optimum.
- Pemeriksaan Kabel: Periodically inspect all cables for wear, damage, or loose connections, especially for outdoor installations.
- Kesihatan HDD: Monitor the health of your installed HDD through the DVR's system settings. Replace if signs of failure appear.
7. Penyelesaian masalah
| Masalah | Kemungkinan Punca | Penyelesaian |
|---|---|---|
| Tiada paparan video pada monitor | Loose video cable connection; Incorrect input source on monitor; DVR not powered on. | Check HDMI/VGA cable connections; Select correct input on monitor; Ensure DVR power adapter is connected and power light is on. |
| Tiada rakaman | No HDD installed; HDD full; Recording schedule not set; HDD not initialized. | Install a compatible HDD; Check HDD status and format if necessary; Configure recording schedule/mode. |
| Akses jauh tidak berfungsi | DVR not connected to network; Incorrect network settings; Firewall blocking connection; App not configured correctly. | Ensure Ethernet cable is connected to router; Check DVR network settings (DHCP enabled); Verify router firewall settings; Reconfigure app with correct DVR ID. |
| Camera angle cannot be adjusted | Mounting screws are too tight or stuck. | Loosen the adjustment screws on the 3-axis bracket. If screws are seized, apply a small amount of penetrating oil carefully. Do not force adjustment as this may damage the bracket. |
| Kualiti imej yang lemah | Dirty lens; Low light conditions; Cable interference. | Clean camera lens; Ensure adequate lighting or verify night vision is active; Check BNC cable connections for damage or interference. |
8. Spesifikasi
| Ciri | Perincian |
|---|---|
| Jenama | TMEZON |
| Nombor Model | MZ-HD1004M-K4 |
| DVR Channels | 4 Saluran |
| Resolusi Kamera | 1080P (2 Megapiksel) |
| Resolusi Tangkapan Video | 1080p |
| Jenis Kamera | Outdoor/Indoor Weatherproof CCTV |
| Teknologi Ketersambungan | Wired (Cameras to DVR), Wireless (Remote Access via App) |
| Sumber Kuasa | Elektrik Bertali |
| Sokongan HDD | 3.5-inch SATA, 500GB to 2TB (HDD not included) |
| DVR Product Dimensions | 30 x 30 x 30 cm (anggaran) |
| Berat Barang | 3.88 Kilogram |
| warna | Hitam |
| Ciri Khas | Motion Alert, Smartphone/PC Remote Monitoring, Night Vision, Weatherproof |
9. Waranti dan Sokongan
TMEZON offers comprehensive support for its products:
- Waranti: Produk ini disertakan dengan jaminan 2 tahun.
- Polisi Pemulangan: A 30-day money-back guarantee is provided.
- Sokongan Pelanggan: For any issues or inquiries, please contact TMEZON customer service.
- Sokongan E-mel: Anda boleh menghubungi pasukan sokongan kami di tmezoncctvsystem@yahoo.com.
- Bulk Purchase: For purchases of 2 sets or more, please contact us for special discounts.


