pengenalan
Terima kasih kerana membeliasing the PRIXTON Mini Portable Sewing Machine P120. This manual provides detailed instructions for the safe and efficient operation, maintenance, and troubleshooting of your new sewing machine. Please read this manual thoroughly before first use and keep it for future reference.
The PRIXTON P120 is designed for ease of use, featuring 16 different stitch types, an integrated accessory drawer, built-in LED light, and both foot pedal and manual operation options, making it ideal for various sewing projects.
Arahan Keselamatan Penting
Apabila menggunakan perkakas elektrik, langkah berjaga-jaga keselamatan asas hendaklah sentiasa dipatuhi, termasuk yang berikut:
- Baca semua arahan sebelum menggunakan mesin jahit ini.
- Jauhkan jari dari semua bahagian yang bergerak. Penjagaan khas diperlukan di sekitar jarum mesin jahit.
- Always switch the sewing machine OFF when changing the needle, threading the machine, or performing any maintenance.
- Gunakan hanya aksesori yang disyorkan oleh pengilang seperti yang terkandung dalam manual ini.
- Jangan sekali-kali mengendalikan mesin jahit jika ia mempunyai kord atau palam yang rosak, jika ia tidak berfungsi dengan betul, atau jika ia telah terjatuh atau rosak.
- Jangan gunakan di luar rumah.
- Unplug the machine from the electrical outlet when not in use.
Produk Selesaiview
Familiarize yourself with the components of your PRIXTON Mini Portable Sewing Machine P120.

Rajah 1: Depan view of the PRIXTON Mini Portable Sewing Machine P120, showing the main body, needle, presser foot, and stitch selection dial.

Rajah 2: sebelah view of the sewing machine, highlighting the integrated accessory drawer for storing threads and needles.

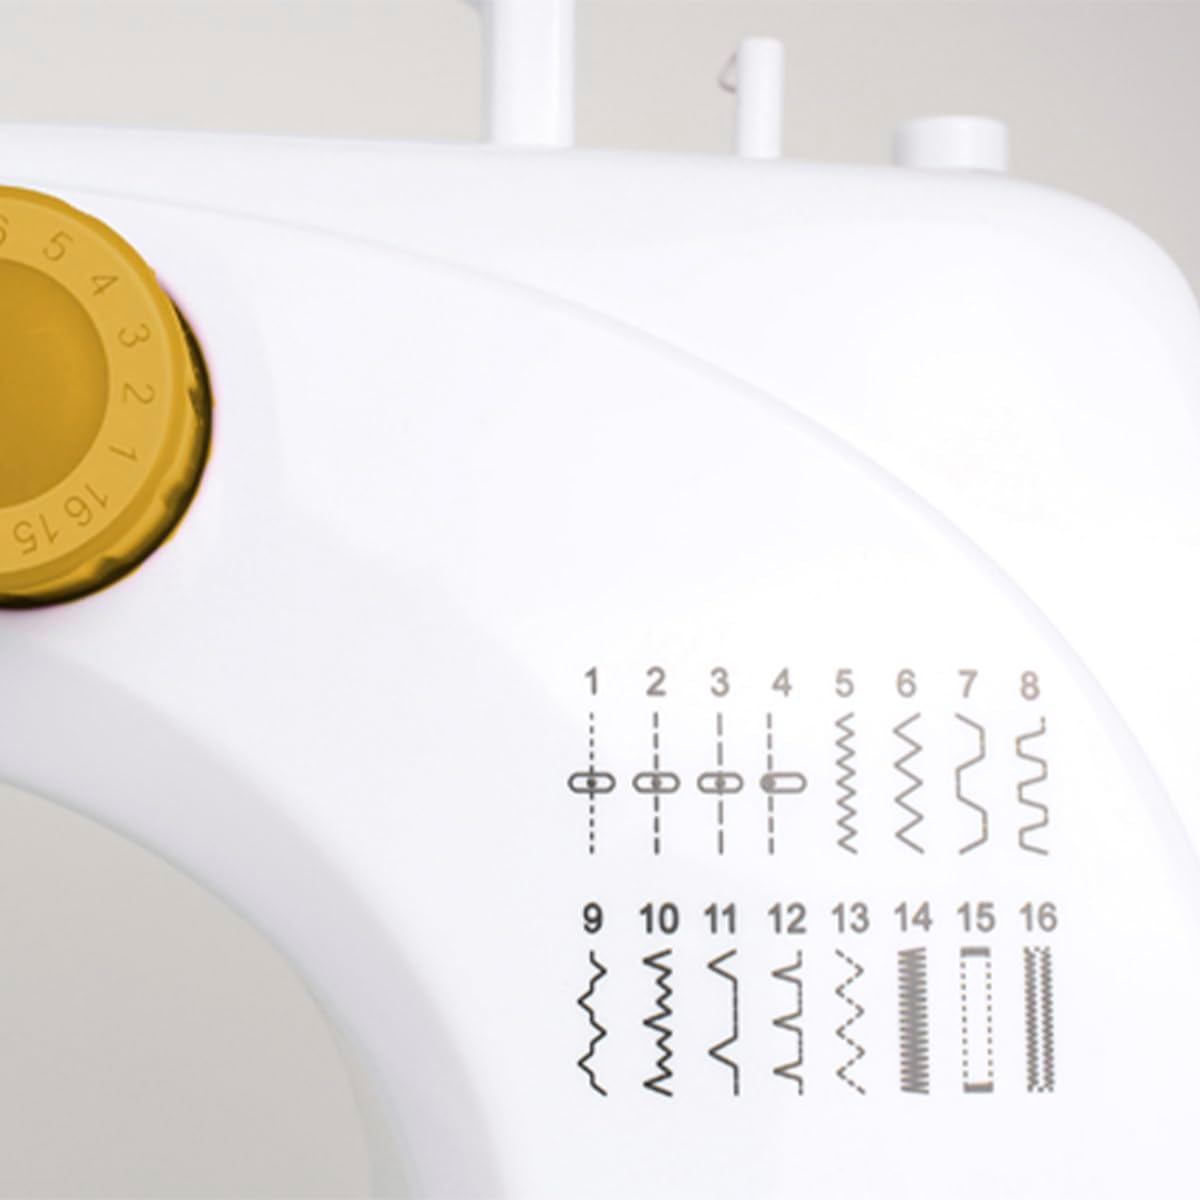
Rajah 3: Close-up of the stitch pattern guide on the machine, illustrating the 16 available stitch types.

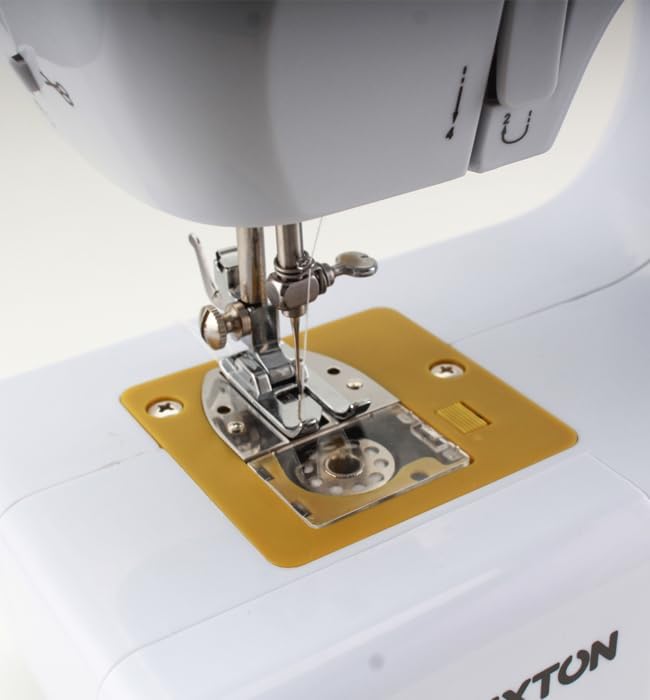
Rajah 4: Terperinci view of the needle and presser foot area, showing the bobbin cover and feed dogs.

Rajah 5: Diagram showing various components of the PRIXTON P120, including the foot pedal input, power input, stitch selector, and speed switch.
Rajah 6: belakang view of the sewing machine, showing the handwheel and power input port.

Rajah 7: Sudut hadapan view of the sewing machine, providing a comprehensive look at its compact design.
Rajah 8: The accessory drawer pulled out, showing spools of thread and bobbins stored inside.
Persediaan
1. Sambungan Kuasa
The PRIXTON P120 can be powered by the included AC adapter or by 4 AA batteries (not included).
- Penyesuai AC: Insert the DC plug of the adapter into the DC input jack on the back of the machine. Plug the AC adapter into a standard wall outlet.
- Bateri: Open the battery compartment cover on the bottom of the machine. Insert 4 AA batteries, ensuring correct polarity (+/-). Close the cover.
2. Penggulungan Bobbin
- Letakkan gelendong benang pada pin gelendong.
- Pandu benang melalui cakera tegangan penggulungan gelendong.
- Wind the thread around an empty bobbin a few times, then place the bobbin onto the bobbin winder spindle.
- Tolak gelendong penggulung gelendong ke kanan.
- Turn on the machine (using the foot pedal or manual switch) to start winding. Stop when the bobbin is full.
- Potong benang dan keluarkan gelendong.
3. Mengulirkan Mesin
- Naikkan jarum ke kedudukan tertinggi dengan memusingkan roda tangan ke arah anda.
- Naikkan tuas kaki penekan.
- Letakkan gelendong benang pada pin gelendong.
- Pandu benang melalui panduan benang atas.
- Pass the thread down through the tension control dial.
- Bring the thread up and through the take-up lever from right to left.
- Guide the thread down through the needle bar thread guide.
- Thread the needle from front to back. Pull about 15 cm of thread through the needle eye.
4. Memasukkan Bobbin
- Buka plat penutup gelendong yang terletak pada plat jarum.
- Insert the wound bobbin into the bobbin case, ensuring the thread unwinds counter-clockwise.
- Pull the thread through the tension spring slot.
- Tutup plat penutup gelendong.
5. Membawa Benang Bobbin
- Hold the upper thread with your left hand.
- Turn the handwheel towards you, lowering the needle into the needle plate and then raising it.
- The upper thread will catch the bobbin thread, forming a loop. Pull the loop up through the needle plate.
- Tarik kedua-dua benang (bahagian atas dan gelendong) di bawah kaki penekan dan ke arah belakang mesin.
Arahan Operasi
1. Memilih Jahitan
The PRIXTON P120 offers 16 different stitch patterns. To select a stitch, turn the stitch selection dial on the front of the machine to the desired number (1-16). Refer to the stitch pattern guide on the machine for visual reference.
2. Melaraskan Panjang dan Lebar Jahitan
Stitch length and width are pre-set for each stitch type. For optimal results, ensure your fabric and thread are suitable for the selected stitch.
3. Adjusting Thread Tension
The thread tension dial controls the tightness of the upper thread. Adjust as needed to achieve balanced stitches. A balanced stitch will have both threads meeting evenly between the two layers of fabric.
- If the upper thread lies flat on the fabric and the bobbin thread forms loops on the top, increase the upper thread tension (turn dial to a higher number).
- If the bobbin thread lies flat on the fabric and the upper thread forms loops on the bottom, decrease the upper thread tension (turn dial to a lower number).
4. Starting to Sew
- Letakkan kain di bawah kaki penekan.
- Turunkan tuas kaki penekan.
- Select your desired sewing speed using the speed switch (L for Low, H for High).
- To start sewing, you can either:
- Use the Foot Pedal: Connect the foot pedal to the machine's foot pedal jack. Press the foot pedal to start sewing. Release to stop.
- Use the Manual Switch: Slide the ON/OFF switch to the ON position. Slide it back to OFF to stop.
- Gently guide the fabric as you sew. Do not pull or push the fabric forcefully.
5. Reverse Sewing
The machine supports reverse sewing for securing stitches at the beginning and end of a seam. Press and hold the reverse lever/button (if available, not explicitly mentioned in features but common) to sew in reverse. Release to sew forward again.
6. Finishing a Seam
- Sew a few reverse stitches to secure the seam.
- Naikkan jarum ke kedudukan tertinggi.
- Naikkan tuas kaki penekan.
- Pull the fabric away from the machine.
- Cut the threads using the built-in thread cutter or scissors, leaving about 15 cm of thread.
7. Lampu LED Bersepadu
The machine features an integrated LED light to illuminate the sewing area. This light turns on automatically when the machine is powered on.
Rajah 9: The integrated LED light illuminating the sewing area for improved visibility.
Penyelenggaraan
Penyelenggaraan yang kerap memastikan jangka hayat dan prestasi optimum mesin jahit anda.
1. Pembersihan
- Sentiasa cabut plag mesin sebelum membersihkan.
- Gunakan berus lembut atau berus lint untuk membuang lint dan habuk dari kawasan gelendong dan memberi makan anjing.
- Lap bahagian luar mesin dengan lembut, damp kain. Jangan gunakan bahan kimia yang keras atau pembersih yang kasar.
2. Oiling
The PRIXTON P120 is generally designed to be low-maintenance. Refer to the manufacturer's specific instructions regarding oiling. If oiling is required, use only high-quality sewing machine oil on designated points, typically around the bobbin case and needle bar.
3. Penggantian Jarum
- Matikan dan cabut plag mesin.
- Longgarkan jarum clamp skru.
- Tanggalkan jarum lama.
- Masukkan jarum baharu dengan bahagian rata menghadap bahagian belakang mesin, tolak ke atas sejauh yang boleh.
- Ketatkan jarum clamp skru dengan selamat.
4. Penyimpanan
When not in use, store the machine in a dry, dust-free environment. Use a dust cover to protect it from dust and debris.
Menyelesaikan masalah
This section addresses common issues you might encounter with your sewing machine.
| Masalah | Kemungkinan Punca | Penyelesaian |
|---|---|---|
| Mesin tidak dihidupkan | No power; Foot pedal not connected; Speed switch in OFF position. | Check power adapter/batteries; Ensure foot pedal is securely plugged in; Set speed switch to L or H. |
| Jahitan yang dilangkau | Needle bent or dull; Incorrect needle size for fabric; Machine incorrectly threaded. | Replace needle; Use appropriate needle for fabric type; Re-thread the machine carefully. |
| Pemutusan benang | Thread tension too high; Poor quality thread; Needle bent or inserted incorrectly; Machine incorrectly threaded. | Reduce upper thread tension; Use good quality thread; Replace/re-insert needle correctly; Re-thread the machine. |
| Fabrik tidak menyusu | Presser foot not lowered; Lint under needle plate/feed dogs. | Lower presser foot; Clean lint from feed dogs and bobbin area. |
| Operasi bising | Lack of lubrication; Loose parts; Lint buildup. | Oil machine if necessary (refer to manual); Check for loose screws; Clean thoroughly. |
Spesifikasi
- model: P120
- Jenama: Prixton
- Jenis Jahitan: 16
- Sumber Kuasa: AC Adapter (Cable électrique) or 4x AA Batteries
- Bahan: plastik
- warna: putih
- Dimensi (L x W x H): 25.7 x 12.5 x 28.5 cm (10.1 x 4.9 x 11.2 inci)
- Berat: 3 Kilogram (6.6 lbs)
- ciri-ciri: Integrated LED light, Accessory drawer, Foot pedal included
Waranti dan Sokongan
PRIXTON products are manufactured to high-quality standards. For information regarding warranty coverage, technical support, or spare parts availability, please refer to the purchase documentation or contact your retailer.
Please note that spare parts availability information is currently unavailable for this product (as per product data).
For further assistance, you may visit the official Prixton webtapak atau hubungi bahagian perkhidmatan pelanggan mereka.