AMIR Wireless Refrigerator Thermometer with 2 Sensors User Manual
Model: 4868e9ff-1090-40b4-8a6a-025a98227e17
pengenalan
This manual provides detailed instructions for the setup, operation, and maintenance of your AMIR Wireless Refrigerator Thermometer. This device is designed to monitor temperatures in various environments, including refrigerators, freezers, and other indoor spaces, using two wireless sensors. Please read this manual thoroughly before using the product to ensure proper function and longevity.
Maklumat Keselamatan Penting
- Jangan campurkan bateri lama dan baru.
- Jangan campurkan bateri beralkali, standard (karbon-zink), atau boleh dicas semula (nikel-kadmium).
- Always remove exhausted batteries promptly.
- Buang bateri dengan betul mengikut peraturan tempatan.
- Do not expose the main unit or sensors to extreme temperatures or direct sunlight for extended periods.
- Keep the device away from water and high humidity, except for the sensors which are designed for refrigerator/freezer use.
- This device is for informational purposes only and should not be used as a substitute for professional temperature monitoring in critical applications.
Kandungan Pakej
Sila semak pakej untuk memastikan semua item ada:
- 1 x Main Display Unit
- 2 x Wireless Sensors
- 1 x Manual Pengguna (dokumen ini)
Produk Selesaiview
The AMIR Wireless Refrigerator Thermometer consists of a main display unit and two wireless sensors. The main unit displays temperatures from both sensors and its own ambient temperature. It features a large LCD screen with backlight, MAX/MIN record, and an audible alarm function.
Main Display Unit Features:
- Indoor/Outdoor Temperature Display (Dual-channel)
- Unit Selector (Celsius/Fahrenheit)
- MAX/MIN Temperature Record
- 24-hour / All-time Record Option
- Upper/Lower Limit Alarm Function
- LCD dengan lampu latar besar
- Penunjuk Bateri Rendah
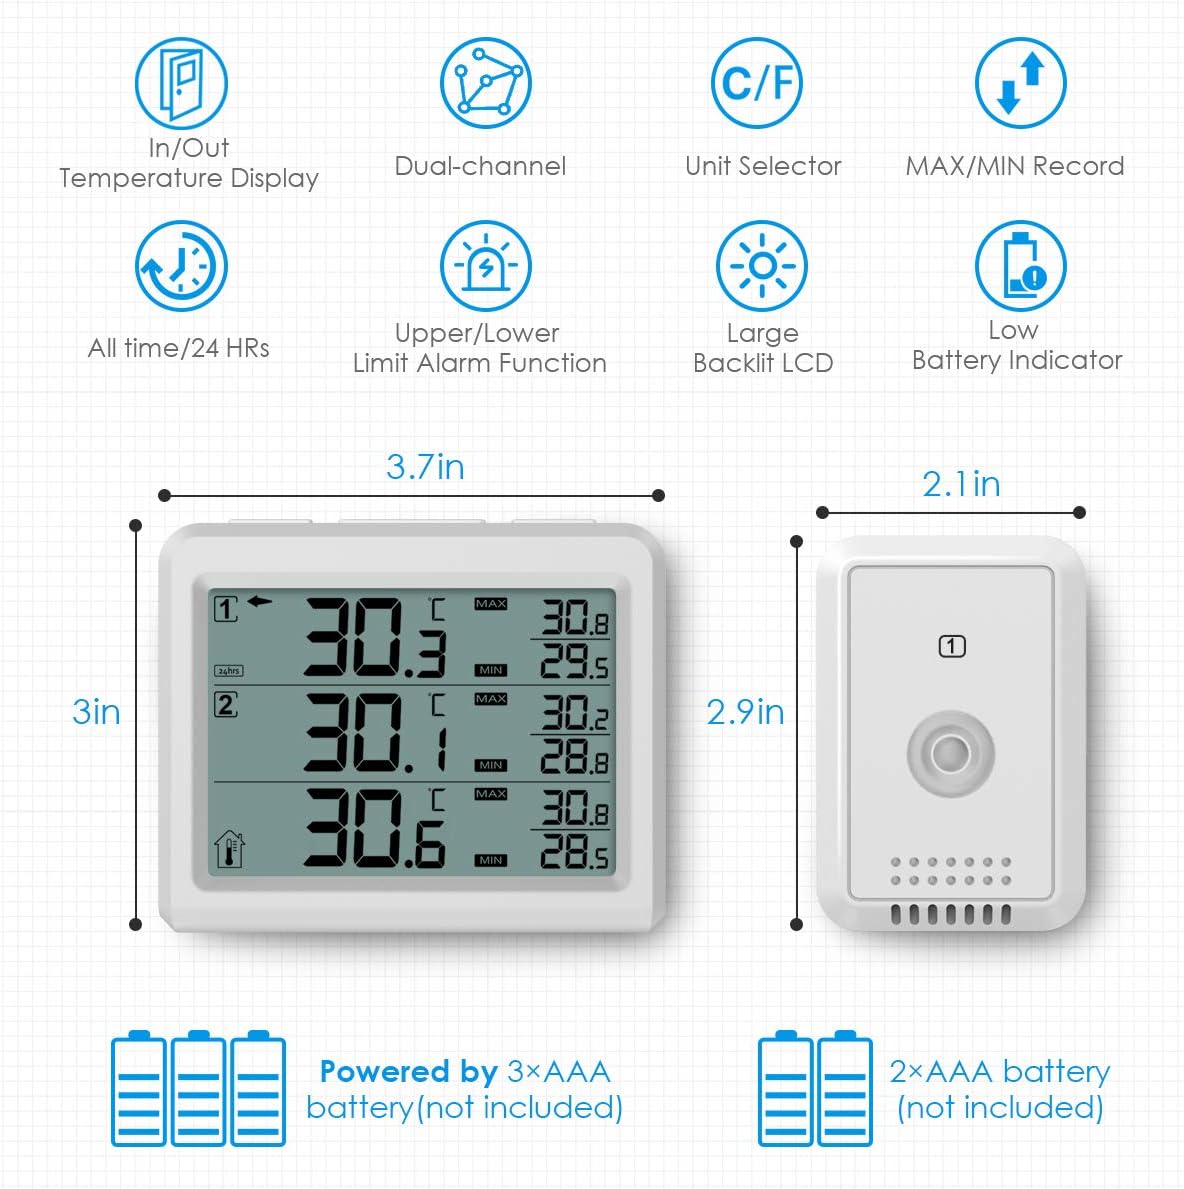
Imej: Main display unit and two wireless sensors with key features and dimensions. The main unit measures 3.7 inches wide by 3 inches high. Each sensor measures 2.1 inches wide by 2.9 inches high. The main unit is powered by 3x AAA batteries, and each sensor by 2x AAA batteries (batteries not included).
Panduan Persediaan
1. Pemasangan Bateri
For the Main Display Unit:
- Buka penutup petak bateri di belakang unit utama.
- Insert 3 AAA batteries (not included) according to the polarity markings (+/-).
- Tutup penutup petak bateri.
For the Wireless Sensors:
- Open the battery compartment cover on the back of each sensor.
- Insert 2 AAA batteries (not included) into each sensor according to the polarity markings (+/-).
- Close the battery compartment cover. The sensor's LED indicator will flash once, indicating it is transmitting data.
Nota: Use fresh alkaline batteries for optimal performance, especially in low temperatures. Rechargeable batteries are not recommended.
2. Berpasangan Sensor
The main unit should automatically connect to the sensors once batteries are installed. If a sensor does not connect, or if you need to re-establish connection:
- Ensure both the main unit and the sensor are powered on and within range.
- On the main unit, press the "CH/+" button to select the desired channel (1 or 2) for the sensor you wish to reconnect.
- Press and hold the "CH/+" button for approximately 3 seconds. The main unit will attempt to reconnect to the selected sensor. The signal icon for that channel will flash until a connection is established.
Video: This video demonstrates the basic functions of the Brifit Digital Fridge Thermometer, including indoor/outdoor dual-channel temperature display, backlight activation, switching between Fahrenheit and Celsius, and reconnecting sensors by pressing and holding the CH/+ button. It also shows how to set MAX/MIN alarms and switch between 24H and ALL TIME records.
3. Peletakan Sensor
Place the wireless sensors in the desired monitoring locations, such as inside a refrigerator, freezer, or other indoor areas. The sensors are designed to withstand cold temperatures.

Imej: Two wireless sensors placed inside a refrigerator and a freezer compartment, demonstrating their intended use for monitoring different locations. The main unit displays readings from both sensors. The maximum transmission distance is approximately 328ft/100m in open air.

Imej: Various installation options for the main display unit and sensors. The main unit can be placed on a tabletop using its built-in stand or wall-mounted using the hang hole. Sensors also have hang holes for wall mounting or can be placed on shelves. The image shows the battery compartments and stand on the back of the main unit and a sensor.
Arahan Operasi
1. Hidupkan/Mati Kuasa
The main unit and sensors power on automatically once batteries are installed. There is no manual power on/off button for the sensors. To turn off the main unit, remove its batteries.
2. Temperature Unit Selection (°C/°F)
To switch between Celsius (°C) and Fahrenheit (°F), locate the °C/°F switch inside the battery compartment of the main unit. Slide the switch to your preferred unit.
3. Fungsi Lampu Belakang
Press any button on the main unit to activate the backlight for approximately 10 seconds, improving readability in low-light conditions.

Imej: The main display unit with its backlight activated, showing clear temperature readings in a dimly lit room. The large LCD screen is designed for easy reading.
4. Setting Temperature Alarms (MAX/MIN)
The thermometer allows you to set upper (MAX) and lower (MIN) temperature limits for each channel. An audible alarm will sound if the temperature goes outside these set limits.
- Press and hold the "ALARM" button for 3 seconds. The MAX alarm value will flash.
- Use the "CH/+" or "CLEAR/-" buttons to adjust the MAX temperature limit.
- Press the "ALARM" button again to confirm the MAX setting and proceed to the MIN alarm setting. The MIN alarm value will flash.
- Use the "CH/+" or "CLEAR/-" buttons to adjust the MIN temperature limit.
- Press the "ALARM" button once more to confirm the MIN setting and exit alarm setting mode. The display will return to normal operation.

Imej: The main display unit showing the alarm function, with indicators for MAX and MIN temperature thresholds. An alarm bell icon signifies that the alarm feature is active, alerting users when temperature readings exceed or fall below set limits.
5. ViewRekod MAX/MIN
The main unit records the maximum and minimum temperatures detected by each sensor and its own ambient sensor.
- In normal mode, press the "MAX/MIN" button once to display the maximum recorded temperatures for all channels.
- Press the "MAX/MIN" button again to display the minimum recorded temperatures for all channels.
- Press the "MAX/MIN" button a third time to return to the current temperature display.
6. Clearing MAX/MIN Records and Switching 24H/ALL TIME
To clear the MAX/MIN records or switch between 24-hour and all-time records:
- In normal mode, press and hold the "CLEAR/-" button for 3 seconds. This will clear the MAX/MIN records and switch the display between 24-hour and all-time recording modes.
Penyelenggaraan
Pembersihan:
- Lap unit utama dan sensor dengan kain lembut,amp kain.
- Jangan gunakan pembersih atau pelarut yang melelas.
- Ensure the devices are completely dry before re-installing batteries or placing them in use.
Penggantian Bateri:
When the low battery indicator appears on the display, replace the batteries in the respective unit (main unit or sensor) as soon as possible to ensure continuous and accurate monitoring. Follow the battery installation steps in the Setup Guide.
Menyelesaikan masalah
| Masalah | Kemungkinan Punca | Penyelesaian |
|---|---|---|
| No temperature reading on a channel. | Sensor not paired or out of range; dead batteries in sensor. | Check sensor batteries and replace if necessary. Re-pair the sensor by pressing and holding the "CH/+" button on the main unit for 3 seconds. Move sensor closer to the main unit. |
| Bacaan suhu tidak tepat. | Sensor placed too close to heat sources or vents; low batteries. | Relocate the sensor to a more representative area. Replace batteries. |
| Paparan malap atau kosong. | Low or dead batteries in the main unit. | Replace the batteries in the main unit. |
| Penggera berbunyi tanpa diduga. | Temperature exceeded set MAX/MIN limits. | Check the current temperature and the set alarm limits. Adjust limits if needed. |
Spesifikasi
| Ciri | Perincian |
|---|---|
| Jenama | AMIR |
| Nombor Model | 4868e9ff-1090-40b4-8a6a-025a98227e17 |
| Jenis Paparan | LCD Digital dengan Lampu Latar |
| Teknologi Ketersambungan | Tanpa wayar |
| Sumber Kuasa (Unit Utama) | Dikuasakan Bateri (3x AAA, tidak termasuk) |
| Sumber Kuasa (Sensor) | Battery Powered (2x AAA per sensor, not included) |
| Ciri Khas | Audible Alarm, MAX/MIN Record |
| Penggunaan Dalaman/Luar | Dalaman |
| Masa Tindak Balas | 10 saat |
| Berat Barang | 7 auns |
| bahan | plastik |
Waranti dan Sokongan
AMIR provides the following support for this product:
- Perlindungan Kualiti: 12-month quality protection from the date of purchase.
- Penggantian Percuma: 60 days free replacement for manufacturing defects.
- Perkhidmatan Pelanggan: 7*24h customer service is available for any inquiries or assistance. Please refer to the product packaging or official AMIR weblaman web untuk maklumat hubungan.


