1. Pengenalan
The Technical Pro STUDIOPRO1 is a versatile recording deck designed for audio professionals. It facilitates the capture of various audio sources, from speeches and lectures to live performances and music. Beyond its recording capabilities, the STUDIOPRO1 functions as a high-fidelity audio receiver, supporting playback from multiple digital and analog sources.

Rajah 1.1: Depan view of the STUDIOPRO1 unit.
2. Ciri-ciri Utama
- Integrated Bluetooth connectivity for wireless audio streaming.
- USB and SD card inputs for MP3/WAV/WMA file playback and MP3 recording.
- Digital display for track information and mode indication.
- RCA and 1/8'' (Aux) inputs for connecting external audio sources.
- RCA line output for connection to audio systems.
- Two microphone inputs with independent volume, tone, and echo controls.
- 9-band master equalizer for precise audio adjustment.
- Output fon kepala untuk pemantauan.
- Rack-mountable design for easy integration into existing setups.
3. Arahan Keselamatan Penting
WARNING: TO REDUCE THE RISK OF ELECTRIC SHOCK, DO NOT REMOVE THE COVER OR BACK PANEL. THERE ARE NO USER-SERVICEABLE PARTS INSIDE. REFER ALL SERVICING TO QUALIFIED SERVICE PERSONNEL.
- Baca arahan ini dengan teliti sebelum mengendalikan unit.
- Simpan arahan ini untuk rujukan masa hadapan.
- Heed all warnings on the unit and in this manual.
- Ikut semua arahan.
- Jangan gunakan alat ini berhampiran air.
- Bersihkan hanya dengan kain kering.
- Jangan sekat sebarang bukaan pengudaraan. Pasang mengikut arahan pengilang.
- Jangan pasang berhampiran mana-mana sumber haba seperti radiator, daftar haba, dapur, atau radas lain (termasuk amppenghidup) yang menghasilkan haba.
- Jangan kalahkan tujuan keselamatan plag terkutub atau jenis pembumian. Palam terkutub mempunyai dua bilah dengan satu lebih lebar daripada yang lain. Palam jenis pembumian mempunyai dua bilah dan serampang pembumian ketiga. Bilah lebar atau serampang ketiga disediakan untuk keselamatan anda. Jika palam yang disediakan tidak sesuai dengan alur keluar anda, rujuk juruelektrik untuk menggantikan alur keluar usang.
- Lindungi kord kuasa daripada berjalan atau tersepit, terutamanya pada palam, bekas kemudahan dan tempat keluar dari radas.
- Hanya gunakan lampiran/aksesori yang ditentukan oleh pengilang.
- Cabut plag radas ini semasa ribut petir atau apabila tidak digunakan untuk jangka masa yang lama.
4. Panduan Persediaan
4.1 Membongkar
Carefully remove the STUDIOPRO1 unit and all accessories from its packaging. Verify that all components are present:
- STUDIOPRO1 unit
- Kabel kuasa
- Rack mount ears and screws
- Audio cable (1/8" to 1/8")

Figure 4.1: Included accessories: rack mount ears, screws, and audio cable.
4.2 Sambungan
The STUDIOPRO1 offers various input and output options for integration into your audio system.
- Input RCA: Connect external audio sources (e.g., CD player, mixer) to the RCA input ports on the rear panel.
- Keluaran RCA: Connect the RCA output ports on the rear panel to your amplifier, powered speakers, or recording device for audio playback.
- Aux Input (1/8"): Use the 1/8" (3.5mm) Aux input on the front panel to connect smartphones, tablets, or other portable music devices.
- Microphone Inputs (1/4"): Two 1/4" microphone inputs are located on the front panel for connecting dynamic microphones.
- Headphone Output (1/8"): Connect headphones to the 1/8" (3.5mm) jack on the front panel for private monitoring.

Figure 4.2: Rear panel connections, including RCA input/output and power.
4.3 Sambungan Kuasa
Connect the provided power cable to the power input on the rear panel of the STUDIOPRO1 and then to a suitable electrical outlet. Ensure the voltagpemilih e pada panel belakang ditetapkan kepada volum yang betultage for your region (110V/220V).
5. Arahan Operasi
5.1 Panel Hadapan Atasview
The front panel provides access to all primary controls and inputs.

Figure 5.1: Left side of the front panel with power switch, display, and media inputs.
5.2 Media Playback (USB/SD/Aux/Bluetooth)
- Main balik USB/SD: Insert a USB flash drive or SD card (up to 32 GB) containing MP3, WAV, or WMA files into the respective front panel slots. The unit will automatically detect the media and begin playback. Use the navigation buttons (◀◀, ▶▶, ▶/▌▌) to control playback.
- Aux Playback: Connect your external audio device to the 1/8" Aux input using an appropriate cable. Select the Aux input source on the unit.
- Main Balik Bluetooth: Press the 'BT' button to activate Bluetooth mode. The digital display will show "Bluetooth Mode" and "bt nolink" (Figure 5.2). On your mobile device, search for "STUDIOPRO1" in the Bluetooth settings and pair. Once connected, you can stream audio wirelessly.

Figure 5.2: Front panel display indicating Bluetooth mode.
5.3 Rakaman
The STUDIOPRO1 can record audio directly to a USB flash drive or SD card in MP3 format.
- Ensure a USB drive or SD card is inserted.
- Select the desired input source (RCA or 1/8" Aux).
- Tekan ke REC button on the front panel to start recording. The REC indicator light will illuminate.
- Tekan REC sekali lagi untuk menghentikan rakaman.
- Dirakam files are saved in MP3 format at a sampling rate of 128 kbps / 44.1 KHz.
5.4 Equalization and Volume Control
The STUDIOPRO1 features a 9-band master equalizer to fine-tune the audio output.

Figure 5.3: Master Equalizer controls.
- Adjust the sliders for each frequency band (63Hz to 16KHz) to boost or cut specific frequencies.
- Yang besar JILID knob controls the overall output level of the unit.
5.5 Microphone Inputs and Effects
Two 1/4" microphone inputs are available with dedicated controls.

Figure 5.4: Microphone and recording section of the front panel.
- Connect microphones to MIC1 or MIC2 input.
- Gunakan MIC.VOL knob to adjust the microphone volume.
- The MIC.TONE knob allows adjustment of the microphone's tonal characteristics.
- Apply an echo effect to the microphones using the ECHO tombol.
6. Penyelenggaraan
To ensure the longevity and optimal performance of your STUDIOPRO1, follow these maintenance guidelines:
- Pembersihan: Gunakan kain lembut dan kering untuk membersihkan bahagian luar unit. Elakkan pembersih, pelarut atau lilin yang kasar.
- Pengudaraan: Pastikan bukaan pengudaraan pada unit tidak tersumbat untuk mengelakkan terlalu panas.
- Storan: Jika menyimpan unit untuk tempoh yang lama, putuskan sambungannya daripada kuasa dan simpan di tempat yang sejuk dan kering jauh daripada cahaya matahari langsung dan suhu yang melampau.
7. Penyelesaian masalah
If you encounter issues with your STUDIOPRO1, refer to the following common problems and solutions:
- Tiada Kuasa:
- Ensure the power cable is securely connected to both the unit and a working electrical outlet.
- Pastikan suis kuasa pada panel hadapan berada dalam kedudukan 'ON'.
- Sahkan voltage selector on the rear panel is set correctly for your region.
- Tiada Output Audio:
- Check all audio cable connections (RCA output, Aux input, etc.).
- Ensure the master VOLUME knob is turned up.
- Verify the correct input source is selected on the unit.
- Check the volume levels on any connected external devices or amppenyelamat.
- Cannot Record:
- Ensure a USB flash drive or SD card is properly inserted and has sufficient free space (up to 32 GB supported).
- Verify the input source is active and producing audio.
- Ensure the media is formatted correctly (FAT32 is generally recommended).
- Isu Sambungan Bluetooth:
- Ensure the STUDIOPRO1 is in Bluetooth pairing mode.
- Pastikan Bluetooth didayakan pada peranti mudah alih anda.
- Move your device closer to the STUDIOPRO1 to ensure it's within range.
- Cuba nyahgandingkan dan pasangkan semula peranti.
8. Spesifikasi Teknikal
| Ciri | Spesifikasi |
|---|---|
| Model | STUDIOPRO1 |
| Input | USB Flash Drive / SD Card (Up to 32 GB), RCA, 1/8'' (Aux), Bluetooth |
| Keluaran | RCA (Line Out), 1/8'' Headphone |
| Format Main Semula | MP3, WAV, WMA (from USB/SD) |
| Format Rakaman | MP3 |
| Sampling Rate (Recording) | 128 kbps / 44.1 KHz |
| Respons Kekerapan | 20Hz-20KHz ±3dB |
| Nisbah Isyarat kepada Bunyi | >90dB |
| Input Mikrofon | 2 x 1/4" |
| Penyamaan | 9-band Master Equalizer |
| Keserasian | USB 2.0 |
| Voltage | 110/220V (selectable) |
| Dimensi (L x W x H) | 19.1'' x 4.3'' x 1.8'' |
| Berat badan | 3.56 paun |
9. Waranti dan Sokongan
Technical Pro products are warranted against defects in materials and workmanship for a period of one year from the date of original purchase. This warranty is extended only to the original retail purchaser and is not transferable. It does not cover damage resulting from misuse, abuse, accident, neglect, improper installation, or unauthorized repair or modification.
To obtain warranty service, you must contact Technical Pro for a Return Merchandise Authorization (RMA) number. The unit must be sent back in its original packaging with proof of purchase. Shipping costs to the service center are the responsibility of the purchaser.
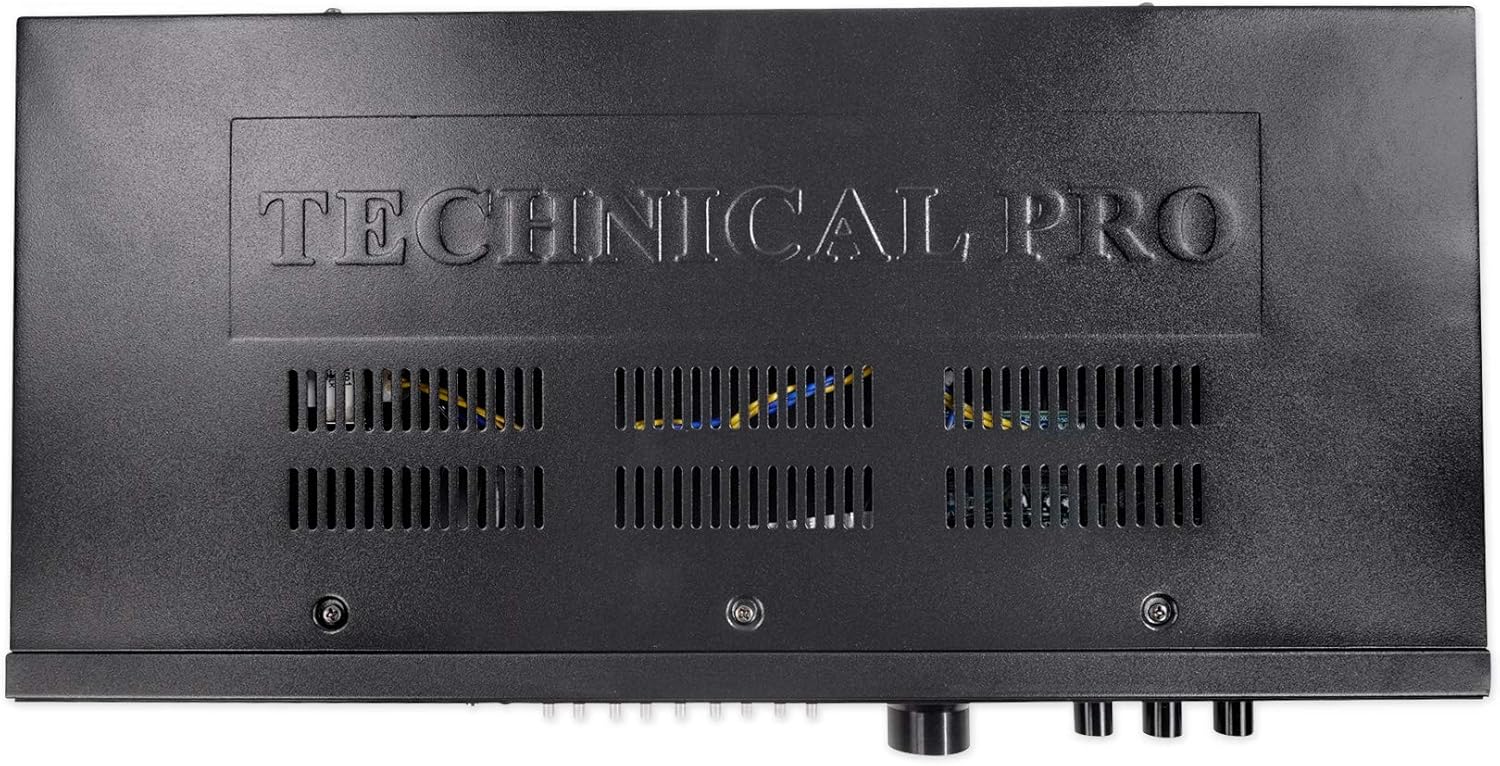
Figure 9.1: Technical Pro Limited Warranty details.
For technical support or warranty inquiries, please refer to the contact information provided with your product or visit the official Technical Pro webtapak.


