1. Pengenalan
The Samson AirLine 99m AH9 Headset Wireless System is a compact and versatile wireless microphone solution designed for active performers, presenters, and educators. This system provides high-definition audio transmission without the need for cables or belt packs, offering freedom of movement and ease of use. It operates on a frequency-agile UHF band, ensuring reliable performance across 100 selectable channels.
The system comprises three main components:
- AH9 Micro Transmitter: A lightweight, rechargeable transmitter integrated into the headset.
- AR99m Micro Receiver: A compact receiver with multiple output options for versatile connectivity.
- DE10x Headset Microphone: Pro rendahfile, comfortable headset microphone designed for clear vocal reproduction.
2. Komponen Sistem Lebihview

Rajah 2.1: The complete Samson AirLine 99m AH9 Headset Wireless System, showing the AR99m receiver, AH9 micro transmitter, and DE10x headset microphone.

Rajah 2.2: jarak dekat view of the AH9 micro transmitter integrated with the DE10x headset microphone. The green light indicates power status.

Rajah 2.3: Atas view of the AR99m micro receiver, showing the volume knob, SET button, channel display, and status indicators (READY, IR, PEAK).
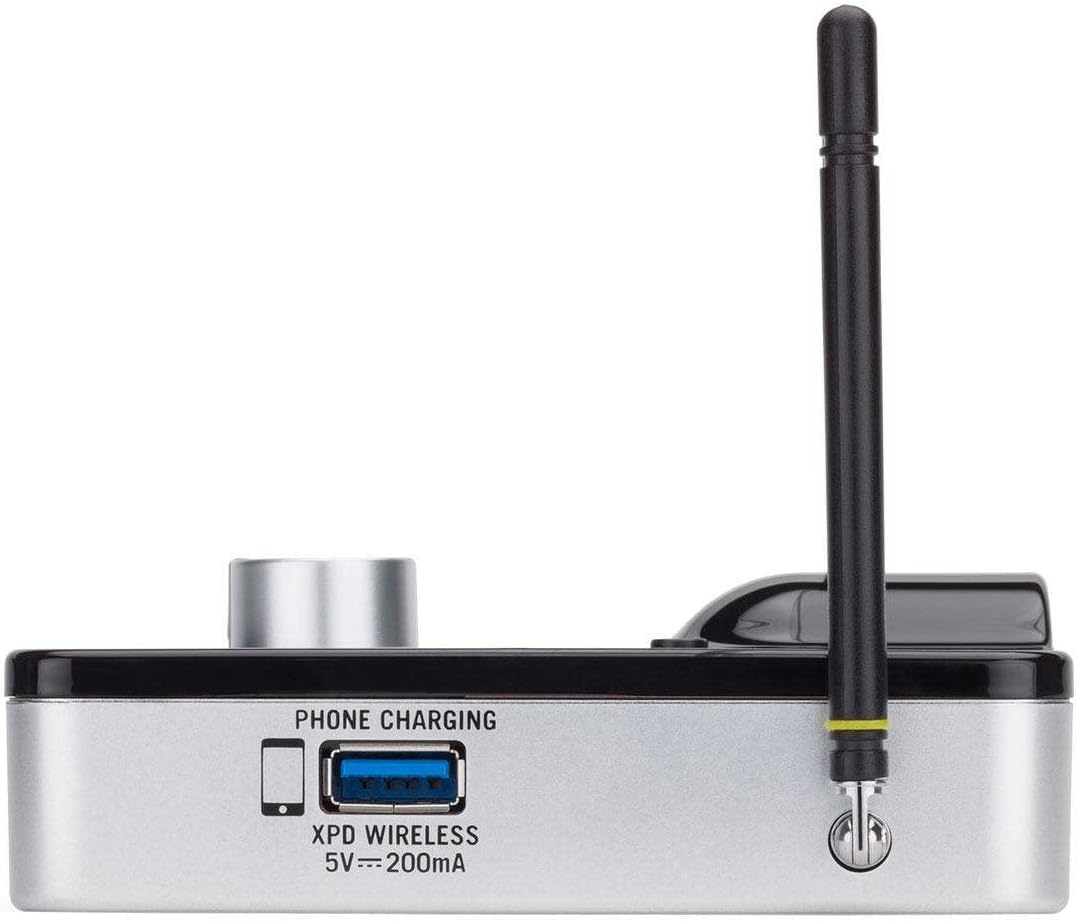
Rajah 2.4: sebelah view of the AR99m micro receiver, highlighting the 'PHONE CHARGING' USB port (5V --- 200mA) and antenna connection.

Rajah 2.5: bersudut view of the AR99m micro receiver, showing the DC IN port, 1/8" unbalanced output, and XLR balanced output.

Rajah 2.6: belakang view of the AH9 micro transmitter, showing the charging contacts and the integrated headset cable connection.

Rajah 2.7: belakang view of the AR99m micro receiver, detailing the DC IN (15V === 600mA), 1/4" unbalanced output, and XLR balanced output ports.

Rajah 2.8: The DE10x headset microphone, showing its lightweight design and adjustable ear hooks.
3. Arahan Persediaan
3.1. Charging the AH9 Micro Transmitter
- Connect the supplied USB charging cable to the AH9 micro transmitter.
- Plug the other end of the USB cable into a standard USB power adapter (not included) or a powered USB port.
- The LED indicator on the AH9 will show charging status. A full charge provides up to 8 hours of operation.
3.2. Connecting the AR99m Micro Receiver
- Connect the included power adapter to the DC IN port (15V === 600mA) on the AR99m receiver.
- Palamkan penyesuai kuasa ke alur keluar AC.
- Connect the AR99m receiver to your audio mixer, PA system, or recording device using one of the following outputs:
- Output XLR Seimbang: Untuk peralatan audio profesional.
- Unbalanced 1/4" Output: For standard instrument inputs or line-level inputs.
- Unbalanced 1/8" Output: For consumer-grade audio devices or computer inputs.
- Extend the antennas on the AR99m receiver for optimal signal reception.
3.3. Wearing the DE10x Headset Microphone
- Carefully place the headset over your ears, ensuring a comfortable and secure fit.
- Position the microphone element approximately 1-2 inches from the corner of your mouth for best sound quality.
- Use the included windscreens to reduce plosives and wind noise, if necessary.
4. Arahan Operasi
4.1. Menghidupkan/Mematikan
- AH9 Micro Transmitter: Press and hold the power button on the transmitter until the LED illuminates. Press and hold again to power off.
- AR99m Micro Receiver: Turn the VOLUME knob clockwise to power on. Turn counter-clockwise until it clicks to power off.
4.2. Channel Selection and Pairing
The AirLine 99m system features 100 operating channels across a 24MHz bandwidth.
- Turn on the AR99m receiver. The channel display will show the current channel.
- Tekan ke SET button on the AR99m receiver to cycle through available channels. Select a clear channel with no interference.
- Once a channel is selected on the receiver, turn on the AH9 transmitter.
- The AH9 transmitter will automatically scan and pair with the receiver on the selected channel. The 'READY' indicator on the receiver will illuminate when a successful connection is established.
4.3. Melaraskan Kelantangan
Gunakan JILID knob on the AR99m receiver to adjust the output level of the wireless system. Start with a low volume and gradually increase it to avoid sudden loud audio.
4.4. Monitoring Signal Status
- READY Indicator: Illuminates when the transmitter and receiver are successfully paired and receiving a signal.
- Petunjuk PUNCAK: Illuminates when the audio input from the transmitter is too high, indicating potential clipping. Reduce the input gain on your mixer or adjust the microphone position if this occurs.
- Penunjuk IR: Used during initial setup for infrared pairing (if applicable, though this model typically auto-pairs).
5. Penyelenggaraan
- Pembersihan: Use a soft, dry cloth to clean the surfaces of the transmitter and receiver. Avoid using abrasive cleaners or solvents.
- Penjagaan Bateri: Recharge the AH9 transmitter regularly. For long-term storage, ensure the battery is partially charged (around 50%) to prolong its lifespan.
- Storan: Simpan sistem di tempat yang sejuk dan kering jauh dari cahaya matahari langsung dan suhu yang melampau.
- Cermin hadapan: Replace windscreens on the DE10x headset microphone as needed to maintain hygiene and acoustic performance.
6. Penyelesaian masalah
| Masalah | Kemungkinan Punca | Penyelesaian |
|---|---|---|
| Tiada bunyi dari penerima |
|
|
| Gangguan atau keciciran |
|
|
| Audio yang diputarbelitkan |
|
|
| Hayat bateri pendek |
|
|
7. Spesifikasi
| Ciri | Perincian |
|---|---|
| Nombor Model | SW9A9SDE10-K |
| Saluran Operasi | 100 (across 24MHz bandwidth) |
| Julat Operasi | Sehingga 300 kaki (garis penglihatan) |
| AH9 Transmitter Battery Life | Up to 8 hours (Lithium-Ion, rechargeable) |
| AR99m Receiver Outputs | Balanced XLR, Unbalanced 1/4", Unbalanced 1/8" |
| Jenis Mikrofon | DE10x Headset Microphone |
| Termasuk Aksesori | 4 Windscreens, USB charging cable, Power adapter |
| Berat Barang | 1 paun |
| Dimensi Produk | 3 x 3 x 3 inci |
| Jenis Bahan | plastik |
| Sumber Kuasa | Dikuasakan Bateri |
| Peranti Serasi | Mixers, Audio Interfaces, PA Systems, Computers, Recording Devices |
8. Waranti dan Sokongan
For warranty information and technical support, please refer to the official Samson Technologies webtapak atau hubungi perkhidmatan pelanggan mereka secara langsung. Simpan resit pembelian anda sebagai bukti pembelian untuk sebarang tuntutan waranti.
Sumber Dalam Talian: Lawati Samson Brand Store on Amazon untuk maklumat dan sokongan produk tambahan.


