This manual provides essential information for the safe and efficient operation, maintenance, and troubleshooting of your Silverline DC-LBD69 Belt and Disc Sander. Please read this manual thoroughly before operating the machine to ensure proper use and to prevent injury or damage.
The Silverline DC-LBD69 is a versatile power tool designed for sanding and finishing various materials. It features both a belt sanding mechanism and a disc sanding mechanism, powered by a 1HP single-phase 110V motor.
2. Arahan Keselamatan
AMARAN: Kegagalan mematuhi arahan keselamatan ini boleh mengakibatkan kecederaan diri yang serius atau kerosakan harta benda.
Sentiasa memakai peralatan pelindung diri (PPE) yang sesuai, termasuk cermin mata keselamatan, perlindungan pendengaran dan topeng habuk.
Pastikan kawasan kerja bersih, terang dan bebas daripada kekacauan.
Jangan kendalikan sander dalam damp atau keadaan basah.
Jauhkan kanak-kanak dan orang ramai daripada mesin pengendalian.
Securely fasten the sander to a stable workbench or stand before use.
Disconnect the power supply before making any adjustments, changing sanding belts/discs, or performing maintenance.
Never wear loose clothing, gloves, or jewelry that could get caught in moving parts.
Use the correct sanding belt and disc for the material being worked on.
Do not force the tool. Let the sander's speed and power do the work.
Ensure proper ventilation to minimize dust inhalation. Connect to a dust extraction system if available.
Periksa kord kuasa untuk kerosakan sebelum setiap penggunaan.
3. Komponen Selesaiview
Familiarize yourself with the main components of your Silverline DC-LBD69 Belt and Disc Sander:
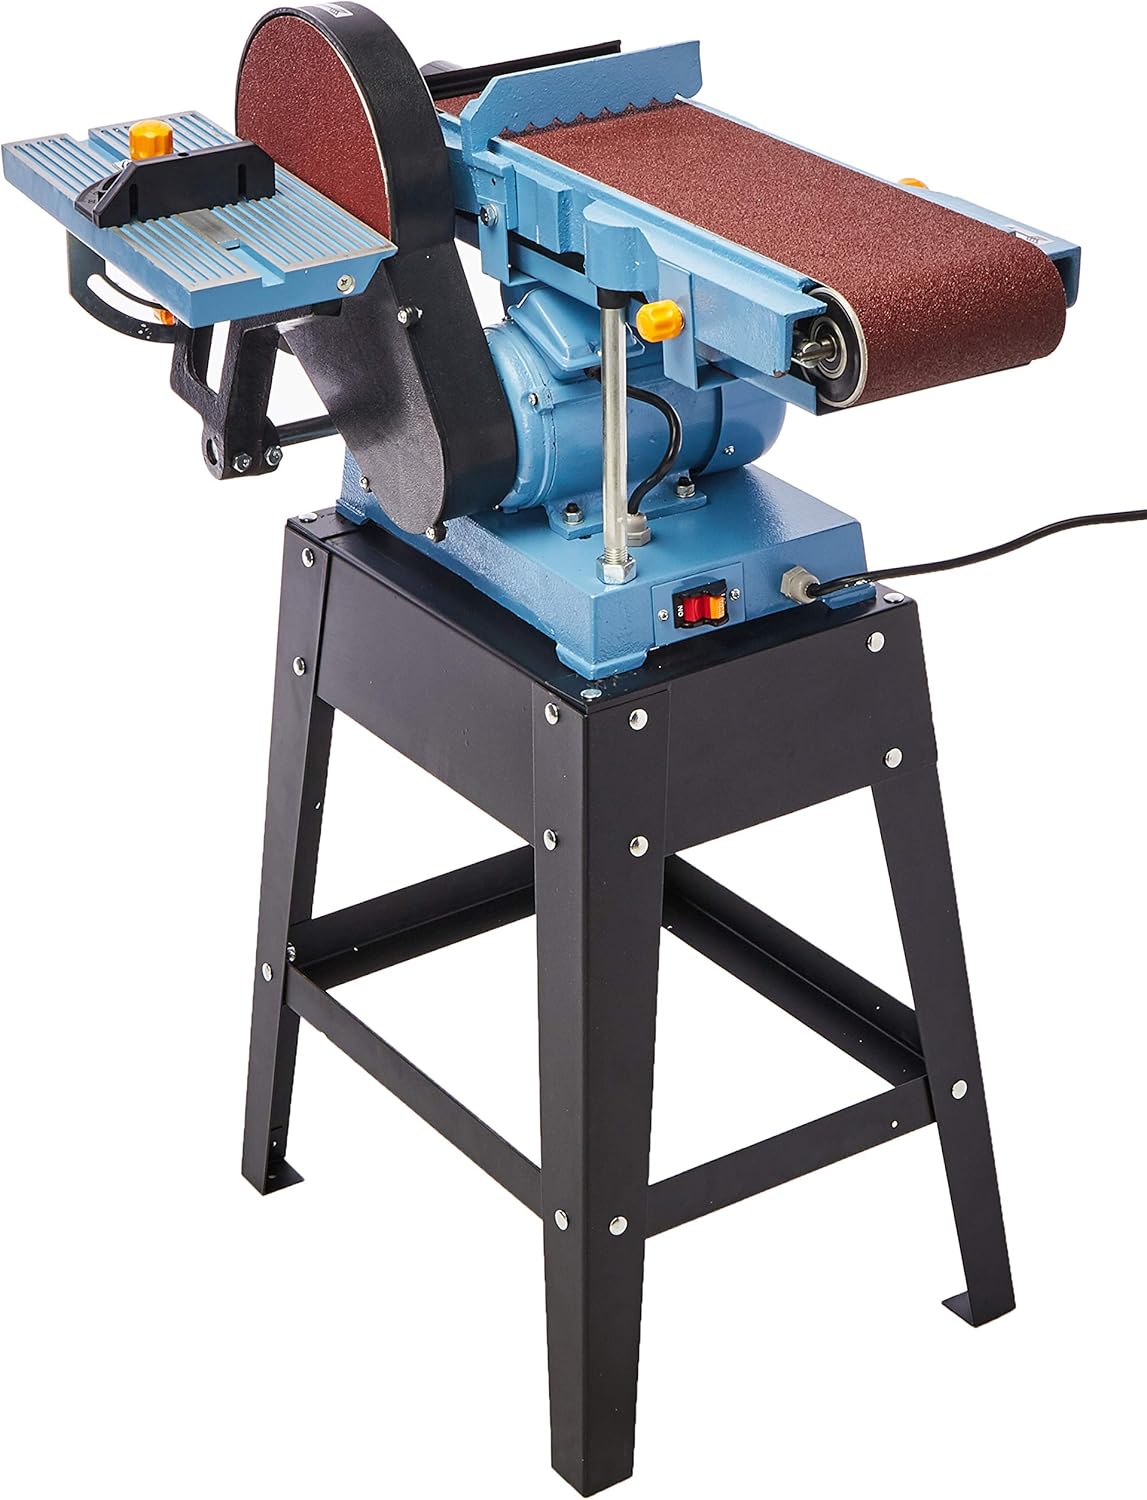
Rajah 3.1: Depan view of the Silverline DC-LBD69 Belt and Disc Sander. This image shows the main body of the sander, including the belt sanding mechanism on the left and the disc sanding mechanism on the right, mounted on its black metal stand.
Rajah 3.2: Sisi view of the Silverline DC-LBD69 Belt and Disc Sander. This image highlights the belt sander's full length and the disc sander's circular plate, along with the power switch located on the side of the motor housing.
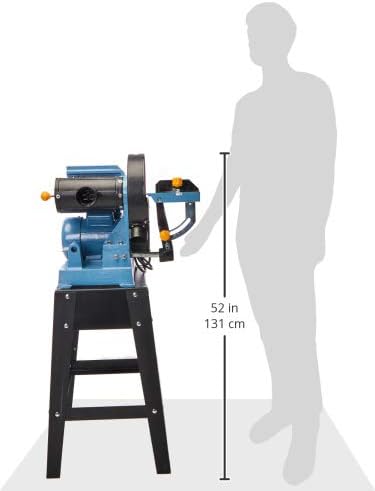
Figure 3.3: Dimensions of the Silverline DC-LBD69 Belt and Disc Sander relative to a human figure. This image illustrates the approximate height of the sander, which is about 52 inches (131 cm), providing a sense of its overall size.
Belt Sanding Table: Adjustable table for supporting workpieces during belt sanding.
Belt Tracking Knob: Used to adjust the alignment of the sanding belt.
Belt Tension Lever: Releases tension for belt changes.
Disc Sanding Table: Adjustable table for supporting workpieces during disc sanding.
Tolok Miter: For precise angle sanding on the disc sander.
Pelabuhan Debu: For connecting a dust extraction system.
Suis Hidup/Mati: Power control for the motor.
Perumahan Motor: Encloses the 1HP motor.
Pendirian kukuh: Provides a stable base for the sander.
4. Persediaan
4.1 Membongkar dan Memasang
Keluarkan semua komponen dari pembungkusan dengan berhati-hati. Simpan pembungkusan untuk penyimpanan atau pengangkutan masa hadapan.
Inspect all parts for any shipping damage. If damage is found, do not proceed with assembly and contact customer support.
Assemble the stand according to the included hardware and instructions. Ensure all bolts are securely tightened.
Mount the sander unit onto the assembled stand. Secure it firmly using the provided bolts and nuts.
Attach the belt and disc sanding tables. Adjust them to be perpendicular to the sanding surfaces using a square.
Install the desired sanding belt and disc. Refer to sections 4.2 and 4.3 for detailed instructions.
4.2 Installing the Sanding Belt
Pastikan sander dicabut dari sumber kuasa.
Release the belt tension lever to loosen the existing belt or prepare for a new one.
Slide the new sanding belt onto the rollers, ensuring the arrow on the belt matches the direction of rotation indicated on the machine.
Engage the belt tension lever to apply tension to the belt.
Plug in the sander and briefly turn it on to check belt tracking. Adjust the belt tracking knob until the belt runs centrally on the rollers. Unplug before further adjustments.
4.3 Installing the Sanding Disc
Pastikan sander dicabut dari sumber kuasa.
Remove the old sanding disc if present.
Clean the disc plate thoroughly to ensure good adhesion for the new disc.
Peel the backing from the new adhesive-backed sanding disc and carefully align it with the disc plate. Press firmly from the center outwards to remove air bubbles.
5. Arahan Operasi
5.1 Operasi Am
Before starting, ensure all safety precautions are observed and PPE is worn.
Connect the sander to a suitable 110V single-phase power outlet.
Turn on the sander using the On/Off switch. Allow the machine to reach full speed before beginning work.
Always feed the workpiece against the direction of rotation of the sanding belt or disc. For the disc sander, this means feeding from the left side (downward rotating side) to prevent the workpiece from being thrown.
Apply light, even pressure. Do not force the workpiece against the abrasive.
Keep hands clear of the sanding surfaces at all times. Use push sticks or clamps for small workpieces.
When finished, turn off the sander and wait for all moving parts to come to a complete stop before leaving the machine.
5.2 Belt Sanding
Adjust the belt sanding table to the desired angle.
For edge sanding, hold the workpiece firmly against the table and feed it into the belt.
For surface sanding, use the flat platen area of the belt sander.
5.3 Mengempelas Cakera
Adjust the disc sanding table to the desired angle.
Use the miter gauge for precise angle sanding.
Always sand on the downward-rotating side of the disc (left side) to prevent kickback.
6. Penyelenggaraan
Regular maintenance ensures the longevity and optimal performance of your sander. Always disconnect the power before performing any maintenance.
Pembersihan: Regularly clean dust and debris from the machine, especially around the motor vents and sanding areas. Use compressed air or a soft brush.
Belt and Disc Replacement: Replace sanding belts and discs when they become worn or lose their abrasive quality. Refer to sections 4.2 and 4.3.
Pelinciran: Periodically check and lubricate moving parts as indicated in the detailed service manual (if applicable).
Pemeriksaan Motor: Ensure motor vents are clear for proper cooling. Listen for unusual noises during operation.
Kord Kuasa: Inspect the power cord for cuts, fraying, or damage. Replace immediately if damaged.
Table Adjustment: Periodically check and ensure the sanding tables are properly aligned and secured.
7. Penyelesaian masalah
This section addresses common issues you might encounter. For problems not listed here, contact Silverline customer support.
Masalah
Kemungkinan Punca
Penyelesaian
Sander tidak bermula.
Tiada bekalan kuasa. Suis rosak. Lebihan motor.
Periksa kord kuasa dan soket. Test switch with a multimeter (qualified technician only). Biarkan motor sejuk; periksa sebarang halangan.
Sanding belt slips or runs off track.
Ketegangan tali pinggang yang tidak betul. Improper belt tracking adjustment. tali pinggang lusuh.
Adjust belt tension lever. Adjust belt tracking knob. Gantikan tali pinggang pengamplasan.
Check all fasteners and tighten. Hubungi pusat perkhidmatan. Replace disc/belt.
Prestasi pengamplasan yang lemah.
Worn abrasive. Incorrect grit for material. Tekanan yang berlebihan.
Gantikan tali pinggang pengampelas/cakera. Gunakan grit yang sesuai. Apply lighter pressure.
8. Spesifikasi
Ciri
Perincian
Nombor Model
DC-LBD69
Jenama
Silverline
Kuasa Motor
1 HP
Voltage
110V
fasa
Fasa Tunggal
Belt Sander Size
6 inci
Disc Sander Size
9 inci
Dimensi Produk (L x W x H)
70 x 38 x 43.8 cm (27.6 x 15 x 17.2 inci)
Berat badan
52 kg (114.6 lbs)
Komponen yang Disertakan
SILVERLINE DC-LBD69 Belt and Disc Sander, 6" x 9", 1HP Motor, 110V, Single-Phase
9. Maklumat Waranti
Silverline products are manufactured to high standards and undergo rigorous quality control. This product comes with a standard manufacturer's warranty against defects in materials and workmanship. Please refer to the warranty card included with your product for specific terms, conditions, and duration. Keep your proof of purchase for warranty claims.
For warranty service, please contact Silverline customer support with your product model number and purchase details.
10. Sokongan Pelanggan
If you have any questions, require technical assistance, or need replacement parts, please contact Silverline customer support. Have your model number (DC-LBD69) and serial number (if applicable) ready when contacting support.
For the most up-to-date contact information, please visit the official Silverline webtapak atau rujuk butiran hubungan yang disediakan dalam pembungkusan produk anda.
Silverline DIY 710W Planer 82mm User Manual Comprehensive user manual for the Silverline DIY 710W Planer 82mm. This guide covers essential safety instructions, operation details, maintenance procedures, and product specifications for this powerful electric planer. Ideal for DIY woodworking projects. Visit silverlinetools.com for more information.
Silverline BO 7005 SR Built-in Oven User Manual User manual for the Silverline BO 7005 SR built-in oven. Contains essential safety information, installation instructions, operating guides, and maintenance tips for optimal appliance use.
Silverline 18V Drill Driver User Manual User manual for the Silverline 18V Drill Driver (Model 975325), providing essential information for safe operation, setup, maintenance, and troubleshooting. Includes product specifications and warranty details.
Silverline Kjøkkenventilatorer og Hvitevarer - Hovedkatalog Utforsk Silverline sitt omfattende utvalg av høykvalitets kjøkkenventilatorer, innebygde ovner, mikrobølgeovner og platetopper. Finn den perfekte løsningen for ditt kjøkken med fokus på design, funksjonalitet og innovasjon.
Silverline Kitchen Appliances Catalog 2021 Browse the Silverline 2021 price catalog featuring a wide range of kitchen appliances including range hoods, cooktops, ovens, microwaves, and ventilation systems.