1. Pengenalan
This manual provides essential information for the safe and effective operation, installation, and maintenance of your FridayParts 24V 25A Battery Charger. This aftermarket charger is designed to be compatible with various Genie Lift models, including GR-08, GR-12, GR-15, GR-20, and GRC-12. Please read this manual thoroughly before using the product to ensure proper function and to prevent damage or injury.
2. Maklumat Keselamatan
Sentiasa patuhi langkah berjaga-jaga keselamatan berikut untuk mengurangkan risiko renjatan elektrik, kebakaran atau kecederaan.
- Keselamatan Elektrik: Ensure the charger is connected to a properly grounded outlet. Do not operate the charger if the power cord or output cables are damaged. Avoid contact with water or wet surfaces.
- Pengudaraan: The charger generates heat during operation. Ensure adequate ventilation around the unit to prevent overheating. Do not cover the charger or place it in an enclosed space.
- Keserasian Bateri: This charger is designed for 24V battery systems. Do not attempt to charge batteries with different voltage penilaian.
- Gas Letupan: Batteries can produce explosive gases. Charge in a well-ventilated area. Avoid open flames, sparks, or smoking near the battery.
- Peralatan Pelindung Diri: Pakai pelindung mata dan sarung tangan semasa bekerja dengan bateri.
- Memutuskan sambungan: Always disconnect the AC power from the charger before disconnecting the battery cables.
3. Produk Lebihview
The FridayParts 24V 25A Battery Charger is a robust unit designed for industrial applications, featuring a durable black casing with heat dissipation fins. It includes an AC input power cord, DC output cables with ring terminals, and an interlock cable.
3.1 Komponen
- Battery Charger Unit (Model QB2425)
- AC Input Power Cord (with standard 3-prong plug)
- DC Output Cables (Red for positive, Black for negative, with ring terminals)
- Interlock Cable (Yellow wires with spade connectors)

Gambar 1: Lebihview of the FridayParts 24V 25A Battery Charger with its input and output cables.
3.2 Dimensi Produk
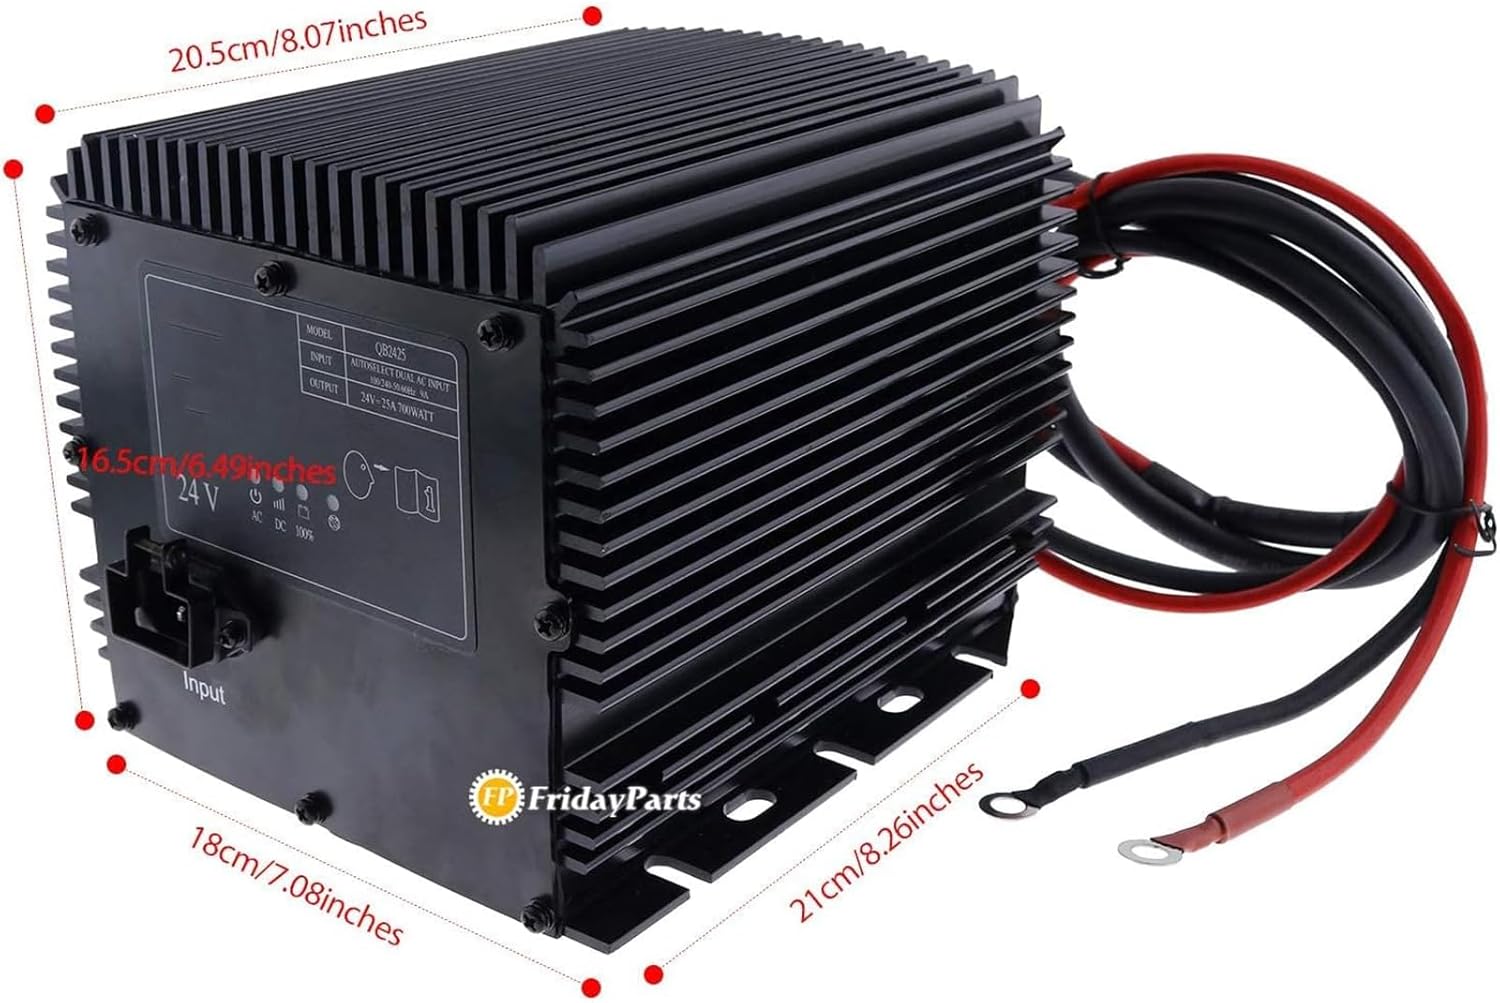
Figure 2: The charger measures approximately 20.5 cm (8.07 inches) in length, 16.5 cm (6.49 inches) in height, and 18 cm (7.08 inches) in width. The output cables extend approximately 21 cm (8.26 inches).
3.3 Product Label and Indicators
The charger features a label on its side providing model information, input/output specifications, and charging status indicators.

Rajah 3: Terperinci view of the charger's label, displaying model QB2425, input/output specifications, and charging status icons.
4. Persediaan
Follow these steps to properly set up your battery charger:
- penempatan: Letakkan pengecas di atas permukaan yang stabil dan rata di kawasan yang mempunyai pengudaraan yang baik, jauh daripada cahaya matahari langsung, sumber haba dan kelembapan.
- Sambungan Bateri: Connect the DC output cables to the battery terminals. Ensure the MERAH cable (positive, +) is connected to the positive battery terminal and the HITAM cable (negative, -) is connected to the negative battery terminal. Ensure connections are secure.
- Interlock Connection: If your equipment requires an interlock signal, connect the yellow interlock wires to the appropriate terminals on your Genie Lift. Refer to your Genie Lift's manual for specific interlock wiring diagrams.
- Sambungan Kuasa AC: Once the battery and interlock (if applicable) are securely connected, plug the AC input power cord into a standard, grounded 100-240V AC, 50/60Hz electrical outlet.

Figure 4: The charger's AC input and DC output cables, ready for connection to power and battery.
5. Arahan Operasi
After proper setup, the charger will begin its operation automatically.
- Caj Permulaan: Once the AC power is connected and the battery cables are properly attached, the charger will automatically detect the battery and begin the charging cycle.
- Status Caj Pemantauan: Refer to the indicator lights on the charger's label (refer to Figure 3) to monitor the charging progress:
- Power Indicator (ⓘ): Illuminates when the charger is receiving AC power.
- Charging Status Indicators (███): A series of bars that illuminate to indicate the battery's charge level. More bars indicate a higher charge.
- Full Charge Indicator (100%): Illuminates when the battery has reached a full charge. The charger will then switch to a float charge mode to maintain the battery.
- AC/DC Indicators: Indicate whether the charger is operating on AC input or providing DC output.
- Completing Charge: Once the 100% indicator light is on, the battery is fully charged. You may leave the charger connected for maintenance charging, or disconnect it.
- Memutuskan sambungan: First, unplug the AC power cord from the wall outlet. Then, disconnect the DC output cables from the battery terminals.
6. Penyelenggaraan
Regular maintenance ensures the longevity and optimal performance of your charger.
- Pembersihan: Periodically wipe the exterior of the charger with a dry, soft cloth to remove dust and debris. Do not use liquid cleaners or solvents.
- Pemeriksaan Kabel: Regularly inspect the AC power cord and DC output cables for any signs of damage, fraying, or exposed wires. Replace damaged cables immediately.
- Pengudaraan: Ensure the cooling fins and ventilation openings are free from obstructions to allow proper airflow.
- Storan: When not in use, store the charger in a cool, dry place, away from direct sunlight and extreme temperatures.
7. Penyelesaian masalah
Jika anda menghadapi masalah dengan pengecas anda, rujuk jadual di bawah untuk masalah dan penyelesaian biasa.
| Masalah | Kemungkinan Punca | Penyelesaian |
|---|---|---|
| Pengecas tidak dihidupkan / Tiada lampu penunjuk | No AC power; Faulty power cord; Loose connection | Check AC outlet and power cord connection; Test outlet with another device; Inspect power cord for damage. |
| Pengecas tidak mengecas bateri | Incorrect battery connection; Battery deeply discharged or faulty; Incorrect battery voltage | Verify correct polarity (+ to +, - to -) and secure connections; Have battery tested by a professional; Ensure battery is 24V. |
| Pengecas terlalu panas | Poor ventilation; Overload | Ensure charger is in a well-ventilated area; Clear any obstructions from cooling fins; Ensure battery capacity is within charger's limits. |
| Pengecas mengeluarkan bunyi yang luar biasa | Isu komponen dalaman | Disconnect power immediately and contact support. Do not attempt to repair. |
8. Spesifikasi
Technical specifications for the FridayParts 24V 25A Battery Charger:
| Ciri | Spesifikasi |
|---|---|
| Nombor Bahagian | 105739, 105739GT |
| Model | QB2425 |
| Input Voltage | 100-240V AC, 50/60Hz, 9A (Autoselect Dual AC Input) |
| Keluaran Voltage | 24V DC |
| Arus Keluaran | 25A |
| Kuasa Keluaran | 700WATT |
| Keserasian | Genie Lift GR-08, GR-12, GR-15, GR-20, GRC-12 (and specific serial number ranges as detailed in product description) |
| warna | Hitam |
9. Waranti dan Sokongan
This product is an aftermarket replacement part. For specific warranty information, please refer to the terms and conditions provided by your point of purchase or the seller, FridayParts. If you encounter any issues or require technical assistance, please contact the seller directly through the platform where the purchase was made. Ensure you have your order details and the product's part number (105739 or 105739GT) ready when contacting support.
For further application details or specific serial number compatibility, please refer to the comprehensive product description provided by the seller.

