1. Produk Lebihview
The Klip xtreme KPM-310 Dual Monitor Desk Mount Stand is designed to optimize your workspace by securely holding two monitors, freeing up valuable desk space. This robust mount promotes an ergonomic viewing experience with its extensive adjustability.
Constructed from high-grade steel, the KPM-310 supports two screens, each up to 32 inches in size and weighing up to 17.6 lbs. It features a sturdy desktop C-clamp base for stability and a fully articulating mechanism allowing for tilt, swivel, and rotation adjustments. Integrated cable management clips help maintain a tidy setup, and a tool holder ensures the hexagonal key is always accessible for quick adjustments.

Rajah 1: The Klip xtreme KPM-310 Dual Monitor Desk Mount Stand, showing its C-clamp base and two articulating arms designed to hold monitors.
2. Kandungan Pakej
Please verify that all components are present before beginning installation. If any parts are missing or damaged, please contact customer support.
- Main Pole with C-Clamp Pangkalan
- Dual Articulating Arms
- VESA Mounting Plates (2x)
- Kit Perkakasan (skru, pencuci, spacer)
- Hexagonal Key (for adjustments)
- Klip Pengurusan Kabel

Rajah 2: Depan view of the assembled monitor mount, illustrating the main pole, dual arms, and VESA plates.
3. Persediaan dan Pemasangan
Follow these steps to properly install your monitor desk mount.
3.1. Attaching the C-Clamp Base to Your Desk
- Place the main pole with the integrated C-clamp base onto the edge of your desk.
- Ketatkan C-clamp screw securely until the mount is firmly attached to the desk surface. Ensure the desk surface is stable and can support the weight of the mount and two monitors.
3.2. Assembling the Articulating Arms
- Slide the articulating arms onto the main pole at your desired height.
- Secure the arms in place using the provided locking mechanism or screws.

Rajah 3: Atas ke bawah view of the monitor mount, showing the full extension of the articulating arms and the central pole.
3.3. Attaching Monitors to VESA Plates
- Remove the VESA mounting plates from the articulating arms by loosening the securing screws.
- Align the VESA plate with the mounting holes on the back of your monitor (compatible with VESA 75x75mm or 100x100mm patterns).
- Secure the VESA plate to the monitor using the appropriate screws from the hardware kit. Do not overtighten.
- Carefully slide the monitor with the attached VESA plate back onto the articulating arm.
- Secure the VESA plate to the arm using the securing screws.
- Repeat for the second monitor.
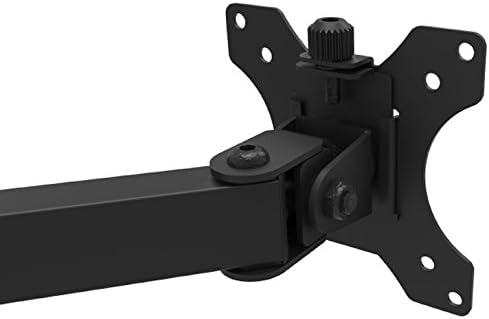
Rajah 4: jarak dekat view of a VESA mounting plate attached to an articulating arm, illustrating the connection point for a monitor.
4. Pengendalian dan Pelarasan
The KPM-310 offers a range of adjustments to achieve optimal viewsudut dan kedudukan ergonomik.
- Pelarasan Ketinggian: Loosen the collar on the main pole to slide the arms up or down. Retighten to secure.
- Pelarasan Kecondongan: The monitor can be tilted +45° to -45° (90° total range) to reduce glare and optimize viewing angle. Use the hexagonal key to adjust the tension at the tilt joint if needed.
- Pelarasan Pusing: Each arm can swivel +90° to -90° (180° total range) at the pole and at the monitor connection point, allowing you to position monitors side-by-side or at an angle.
- Pelarasan Putaran: Monitors can be rotated 360° (+180° to -180°) from landscape to portrait orientation without removing the screen.
- Pelarasan Ketegangan: All joints can be tightened or loosened individually using the hexagonal key to control the fluidity or rigidity of movement.
After making adjustments, ensure all connections are secure to prevent monitors from shifting.
5. Penyelenggaraan
Regular maintenance ensures the longevity and proper function of your monitor mount.
- Pembersihan: Lap pelekap dengan lembut, damp kain. Elakkan pembersih atau pelarut yang kasar yang boleh merosakkan kemasan.
- Pemeriksaan kekejangan: Periodically check all screws and connections, especially the C-clamp and VESA plate screws, to ensure they remain tight and secure.
- Pelinciran: No lubrication is typically required for the joints. If movement becomes stiff, check for debris or overtightened screws.
6. Penyelesaian masalah
If you encounter issues with your monitor mount, refer to the following common problems and solutions:
- Monitors are sagging or not holding position:
- Pastikan C-clamp diketatkan dengan kukuh pada meja.
- Use the hexagonal key to tighten the tension screws at the articulating joints and VESA plate connection points.
- Verify that the monitor weight does not exceed the maximum load capacity of 17.6 lbs per arm.
- Gunung berasa tidak stabil:
- Confirm the C-clamp is fully tightened and the desk surface is sturdy.
- Ensure the main pole is properly seated in the base.
- Difficulty adjusting tilt/swivel/rotation:
- Loosen the tension screws at the respective joints slightly using the hexagonal key.
- Pastikan tiada kabel yang menghalang pergerakan.
7. Spesifikasi
| Ciri | Spesifikasi |
|---|---|
| Nombor Model | KPM-310 |
| Monitor Screen Size Compatibility | 13 to 32 inches (per arm) |
| Kapasiti Beban Maksimum | 17.6 paun (8 kg) setiap lengan |
| Ketinggian Maksimum | 18.3 inci |
| Keserasian VESA | 75x75mm, 100x100mm |
| Sudut Kecondongan | +45° to -45° (90° total) |
| Sudut Pusing | +90° to -90° (180° total) |
| Pelarasan Putaran | +180° to -180° (360° total) |
| bahan | High-grade Steel, Plastic |
| warna | Hitam |
| Dimensi Produk (L x W x H) | 35.1 x 11 x 18.3 inci |
| Product Weight (with hardware) | 9.2 paun |
| Jenis Pemasangan | C-Clamp (Atas meja) |
8. Waranti dan Sokongan
The Klip xtreme KPM-310 Monitor Desk Mount Stand comes with a Waranti Seumur Hidup, memastikan ketenangan fikiran mengenai kualiti dan ketahanannya.
For technical support, warranty claims, or inquiries about missing parts, please contact Klip xtreme customer service. Refer to the official Klip xtreme webtapak untuk maklumat hubungan.


