1. Pengenalan
This manual provides essential information for the safe and effective operation, maintenance, and troubleshooting of your Crown CT21056LBMC 18V Cordless Drill Driver. Please read these instructions carefully before using the tool and keep them for future reference. This drill driver is designed for drilling into wood, metal, and plastics, and for driving screws.
2. Arahan Keselamatan
Sentiasa ikuti langkah berjaga-jaga keselamatan asas untuk mengurangkan risiko kebakaran, kejutan elektrik dan kecederaan diri semasa mengendalikan alatan kuasa.
- Keselamatan Kawasan Kerja: Pastikan kawasan kerja anda bersih dan terang. Kawasan bersepah atau gelap mengundang kemalangan. Jangan kendalikan alatan kuasa dalam atmosfera yang mudah meletup, seperti di hadapan cecair mudah terbakar, gas atau habuk.
- Keselamatan Elektrik: Elakkan sentuhan badan dengan permukaan yang dibumikan atau dibumikan seperti paip, radiator, dapur dan peti sejuk. Jangan dedahkan alat kuasa kepada hujan atau keadaan basah.
- Keselamatan Diri: Sentiasa pakai pelindung mata. Gunakan perlindungan pendengaran apabila beroperasi untuk tempoh yang lama. Berpakaian dengan betul; elakkan pakaian atau barang kemas yang longgar. Selamat rambut panjang.
- Penggunaan dan Penjagaan Alat: Jangan paksa alat kuasa. Gunakan alat kuasa yang betul untuk aplikasi anda. Putuskan sambungan pek bateri daripada alat kuasa sebelum membuat sebarang pelarasan, menukar aksesori atau menyimpan alatan kuasa.
- Keselamatan Pek Bateri: Isi semula hanya dengan pengecas yang ditentukan oleh pengilang. Jangan bakar pek bateri walaupun ia rosak teruk.
3. Kandungan Pakej
Carefully unpack all items and check against the list below. If any parts are missing or damaged, contact your retailer.
- 1 x Crown CT21056LBMC Cordless Drill Driver
- 2 x Bateri Litium-Ion 18V (1.5 Ah)
- 1 x Pengecas Bateri
- 1 x Manual Arahan (dokumen ini)
- 1 x Sarung Pembawa

Image 1: The complete Crown CT21056LBMC kit, showing the drill driver, two batteries, charger, and the durable carrying case.
4. Produk Lebihview
Familiarize yourself with the components of your drill driver before operation.
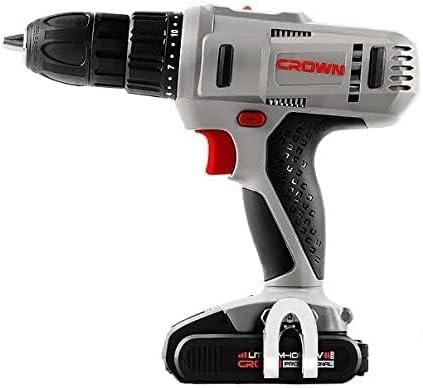
Imej 2: Sisi view of the drill driver, illustrating key components such as the chuck, torque adjustment collar, speed selector switch, and trigger.
- Chuck tanpa kunci: Untuk perubahan yang cepat dan mudah.
- Kolar Pelarasan Tork: Selects the desired torque setting for driving screws or drill mode.
- Suis Pemilih Kelajuan: Allows selection between two mechanical speed ranges.
- Suis Hadapan/Undur: Mengubah arah putaran chuck.
- Suis Pencetus: Mengaktifkan gerudi dan mengawal kelajuan.
- Lampu Kerja LED: Menerangi kawasan kerja.
- Pek bateri: Memberi kuasa kepada alat.
- Butang Pelepas Bateri: Untuk mengeluarkan pek bateri.
5. Persediaan
5.1. Mengecas Bateri
The battery pack is not fully charged at the time of purchase. It must be fully charged before first use.
- Sambungkan pengecas ke salur keluar kuasa standard.
- Slide the battery pack onto the charger base. Ensure it clicks into place.
- The charging indicator light on the charger will show the charging status. A full charge takes approximately 45 minutes for a 1.5 Ah battery.
- Setelah dicas sepenuhnya, cabut bateri daripada pengecas dan cabut plag pengecas daripada soket.
5.2. Memasang dan Menanggalkan Pek Bateri
- Untuk Memasang: Align the battery pack with the base of the drill driver and slide it in until it clicks securely into place.
- Untuk Alih Keluar: Press the battery release button and slide the battery pack out from the tool.

Image 3: The drill driver with a fully installed battery pack, ready for use.
5.3. Installing and Removing Drill Bits/Driver Bits
- Rotate the keyless chuck counter-clockwise to open the jaws.
- Insert the drill bit or driver bit into the chuck, ensuring it is centered.
- Rotate the keyless chuck clockwise to tighten the jaws firmly around the bit. Do not overtighten.
- To remove, rotate the chuck counter-clockwise until the bit can be pulled out.
6. Arahan Operasi
6.1. Memilih Kelajuan
The drill driver features two mechanical speed settings:
- Kelajuan 1 (Kelajuan Rendah, 0-350 RPM): Ideal for driving screws, larger drilling diameters, or applications requiring higher torque.
- Kelajuan 2 (Kelajuan Tinggi, 0-1350 RPM): Suitable for smaller drilling diameters and faster drilling.
To change speed, slide the speed selector switch located on top of the drill. Ensure the tool is stopped before changing speeds.
6.2. Adjusting Torque
The torque adjustment collar has 18 torque settings plus a drill mode (indicated by a drill bit symbol).
- Tetapan Tork (1-18): Use these settings for driving screws. Lower numbers are for smaller screws or softer materials, higher numbers for larger screws or harder materials. The clutch will disengage when the set torque is reached, preventing overtightening or stripping.
- Mod Gerudi (Simbol Bit Gerudi): Provides maximum torque for drilling applications without the clutch disengaging.
Putar kolar pelaras tork untuk memilih tetapan yang diingini.
6.3. Putaran Maju/Undur
The forward/reverse switch is located above the trigger. Push it to the left for forward rotation (for drilling and driving screws) and to the right for reverse rotation (for removing screws or freeing jammed bits). Position the switch in the center to lock the trigger and prevent accidental starting.
6.4. Operating the Trigger Switch and LED Light
Squeeze the trigger switch to start the drill. The speed is variable depending on how far the trigger is pressed. The integrated LED work light will illuminate when the trigger is pressed, providing visibility in dimly lit areas.
7. Penyelenggaraan
Penyelenggaraan tetap memastikan prestasi optimum dan memanjangkan hayat alat anda.
- Pembersihan: Keep the ventilation openings clear and free of dust. Use a soft, damp kain untuk membersihkan alatan casing. Jangan gunakan pelarut atau pembersih yang kasar.
- Penjagaan Bateri: Store batteries in a cool, dry place away from direct sunlight. Do not store fully discharged batteries for extended periods. Charge them periodically if not in use.
- Storan: Store the drill driver, batteries, and charger in the provided carrying case in a dry, secure location out of reach of children.
- Pemeriksaan: Regularly inspect the power tool for any signs of damage, loose screws, or worn parts. If damage is found, have it repaired by a qualified service technician.
8. Penyelesaian masalah
Before attempting any repairs, ensure the battery is removed from the tool.
| Masalah | Kemungkinan Punca | Penyelesaian |
|---|---|---|
| Gerudi tidak bermula | Battery not charged or improperly installed. Forward/Reverse switch in center (locked) position. | Charge battery fully and ensure it is securely installed. Move Forward/Reverse switch to either forward or reverse position. |
| Bateri tidak dicas | Charger not plugged in. Battery or charger is faulty. | Check power connection. If problem persists, contact customer support for replacement. |
| Kehilangan kuasa semasa operasi | Bateri lemah. Perlindungan beban lampau diaktifkan. | Recharge the battery. Reduce pressure on the tool or use a lower speed setting. |
| Sedikit tergelincir dalam chuck | Chuck tidak diketatkan secukupnya. Bit shank kotor atau rosak. | Ketatkan semula chuck dengan kuat. Bersihkan atau ganti bit. |
9. Spesifikasi
| Ciri | Spesifikasi |
|---|---|
| Nombor Model | CT21056LBMC |
| Voltage | 18 Volt |
| Jenis Bateri | Litium-Ion |
| Kapasiti Bateri | 1.5 Ah |
| Kapasiti Chuck | 1.5 - 13 mm |
| No-Load Speed (Speed 1) | 0 - 350 RPM |
| No-Load Speed (Speed 2) | 0 - 1350 RPM |
| Max Torque | 4 Newton-Meter (Nm) |
| Clutch Positions | 18 + 1 (Mod Gerudi) |
| Masa Mengecas | lebih kurang 45 minit |
| Dimensi Produk | 20.5 x 5 x 20 cm |
| Berat Produk | 1.54 kg |
| Ciri Khas | Lampu Kerja LED Bersepadu |
10. Waranti dan Sokongan
For warranty information, service, or technical support, please refer to the warranty card included with your product or contact your point of purchase. Keep your purchase receipt as proof of purchase for any warranty claims.


