1. Pengenalan
This manual provides detailed instructions for the installation, operation, and maintenance of your Zebronics H61 Motherboard. Please read this manual thoroughly before proceeding with installation to ensure proper setup and functionality.
The Zebronics H61 Motherboard is designed to support Intel LGA 1155 socket processors (i7/i5/i3/Pentium/Celeron series) and DDR3 dual-channel memory. It features an Intel H61 chipset, providing a stable and efficient platform for your computing needs.
2. Maklumat Keselamatan
- Sentiasa putuskan sambungan bekalan kuasa sebelum memasang atau mengeluarkan sebarang komponen.
- Handle the motherboard by its edges to avoid electrostatic discharge (ESD) damage. Use an anti-static wrist strap if available.
- Pastikan pengudaraan yang betul dalam bekas komputer anda untuk mengelakkan terlalu panas.
- Jangan dedahkan papan induk kepada kelembapan atau suhu yang melampau.
- Refer to the component manufacturer's manuals for specific installation instructions for your CPU, RAM, and other peripherals.
3. Kandungan Pakej
Sahkan bahawa semua item terdapat dalam pakej:
- Zebronics H61 Motherboard
- I / O Shield
- SATA Data Cable(s)
- Driver CD (for operating systems that do not automatically install drivers)
- Manual Pengguna (dokumen ini)
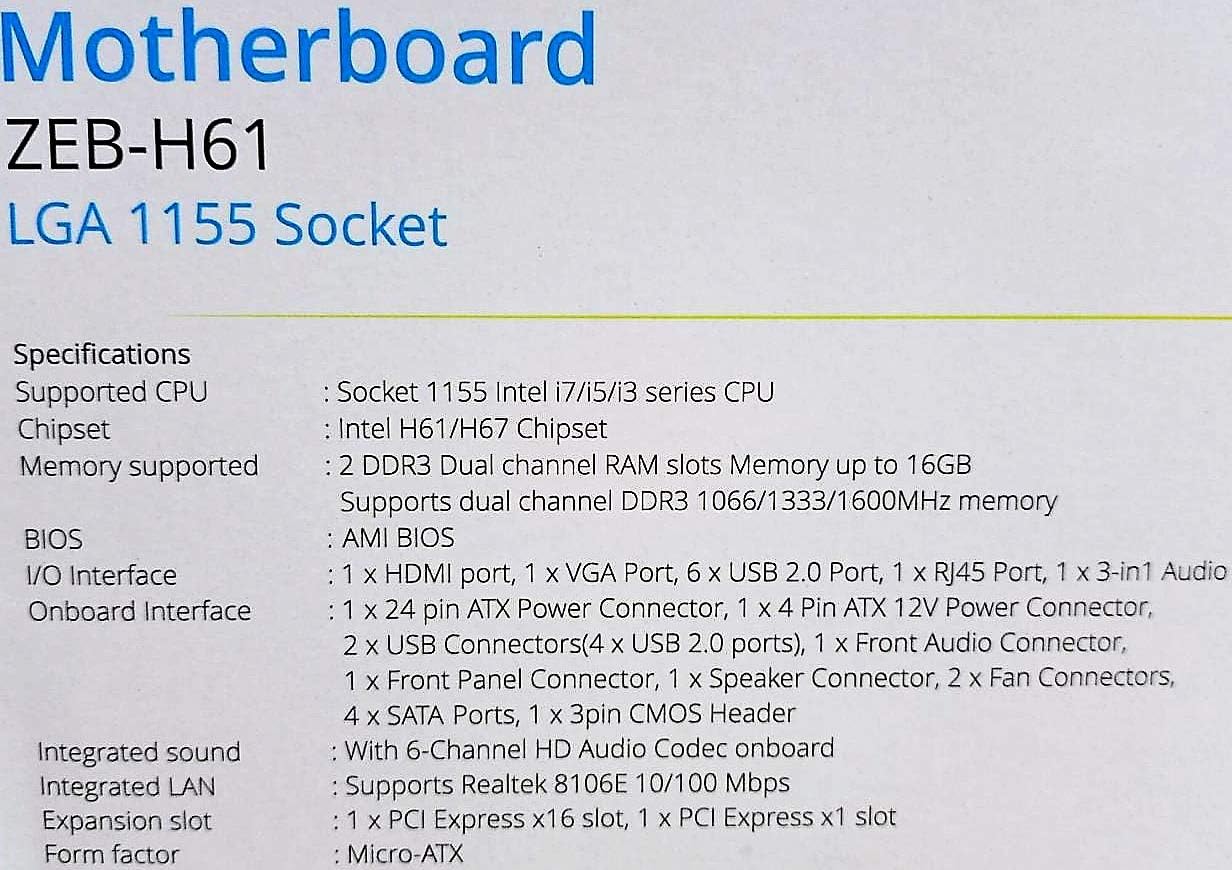
4. Spesifikasi
| Ciri | Penerangan |
|---|---|
| Model | H61 |
| Chipset | Intel H61 Express |
| Soket CPU | LGA 1155 |
| Pemproses yang Serasi | Intel i7/i5/i3/Pentium/Celeron processors (2nd and 3rd Generation) |
| Slot memori | 2 x DDR3 Dual-channel slots |
| Sokongan Memori | DDR3 1066/1333/1600MHz, up to 16GB |
| Antara Muka Grafik | 1 x PCI-Express x16 slot |
| Slot Pengembangan | 1 x slot PCI Express x1 |
| Penyimpanan | 4 x SATA II ports |
| LAN | Realtek 8106E 10/100 Mbps Ethernet |
| Audio | 6-Channel HD Audio Codec onboard (5.1 surround sound support) |
| Port I/O Belakang | 1 x HDMI, 1 x VGA, 6 x USB 2.0, 1 x RJ45, 1 x 3-in-1 Audio Jacks (Line-in, Line-out, Mic-in), PS/2 (Keyboard/Mouse) |
| Faktor Bentuk | ATX |
| Dimensi | 25 x 20 x 3 cm |
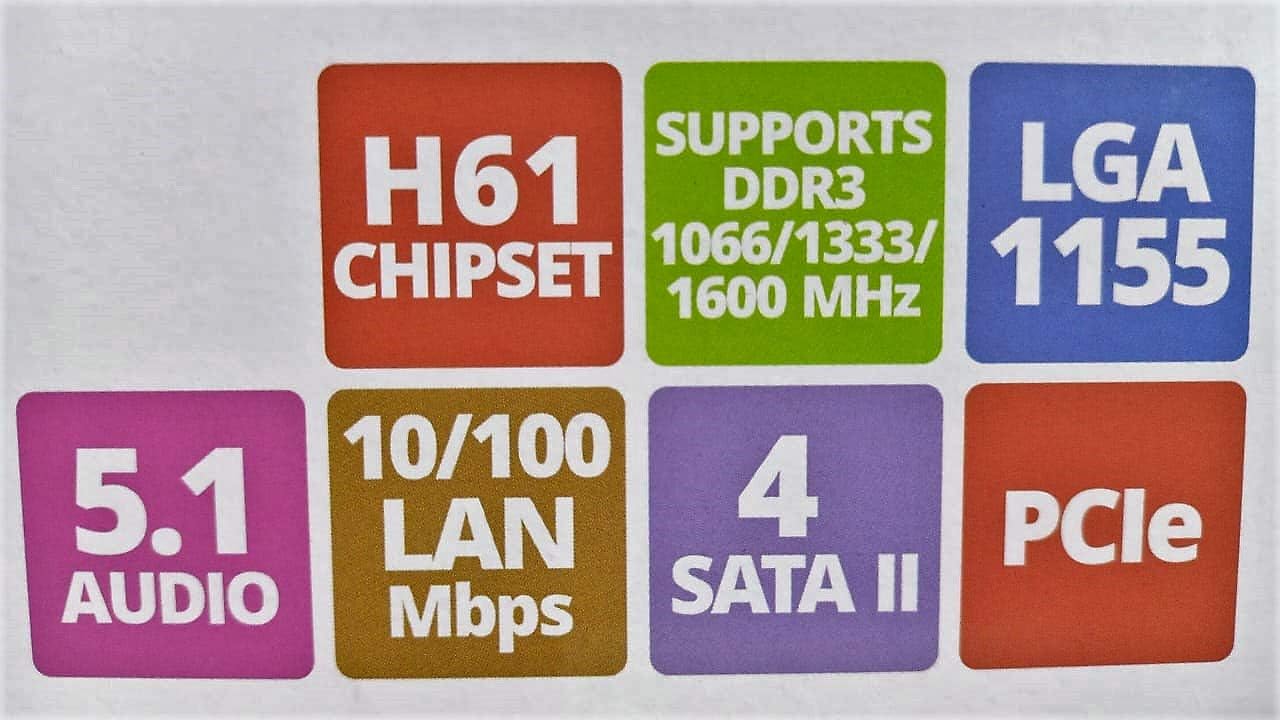
Image: Detailed specifications of the Zebronics H61 Motherboard, including chipset, CPU socket, memory support, and I/O interfaces.

Image: Visual representation of key features such as H61 Chipset, DDR3 support, LGA 1155 socket, 5.1 Audio, 10/100 LAN, 4 SATA II ports, and PCIe.
5. Persediaan dan Pemasangan
5.1 Susun atur Motherboard

Imej: Atas ke bawah view of the Zebronics H61 Motherboard, showing the CPU socket, RAM slots, PCIe slot, and various headers.

Image: Another top-down perspective of the Zebronics H61 Motherboard, highlighting component placement.
5.2 Panel I/O Belakang

Image: Rear I/O panel of the Zebronics H61 Motherboard, displaying ports for PS/2 keyboard/mouse, VGA, HDMI, USB 2.0, LAN, and audio jacks.
Imej: Lebih dekat view of the rear I/O ports, detailing the VGA, HDMI, USB, LAN, and audio connections.
5.3 Langkah Pemasangan Komponen
- Pasang CPU:
- Buka tuil soket CPU.
- Carefully align the CPU with the socket, ensuring the golden triangle on the CPU matches the mark on the socket.
- Perlahan-lahan letakkan CPU ke dalam soket tanpa memaksanya.
- Tutup tuil untuk mengamankan CPU.
- Sapukan pes haba dan pasangkan penyejuk CPU mengikut arahan pengeluarnya.
- Pasang RAM:
- Buka klip di kedua-dua hujung slot memori DDR3.
- Jajarkan modul memori dengan slot, pastikan takuk pada modul sepadan dengan kunci dalam slot.
- Tekan ke bawah dengan kuat pada kedua-dua hujung modul memori sehingga klip terpasang pada tempatnya.
- Pasang Kad Grafik (Pilihan):
- Locate the PCI-Express x16 slot.
- Tanggalkan penutup slot pengembangan yang sepadan daripada bekas PC anda.
- Align the graphics card with the slot and press down firmly until it is seated correctly.
- Pasangkan kad dengan skru pada bekas PC.
- Sambungkan Peranti Storan:
- Connect SATA data cables from the motherboard's SATA ports to your hard drives or SSDs.
- Ensure power cables from the power supply are connected to these devices.
- Sambungkan Bekalan Kuasa:
- Sambungkan penyambung kuasa ATX 24-pin daripada bekalan kuasa anda ke papan induk.
- Connect the 4-pin ATX 12V power connector (CPU power) to the motherboard.
- Sambungkan Pengepala Panel Hadapan:
- Connect the power switch, reset switch, HDD LED, and power LED cables from your PC case to the corresponding pins on the motherboard's front panel header. Refer to the motherboard diagram for pin assignments.
- Connect front USB and audio headers.
6. Arahan Operasi
6.1 But Pertama dan Persediaan BIOS
- Selepas memasang semua komponen, sambungkan monitor, papan kekunci dan tetikus anda.
- Hidupkan komputer anda.
- Tekan kekunci yang ditetapkan (biasanya DEL or F2) repeatedly during startup to enter the BIOS/UEFI setup utility.
- Dalam BIOS, sahkan bahawa semua komponen yang dipasang (CPU, RAM, storan) dikesan dengan betul.
- Konfigurasikan susunan but untuk memasang sistem pengendalian anda daripada pemacu USB atau pemacu optik.
- Simpan perubahan dan keluar dari BIOS. Sistem akan dimulakan semula.
6.2 Pemasangan Pemandu
After installing your operating system, install the necessary drivers for optimal performance. Drivers can be found on the included driver CD or downloaded from the official Zebronics webtapak.
- Pemacu Chipset
- Graphics Drivers (if using integrated graphics or a dedicated GPU)
- Pemacu LAN
- Pemacu Audio
- USB Drivers (if applicable)
7. Penyelenggaraan
- Pastikan ia bersih: Regularly clean dust from inside your PC case, especially from fans and heatsinks, to ensure proper airflow and prevent overheating. Use compressed air.
- Kemas Kini BIOS: Check the Zebronics website periodically for BIOS updates. BIOS updates can improve system stability, compatibility, and performance. Follow update instructions carefully.
- Kemas Kini Pemandu: Keep your drivers updated to ensure compatibility and optimal performance with your operating system and applications.
- Bateri CMOS: The motherboard uses a CR2032 battery to retain BIOS settings. If your system frequently loses time or BIOS settings, the battery may need replacement.
8. Penyelesaian masalah
- Tiada Kuasa / Sistem Tidak Boleh But:
- Ensure all power cables (24-pin ATX, 4-pin ATX 12V) are securely connected to the motherboard.
- Check if the power supply unit (PSU) is switched on and functioning.
- Verify front panel power switch connection.
- Cuba pasang semula modul RAM dan kad grafik.
- Tiada Paparan pada Monitor:
- Ensure the monitor is connected to the correct video output (either integrated graphics on the motherboard or dedicated graphics card).
- Periksa kuasa monitor dan pemilihan input.
- Reseat the graphics card (if installed) and RAM modules.
- Ketidakstabilan Sistem / Ranap:
- Periksa suhu CPU dan GPU. Kepanasan berlebihan boleh menyebabkan ketidakstabilan.
- Ensure RAM modules are properly seated and compatible. Test with one RAM stick if multiple are installed.
- Update drivers and BIOS to the latest versions.
- Jalankan alat diagnostik memori untuk memeriksa RAM yang rosak.
- CMOS Battery Issue (Loss of Time/Settings):
- If the system loses time or BIOS settings after being powered off, the CMOS battery (CR2032) may need replacement.
- To reset CMOS: Disconnect power, remove the CMOS battery, short the battery socket's positive and negative terminals for 30 seconds, then reinsert the battery.
9. Waranti dan Sokongan
For warranty information and technical support, please refer to the official Zebronics webtapak atau hubungi bahagian perkhidmatan pelanggan mereka. Simpan resit pembelian anda sebagai bukti pembelian untuk tuntutan waranti.
Zebronics Official Webtapak: www.zebronics.com


