1. Pengenalan
This manual provides essential information for the safe and effective use of your Vivibright GP90 UP Portable Video Projector. Please read it thoroughly before operating the device and retain it for future reference. The Vivibright GP90 UP is a portable video projector featuring an Android 4.42 operating system, 3200 lumens brightness, and 1280x800 native resolution, designed for multimedia entertainment and presentations.
2. Arahan Keselamatan
- Jangan halang bukaan pengudaraan. Pastikan aliran udara yang mencukupi di sekitar projektor untuk mengelakkan terlalu panas.
- Jangan dedahkan projektor kepada hujan atau kelembapan untuk mengelakkan renjatan elektrik atau kebakaran.
- Elakkan melihat terus ke dalam kanta projektor apabila lamp sedang dihidupkan, kerana cahaya terang boleh menyebabkan kerosakan mata.
- Letakkan projektor di atas permukaan yang stabil dan rata untuk mengelakkannya daripada jatuh.
- Gunakan hanya penyesuai kuasa yang dibekalkan dengan projektor.
- Jangan cuba membuka atau membaiki projektor itu sendiri. Rujuk semua servis kepada kakitangan yang berkelayakan.
- Jauhkan projektor daripada sumber haba dan cahaya matahari langsung.
3. Kandungan Pakej
Sahkan bahawa semua item terdapat dalam pakej:
- Vivibright GP90 UP Projector
- Kabel Kuasa
- Remote Control (may not be included with all models)
- Manual Pengguna (dokumen ini)
4. Produk Lebihview
Biasakan diri anda dengan komponen dan port sambungan projektor.
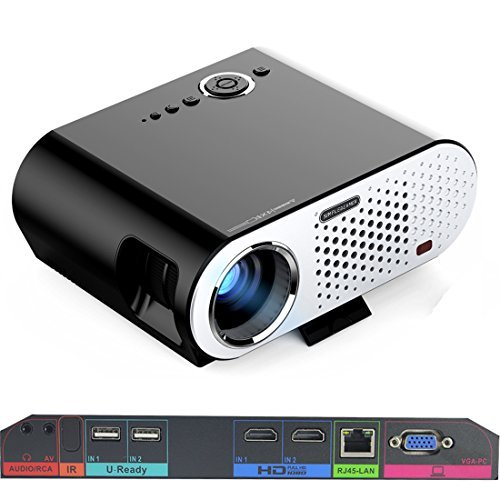
Image: The Vivibright GP90 UP projector showing its top controls, lens, and various input/output ports on the rear panel. The top features power and navigation buttons. The front has the projection lens. The rear panel includes Audio/RCA, IR receiver, two USB ports (U-Ready), two HDMI ports (HD), an RJ45-LAN port, and a VGA-PC port.
4.1 Panel Depan
- Kanta Tayangan: Memancarkan imej.
4.2 Panel Atas
- Butang Kawalan: Power, navigation, and menu access.
4.3 Rear Panel (Input/Output Ports)
- AUDIO/RCA: Audio output and composite video input.
- IR: Penerima inframerah untuk alat kawalan jauh.
- IN 1 / IN 2 (USB): Two USB ports for connecting USB storage devices.
- IN 1 / IN 2 (HDMI): Two HDMI inputs for digital video and audio sources.
- RJ45-LAN: Port Ethernet untuk sambungan rangkaian berwayar.
- VGA-PC: VGA input for connecting to computers.
5. Persediaan
5.1 Penempatan
- Place the projector on a flat, stable surface or mount it on a ceiling or tripod.
- Ensure the projector is positioned directly in front of the screen or wall. Avoid angled placement as horizontal keystone correction is not available.
- The optimal projection distance ranges from 1.2m to 8.5m, producing screen sizes from 35 to 280 inches. For a 100-inch image, a distance of approximately 3 meters is recommended.
5.2 Sambungan Kuasa
- Sambungkan kabel kuasa ke input kuasa projektor.
- Plug the other end of the power cable into a suitable electrical outlet (90~240V/50~60Hz).
5.3 Menyambungkan Peranti Input
- HDMI: Connect an HDMI cable from your source device (e.g., laptop, Blu-ray player, gaming console) to one of the projector's HDMI ports.
- USB: Insert a USB flash drive or external hard drive into a USB port to access media files.
- VGA: Connect a VGA cable from your computer to the projector's VGA-PC port.
- DARI: Use an RCA cable to connect older devices to the AV input.
- LAN: Connect an Ethernet cable to the RJ45-LAN port for a wired internet connection.
5.4 Pelarasan Fokus dan Keystone
- Fokus: Putarkan gelang fokus di sekeliling kanta sehingga imej yang diunjurkan tajam dan jelas.
- Pembetulan Keystone: Use the manual vertical keystone correction feature (±15°) to adjust the image shape if the projector is not perfectly perpendicular to the screen. This corrects trapezoidal distortion.
6. Arahan Operasi
6.1 Menghidupkan/Mematikan
- Hidupkan kuasa: Press the power button on the projector or the remote control. The indicator light will change, and the projector will start.
- Matikan: Tekan butang kuasa sekali lagi. Sahkan penutupan jika digesa. Biarkan projektor sejuk sebelum mencabut palamnya.
6.2 Navigating the Android OS
- The projector runs on Android 4.42. Use the remote control or connect a wireless mouse (recommended for easier navigation) to interact with the interface.
- Access pre-installed apps or download compatible applications from the app store. Note that some newer applications may not be compatible with Android 4.42.
6.3 Tayangan Tanpa Wayar
- Wi-Fi: Connect to a wireless network via the settings menu. Supports dual-band Wi-Fi 2.4G.
- Bluetooth: Supports Bluetooth 4.0 for connecting wireless devices such as speakers. Note that Bluetooth audio output may only be available when using USB or Android sources, not HDMI.
- Wireless Push (EZCast / Miracast / Airplay): Use compatible apps on your smartphone or tablet to mirror your device's screen to the projector. Ensure your device and the projector are on the same Wi-Fi network.
6.4 Tetapan Audio
- The projector features built-in 4Ω, 5W stereo speakers with SRS sound technology.
- For enhanced audio, connect external speakers via the Audio Out port or wirelessly via Bluetooth (when using Android or USB sources).
7. Penyelenggaraan
7.1 Pembersihan
- Kanta: Gunakan kain lembut dan bebas lin yang direka khusus untuk kanta optik. Jangan gunakan pembersih yang kasar.
- Casing: Lap bahagian luar projektor dengan kain lembut dan kering. Untuk kotoran degil, gunakan sedikit kain lapamp kain dan kemudian keringkan dengan teliti.
- Bukaan Pengudaraan: Periodically clean the ventilation openings with a soft brush or compressed air to prevent dust buildup, which can affect performance and lifespan.
7.2 Penyimpanan
- Apabila tidak digunakan untuk tempoh yang lama, simpan projektor di tempat yang sejuk dan kering, jauh daripada cahaya matahari langsung dan suhu yang melampau.
- Cover the lens with its cap to protect it from dust and scratches.
8. Penyelesaian masalah
| Masalah | Kemungkinan Punca | Penyelesaian |
|---|---|---|
| Tiada imej ditayangkan | Kuasa tidak disambungkan; Sumber input tidak dipilih; Penutup kanta dihidupkan | Periksa sambungan kuasa; Pilih sumber input yang betul; Tanggalkan penutup kanta |
| Imej kabur | Fokus tidak dilaraskan; Projektor terlalu dekat/jauh | Adjust focus ring; Adjust projection distance |
| Imej adalah trapezoid | Projektor tidak berserenjang dengan skrin | Adjust vertical keystone correction; Reposition projector to be centered |
| Tiada bunyi | Volume too low; Muted; External speakers not connected/selected | Increase volume; Unmute; Check external speaker connections/settings |
| Wireless projection unstable | Weak Wi-Fi signal; Device incompatibility; Outdated Android OS | Ensure strong Wi-Fi signal; Check device compatibility with Miracast/Airplay; Consider wired connection if issues persist with older Android version. |
9. Spesifikasi
| Ciri | Perincian |
|---|---|
| Jenama | Vivibright |
| Model | GP90 UP |
| Sistem Operasi | Android 4.42 |
| Kecerahan | 3200 Lumens (LED Luminous efficiency) |
| Resolusi Asli | 1280 x 800 (supports up to 1080P) |
| Nisbah Kontras | 3000:1 (Dynamic up to 10,000:1) |
| Saiz Unjuran | 35-280 inci |
| Jarak Unjuran | 1.2m - 8.5m |
| Nisbah Lemparan | 1.45:1 |
| Pembetulan Batu Kunci | Manual menegak ± 15 ° |
| Kehidupan Sumber Cahaya | Sehingga 30,000 jam |
| Ketersambungan | Wi-Fi (2.4G), Bluetooth 4.0, 2x HDMI, 2x USB, VGA, AV, RJ45-LAN |
| Audio | Built-in 4Ω, 5W stereo speakers with SRS sound |
| Bekalan Kuasa | 90~240V/50~60Hz |
| Dimensi Produk | 27 x 22 x 9 cm |
| Berat Barang | 3.17 kg |
10. Waranti dan Sokongan
For warranty information and technical support, please refer to the documentation provided at the time of purchase or contact Vivibright customer service. Keep your purchase receipt as proof of purchase for warranty claims.


