1. Pengenalan
The Technical Pro MM2000BT is a versatile mic mixing amplifier designed for audio professionals and enthusiasts. It combines powerful amplification with comprehensive mixing capabilities, making it suitable for various applications including karaoke, live sound, and home entertainment. This manual provides detailed instructions for setting up, operating, and maintaining your MM2000BT amplebih hidup.
Ciri-ciri Utama:
- Six microphone inputs (two XLR balanced, four 1/4" unbalanced).
- Built-in 10-band equalizer for precise audio tuning.
- USB and SD card inputs for digital media playback (up to 32 GB).
- Wireless Bluetooth compatibility (v2.0 with EDR, 2.4GHz, 30 feet range).
- Auxiliary inputs (3.5mm and RCA) for connecting various audio sources.
- Bass and treble controls for individual mic and music inputs.
- Digital display for easy navigation and status updates.
- Balance controls for audio output.
- Peak power output of 2000 Watts.
- Voltage: 110/220v selectable.
2. Maklumat Keselamatan
To ensure safe operation and prevent damage to the unit, please read and follow all safety instructions:
- Sumber Kuasa: Connect the unit only to the specified power supply (110/220V). Ensure the voltage selector switch on the rear panel matches your local power supply before plugging in.
- Pengudaraan: Jangan sekat bukaan pengudaraan. Pastikan aliran udara yang mencukupi di sekeliling unit untuk mengelakkan terlalu panas.
- Cecair: Jangan dedahkan unit kepada hujan atau lembapan. Jangan letakkan objek yang diisi dengan cecair, seperti pasu, pada unit.
- Pembersihan: Bersihkan hanya dengan kain kering. Jangan gunakan pembersih cecair atau pembersih aerosol.
- Servis: Do not attempt to service this unit yourself. Refer all servicing to qualified service personnel. Opening the unit will void the warranty.
- penempatan: Letakkan unit pada permukaan yang stabil dan rata. Elakkan meletakkannya berhampiran sumber haba atau di bawah cahaya matahari langsung.
3. Kandungan Pakej
Sila tandai kotak untuk item berikut:
- Technical Pro MM2000BT Mixer Amplebih hidup
- Kabel Kuasa
- Manual Pengguna
- Pendakap Pemasangan (untuk pemasangan rak)

4. Kawalan Panel Hadapan
The front panel of the MM2000BT provides access to all essential controls for mixing microphones, music, and adjusting audio output.

4.1. Microphone Input Section
The MM2000BT features six microphone inputs, each with dedicated volume and tone controls.
- MIC 1-4 (1/4" Unbalanced): Connect standard microphones with 1/4" TS connectors.
- MIC 5-6 (XLR Balanced): Connect professional microphones with XLR connectors.
- Volume Knobs (MIC 1-2, MIC 3-4, MIC 5, MIC 6): Adjust the individual volume levels for each microphone input.
- Echo Controls (Delay, Repeat, Hi, Lo, Vol): Fine-tune the echo effect for microphones. Adjust delay time, repetition rate, high/low frequencies of the echo, and overall echo volume.
- Tone Controls (Hi, Mid, Lo): Adjust the high, mid, and low frequencies for microphone channels to shape the vocal sound.

4.2. Music Input Section
This section manages the various music sources and their respective controls.
- Paparan Digital: Shows current input mode (USB, SD, Bluetooth, FM Radio) and track information.
- USB/SD/MMC Card Slots: Insert USB drives or SD/MMC cards for digital audio playback.
- Control Buttons (Folder, Play/Pause, Mode, Skip): Navigate tracks, change input modes, and control playback.
- MP3 Volume Knob: Controls the master volume for USB, SD, Bluetooth, and 3.5mm Aux inputs.
- Bass/Treble Controls (Music): Adjust the low and high frequencies for the music input.
- Tombol Imbangan: Adjusts the left/right balance of the music output.

4.3. Equalizer and Master Controls
These controls allow for overall sound shaping and master volume adjustment.
- Dual 10-Band Equalizer: Adjust specific frequency bands (32Hz to 16kHz) for both left and right channels to fine-tune the overall sound output. Adjustment range: ±12dB.
- Phantom Power (+48V) Switch: Activates 48V phantom power for condenser microphones connected to the XLR inputs.
- Tombol Kelantangan Induk: Controls the overall output volume of the entire mixer amplebih hidup.

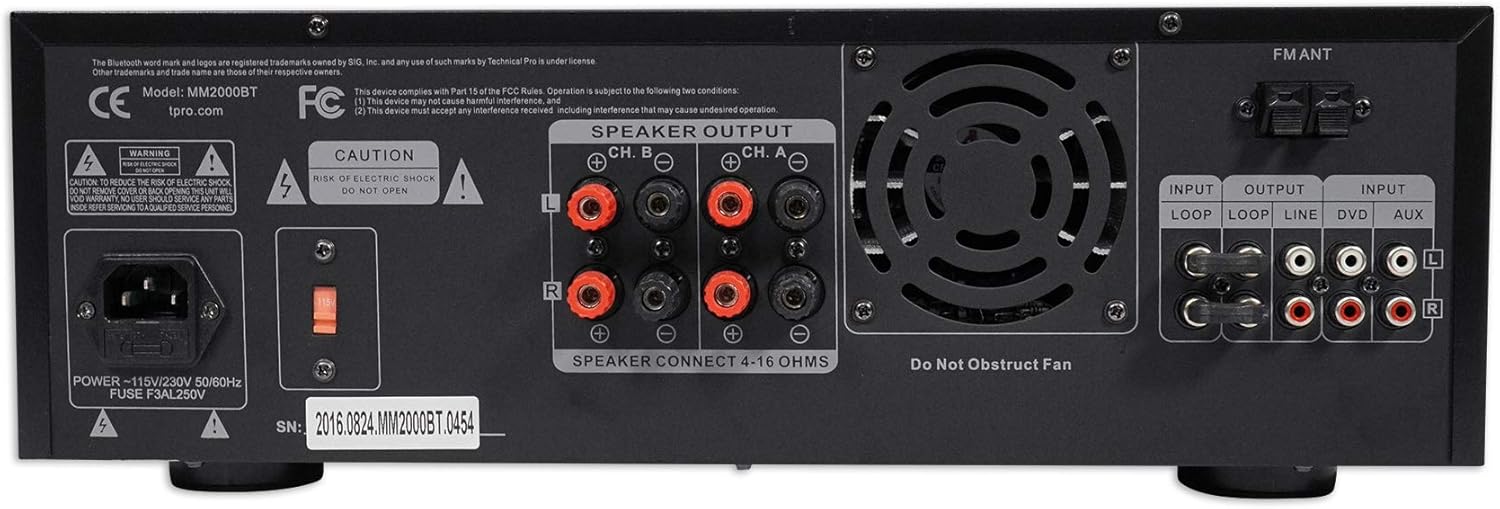
5. Sambungan Panel Belakang
The rear panel houses all the necessary connections for power, speakers, and external audio devices.

- POWER (110V/220V Selector): Connect the included power cable. Ensure the voltage selector switch is set to your local power supply.
- SPEAKER OUTPUT (Banana Binding Post): Connect passive speakers (4-16 ohms) using banana plugs or bare speaker wire. The amplifier supports two channels (Ch. A and Ch. B).
- INPUT (Loop, Line, DVD, Aux RCA): Connect external audio sources such as CD players, DVD players, or other line-level devices using RCA cables.
- OUTPUT (Loop, Line RCA): Provides RCA line-level outputs for connecting to additional amppenghidup, pembesar suara berkuasa atau peranti rakaman.
- SEMUT FM: Connect an FM antenna for radio reception.
6. Persediaan
Follow these steps for initial setup of your MM2000BT amplebih hidup:
- penempatan: Letakkan amplifier on a stable, flat surface, ensuring adequate ventilation. If rack-mounting, secure it properly using the provided brackets.
- Sambungan Kuasa:
a. Verify the 110V/220V selector switch on the rear panel matches your local power supply.
b. Connect the power cable to the amplifier's power input and then to a wall outlet. - Sambungan Pembesar Suara:
a. Connect your passive speakers to the SPEAKER OUTPUT terminals on the rear panel. Ensure correct polarity (+ to + and - to -). The amplifier supports 4-16 ohm speakers.
b. Penting: Do not connect powered speakers to these outputs. - Sambungan Mikrofon:
a. For dynamic microphones, connect to the 1/4" (MIC 1-4) or XLR (MIC 5-6) inputs on the front panel.
b. For condenser microphones requiring phantom power, connect to XLR inputs and activate the +48V PHANTOM switch on the front panel. - Sambungan Sumber Audio:
a. Bluetooth: Memastikan amplifier is in Bluetooth mode (select via MODE button). Enable Bluetooth on your device and select "Rockville" or "MM2000BT" from the list of available devices.
b. USB/SD: Insert a USB drive or SD card into the respective slot on the front panel. The unit will automatically switch to USB/SD mode or can be selected via the MODE button.
c. RCA/Aux: Connect external devices (CD player, DVD player, phone via 3.5mm to RCA cable) to the LINE IN (RCA) or AUX IN (3.5mm) ports. Select the appropriate input via the MODE button.
7. Arahan Operasi
Once your MM2000BT is set up, you can begin operating it using the front panel controls.
7.1. Operasi Mikrofon
- Ensure microphone volume knobs are initially set to minimum.
- Speak into the microphone and slowly increase its respective volume knob until the desired level is reached.
- Adjust the MIC Hi, Mid, Lo controls to fine-tune the microphone's tone.
- Use the ECHO controls (Delay, Repeat, Hi, Lo, Vol) to add and customize the echo effect.
7.2. Main balik Muzik
- Select your desired input source (Bluetooth, USB, SD, RCA/Aux) using the MODE button.
- For Bluetooth, ensure your device is paired. For USB/SD, ensure media is inserted. For RCA/Aux, ensure the external device is playing.
- Adjust the MP3 Volume knob for digital sources or the LINE IN Volume knob for RCA inputs to control music level.
- Use the MUSIC Bass and Treble controls to adjust the music's tone.
- Adjust the Balance knob to shift the music output between left and right channels.
7.3. Master Audio Adjustment
- Use the Dual 10-Band Equalizer sliders to boost or cut specific frequencies across the entire mix.
- Adjust the Master Volume knob to control the final output level of all audio combined.
8. Spesifikasi
| Ciri | Spesifikasi |
|---|---|
| Kuasa Puncak | 2000 Watt |
| RMS Watts per Channel | 355 Watt |
| Input | RCA (2 audio sources), USB, SD Card, Bluetooth, Mp3 (3.5mm) |
| Output Audio | Banana binding post (4 speakers), RCA (Line Out), Headphones (3.5mm) |
| Output Speaker | Bare speaker wire (2 speakers) |
| Format Main Semula | .mp3, .wav, .wma |
| Rakaman | 128 kbps / 44.1 KHz on .wav (to SD Cards and Flash Drives) |
| Versi Bluetooth | v2.0 with EDR (2.4GHZ) |
| Julat Bluetooth | 30 kaki |
| Input USB | 5V power supply (32 GB Max) |
| Input Mik | Two XLR (balanced), Four 1/4" (unbalanced) |
| Equalization Points | 32Hz, 64Hz, 125Hz, 250Hz, 500Hz, 1kHz, 2kHz, 4KHz, 8kHz, 16kHz |
| Adjustment Range (EQ) | ±12dB |
| Respons Kekerapan | 20Hz-20KHz |
| Kipas Terbina dalam | ya |
| Dimensi | 19.0" L x 10.0" W x 5.0" H |
| Berat badan | 14.0 paun |
9. Penyelesaian masalah
If you encounter any issues with your MM2000BT, please refer to the following common problems and solutions:
- Tiada Kuasa:
a. Check if the power cable is securely connected to both the amplampu dan soket dinding.
b. Verify the 110V/220V selector switch on the rear panel is set correctly.
c. Check the fuse on the rear panel and replace if blown. - Tiada Keluaran Bunyi:
a. Ensure the Master Volume knob is turned up.
b. Check individual microphone and music volume knobs.
c. Verify speakers are correctly connected to the SPEAKER OUTPUT terminals with correct polarity.
d. Ensure the correct input source is selected (Bluetooth, USB, SD, RCA/Aux).
e. If using Bluetooth, ensure your device is paired and its volume is turned up. - Bunyi Herot:
a. Reduce the Master Volume or individual input volumes.
b. Check speaker impedance (4-16 ohms) and ensure it matches the ampkeperluan pengawas.
c. Adjust EQ settings to remove unwanted frequencies. - Mikrofon Tidak Berfungsi:
a. Check microphone cable connection.
b. Ensure microphone volume is turned up.
c. If using a condenser microphone, ensure +48V Phantom Power is engaged. - Isu Kesambungan Bluetooth:
a. Ensure the ampPengaktif berada dalam mod Bluetooth.
b. Check that no other device is currently paired with the amplebih hidup.
c. Move your Bluetooth device closer to the amplifier (within 30 feet).
10. Penyelenggaraan
Proper maintenance will ensure the longevity and optimal performance of your MM2000BT amplebih hidup:
- Pembersihan: Gunakan kain lembut dan kering untuk membersihkan bahagian luar unit. Jangan gunakan pembersih, pelarut atau lilin yang kasar.
- Pengudaraan: Regularly check that the ventilation grilles are free from dust and debris. A built-in fan helps maintain optimal operating temperature.
- Storan: Apabila tidak digunakan untuk tempoh yang lama, simpan amppenyangga di tempat yang sejuk dan kering jauh dari cahaya matahari langsung dan suhu yang melampau.
- Sambungan Kabel: Periodically check all cable connections for tightness and wear. Loose connections can lead to signal loss or intermittent issues.
11. Waranti dan Sokongan
Technical Pro products are designed for reliability and performance. For warranty information or technical support, please refer to the documentation included with your purchase or visit the official Technical Pro webtapak. Simpan resit pembelian anda sebagai bukti pembelian untuk sebarang tuntutan waranti.


