1. Pengenalan
This manual provides detailed instructions for the installation, operation, and maintenance of your Avision FL-1501B document scanner. Please read this manual thoroughly before using the scanner to ensure proper and safe operation. Keep this manual for future reference.

Figure 1: Avision FL-1501B Document Scanner with its automatic document feeder (ADF) and output tray extended.
2. Maklumat Keselamatan
Observe the following safety precautions to prevent damage to the scanner and ensure user safety:
- Gunakan hanya penyesuai kuasa yang dibekalkan bersama pengimbas.
- Jangan dedahkan pengimbas kepada air atau kelembapan berlebihan.
- Letakkan pengimbas di atas permukaan yang stabil dan rata.
- Elakkan menyekat bukaan pengudaraan.
- Do not attempt to disassemble or repair the scanner yourself. Refer to qualified service personnel.
- Jauhkan pengimbas daripada cahaya matahari langsung dan sumber haba.
3. Kandungan Pakej
Sahkan bahawa semua item terdapat dalam pakej:
- Avision FL-1501B Scanner Unit
- Penyesuai Kuasa
- Kabel USB
- Panduan Mula Pantas
- CD perisian (atau arahan muat turun)
4. Persediaan
4.1 Membongkar dan Meletakkan
- Keluarkan pengimbas dari pembungkusannya dengan berhati-hati.
- Tanggalkan semua pita pelindung dan bahan pembungkusan.
- Letakkan pengimbas di atas permukaan yang rata dan stabil dengan ruang yang mencukupi untuk penyuapan dan pengeluaran dokumen.

Figure 2: The Avision FL-1501B scanner in its closed position, suitable for storage or before extending trays.
4.2 Menyambung Pengimbas
- Connect the power adapter to the scanner's power input port and then to an electrical outlet.
- Connect the USB cable to the scanner's USB port and then to an available USB port on your computer.
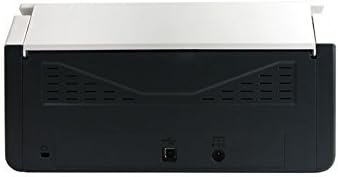
Figure 3: Rear panel of the scanner, illustrating the power input and USB connection ports.
4.3 Pemasangan Pemacu dan Perisian
Before using the scanner, you must install the necessary drivers and scanning software on your computer.
- Insert the provided Software CD into your computer's optical drive, or download the latest drivers and software from the official Avision webtapak.
- Follow the on-screen instructions to complete the installation process. It is recommended to install all bundled software for full functionality.
- Mulakan semula komputer anda jika digesa.
5. Operasi
5.1 Memuatkan Dokumen
- Extend the input tray and output tray of the scanner.
- Laraskan panduan kertas agar sepadan dengan lebar dokumen anda.
- Place the documents face down, top edge first, into the automatic document feeder (ADF). Ensure the stack is neatly aligned. The scanner supports a maximum input sheet capacity of 100 sheets.

Rajah 4: Pro sampinganfile of the scanner, showing the fully extended input and output trays ready for document feeding.
5.2 Menggunakan Panel Kawalan
The scanner features a control panel for quick access to common scanning functions.

Rajah 5: Terperinci view of the scanner's control panel, featuring a digital display, function selection buttons, Cancel, Scan, and Power buttons.
- Butang Kuasa: Press to turn the scanner on or off.
- Function Buttons (Up/Down Arrows): Use these to select different scanning profiles or functions displayed on the digital screen.
- Butang Imbas: Initiates the scanning process based on the currently selected function.
- Butang Batal: Stops the current scanning operation.
5.3 Melakukan Imbasan
- Ensure the scanner is powered on and connected to your computer.
- Load your documents into the ADF as described in section 5.1.
- Open the Avision scanning software on your computer (e.g., Button Manager, Capture Tool).
- Select your desired scanning settings (e.g., color mode, resolution, destination folder, single-sided/duplex).
- Click the "Scan" button in the software or press the Imbas button on the scanner's control panel to begin scanning.
- The scanned images will be processed and saved according to your software settings.
6. Penyelenggaraan
6.1 Membersihkan Pengimbas
Regular cleaning helps maintain optimal scanning performance.
- Turn off the scanner and disconnect the power cable before cleaning.
- Gunakan kain lembut yang tidak berbulu dampdicairkan dengan air atau pembersih lembut yang tidak kasar untuk mengelap bahagian luar pengimbas.
- To clean the glass platen (if applicable) and rollers, open the scanner cover. Use a specialized scanner cleaning kit or a soft cloth with isopropyl alcohol.
- Biarkan semua komponen kering sepenuhnya sebelum menyambung semula kuasa.
6.2 Kemas Kini Perisian Tegar
Periodically check the Avision website for firmware updates. Firmware updates can improve performance, add features, or resolve issues. Follow the instructions provided with the firmware update package carefully.
7. Penyelesaian masalah
Jika anda menghadapi masalah dengan pengimbas anda, rujuk masalah dan penyelesaian biasa berikut:
| Masalah | Kemungkinan Punca | Penyelesaian |
|---|---|---|
| Pengimbas tidak dihidupkan. | Kabel kuasa tidak disambungkan; salur keluar kuasa rosak. | Pastikan kabel kuasa disambungkan dengan selamat. Cuba salur keluar kuasa yang berbeza. |
| Computer does not detect scanner. | USB cable loose; drivers not installed or corrupted. | Periksa sambungan kabel USB. Pasang semula pemacu pengimbas. Cuba port USB yang lain. |
| Scanned images are blurry or streaky. | Scanner glass or rollers are dirty; document misfeed. | Clean the scanner's internal components (refer to Section 6.1). Ensure documents are loaded correctly. |
| Documents jam in the ADF. | Documents are wrinkled or stapled; paper guides not adjusted. | Straighten documents. Remove staples/clips. Adjust paper guides to fit document width. |
8. Spesifikasi
| Ciri | Perincian |
|---|---|
| Jenama | penglihatan |
| Model | FL-1501B |
| Jenis Pengimbas | Pengimbas Dokumen |
| Resolusi Pengimbas | 600 dpi |
| Kapasiti Helaian Input Maks | 100 helai |
| Jenis Media | kertas |
| Wattage | 24 watt |
| Dimensi Produk | 33 x 32.32 x 80.94 cm |
| Berat Barang | 5.67 kg |
| Tarikh Mula-mula Tersedia | 6 Jun 2016 |
9. Waranti dan Sokongan
9.1 Maklumat Waranti
Avision products are manufactured to high-quality standards. This product is covered by a limited warranty against defects in materials and workmanship. The specific terms and duration of the warranty may vary by region. Please refer to the warranty card included with your product or visit the official Avision weblaman web untuk maklumat jaminan terperinci.
9.2 Sokongan Teknikal
For technical assistance, driver downloads, or further information, please visit the official Avision support website or contact your local Avision service center. Contact details can typically be found on the Avision weblaman web atau dalam dokumentasi produk anda.


