1. Pengenalan
This manual provides essential instructions for the safe and efficient operation of your JVC LT-32EM75 32-inch 720p LED TV. Please read this manual thoroughly before using the television and retain it for future reference. Proper installation, setup, and maintenance are crucial for optimal performance and longevity of your device.
Maklumat Keselamatan Penting
- Jangan sekat bukaan pengudaraan. Pastikan ruang yang mencukupi di sekeliling TV untuk aliran udara yang betul.
- Jangan letakkan TV berhampiran sumber haba seperti radiator, daftar haba, dapur, atau radas lain (termasuk amppenghidup) yang menghasilkan haba.
- Lindungi kord kuasa daripada berjalan atau tersepit, terutamanya pada palam, bekas kemudahan dan tempat keluar dari radas.
- Hanya gunakan lampiran/aksesori yang ditentukan oleh pengilang.
- Cabut plag radas ini semasa ribut petir atau apabila tidak digunakan untuk tempoh yang lama.
- Rujuk semua servis kepada kakitangan perkhidmatan yang berkelayakan. Servis diperlukan apabila radas telah rosak dalam apa jua cara, seperti kord bekalan kuasa atau palam rosak, cecair telah tertumpah atau objek jatuh ke dalam radas, radas telah terdedah kepada hujan atau lembapan, tidak beroperasi seperti biasa. , atau telah digugurkan.
2. Kandungan Pakej
Sebelum meneruskan dengan persediaan, sila sahkan bahawa semua item yang disenaraikan di bawah disertakan dalam pakej anda:
- JVC LT-32EM75 32-inch 720p LED TV
- TV Stand (Base and Neck)
- Alat Kawalan Jauh
- Kord Kuasa
- Manual Pengguna (dokumen ini)
- Skru untuk Pemasangan Stand
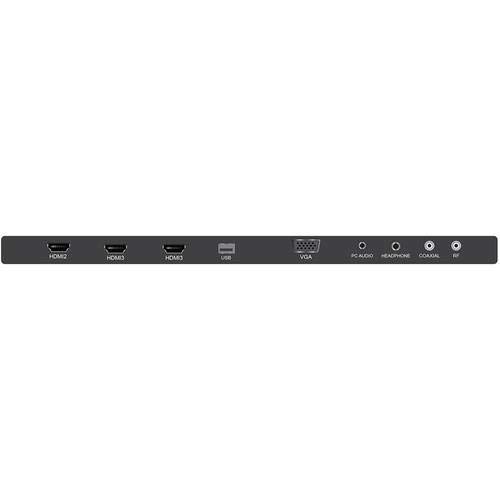
Figure 2.1: JVC LT-32EM75 32-inch 720p LED TV. This image shows the front view of the television with its stand.
3. Persediaan
3.1 Memasang Stand TV
- Letakkan skrin TV dengan berhati-hati pada permukaan yang lembut dan bersih untuk mengelakkan calar.
- Align the stand neck with the mounting holes on the bottom of the TV.
- Secure the stand neck to the TV using the provided screws.
- Attach the stand base to the stand neck, ensuring it clicks into place or is secured with screws if applicable.
- Angkat TV dengan berhati-hati dan letakkan pada permukaan yang stabil dan rata.
3.2 Menyambung Peranti Luaran
Your JVC LT-32EM75 TV features multiple input ports for connecting various devices. Ensure the TV is powered off before making any connections.

Rajah 3.1: Belakang view of the JVC LT-32EM75 TV showing input ports. This image illustrates the location of HDMI, USB, and other connection ports.
- Peranti HDMI: Connect up to three HDMI-enabled devices (e.g., Blu-ray player, game console, cable box) to the HDMI ports. Use high-quality HDMI cables for best picture and sound.
- Antena/Kabel: Connect an antenna or cable TV coaxial cable to the "ANT/CABLE" input for over-the-air or basic cable channels.
- Peranti USB: Insert a USB flash drive into the USB port to view photos or play compatible media files.
- Output Audio: Use the digital audio output (optical) or headphone jack to connect external audio systems or headphones.
3.3 Power Connection and Initial Scan
- Plug the power cord into the TV's power input, then into a standard electrical outlet (AC 120V, 60Hz).
- Press the Power button on the TV or remote control to turn on the TV.
- Follow the on-screen instructions to complete the initial setup, including language selection and channel scanning. This process will detect available channels from your antenna or cable connection.
4. Mengendalikan TV
4.1 Fungsi Kawalan Jauh
The included remote control allows you to access all TV functions. Ensure two AAA batteries are inserted with correct polarity.

Figure 4.1: JVC LT-32EM75 Remote Control. This image displays the layout of the remote control buttons, including power, volume, channel, input, and menu navigation.
- KUASA: Menghidupkan atau mematikan TV.
- MASUKKAN: Selects the input source (HDMI 1, HDMI 2, HDMI 3, TV, USB).
- VOL +/-: Melaraskan tahap kelantangan.
- CH +/-: Menukar saluran.
- MENU: Membuka menu utama untuk pelarasan tetapan.
- ARROW BUTTONS (Up/Down/Left/Right): Menavigasi melalui pilihan menu.
- MASUK/OK: Mengesahkan pilihan.
- KELUAR: Menutup menu semasa atau paparan pada skrin.
4.2 Operasi Asas
- Menukar Sumber Input: Tekan ke INPUT button on the remote repeatedly to cycle through available input sources, or press it once to bring up the input menu and select your desired source using the arrow buttons and MASUK.
- Melaraskan Tetapan Gambar: Tekan MENU, navigate to "Picture" settings. Here you can adjust Brightness, Contrast, Color, Tint, Sharpness, and select Picture Modes (e.g., Standard, Dynamic, Movie).
- Melaraskan Tetapan Bunyi: Tekan MENU, navigate to "Sound" settings. Options include Bass, Treble, Balance, and Sound Modes (e.g., Standard, Music, Movie). Note that the built-in speakers may have limitations in sound quality.
5. Penyelenggaraan
5.1 Membersihkan Skrin TV
- Sentiasa cabut plag TV sebelum membersihkan.
- Gunakan kain lembut dan bebas lin (cth, kain microfiber) untuk mengelap skrin perlahan-lahan.
- Untuk tanda degil, ringankan dampen kain dengan air atau pembersih skrin khusus. Jangan sekali-kali menyembur pembersih terus ke skrin.
- Avoid using abrasive cleaners, alcohol, benzene, or thinners, as these can damage the screen coating.
5.2 Membersihkan TV Casing
- Lap casing dengan kain lembut dan kering.
- Jika perlu, gunakan sedikit damp cloth. Do not allow water to enter the TV's interior.
6. Penyelesaian masalah
Sebelum menghubungi sokongan pelanggan, sila rujuk panduan penyelesaian masalah berikut untuk isu biasa.
| Masalah | Kemungkinan Punca | Penyelesaian |
|---|---|---|
| Tiada kuasa | Power cord not connected; Power outlet not working; TV is off. | Ensure power cord is securely plugged into TV and outlet. Test outlet with another device. Press the Power button on the TV or remote. |
| Tiada gambar, tetapi bunyi hadir | Sumber input yang salah dipilih; Peranti luaran tidak dihidupkan atau disambungkan dengan betul. | Tekan ke INPUT button to select the correct source. Check connections of external devices and ensure they are powered on. |
| Tiada bunyi, tetapi ada gambar | Volume is muted or too low; Incorrect audio output selected; External device audio issue. | Tekan VOL+ or unmute the TV. Check audio settings in the menu. Ensure external device audio settings are correct. |
| Alat kawalan jauh tidak berfungsi | Batteries are dead or incorrectly inserted; Obstruction between remote and TV; Remote sensor on TV is blocked. | Replace batteries with new ones, ensuring correct polarity. Remove any obstructions. Ensure the TV's remote sensor is clear. |
| Poor picture quality (e.g., blurry, grainy) | Weak antenna signal; Incorrect picture settings; Low-quality source material. | Adjust antenna position or check cable connection. Reset picture settings to default or adjust manually. Ensure source device is outputting high-quality signal. |
| Sound quality is not optimal | Built-in speaker limitations; Incorrect sound settings. | Adjust sound settings (Bass, Treble, Sound Mode) in the TV menu. Consider connecting external speakers or a soundbar for improved audio experience. |
7. Spesifikasi
| Ciri | Perincian |
|---|---|
| Nama Model | LT-32EM75 |
| Saiz Skrin | 32 Inci |
| Teknologi Paparan | LED |
| Resolusi | 720p |
| Kadar Segar Semula | 60 Hz |
| Teknologi Ketersambungan | HDMI |
| Port HDMI | 3 |
| Voltage | 120 Volt |
| Wattage | 45 watt |
| Berat Barang | 10 Paun (lebih kurang 4.5 kg) |
| Dimensi Produk (L x W x H) | 40 x 10 x 25 inci (dengan dirian) |
| Jenis Pemasangan | Lekap Meja |
8. Waranti dan Sokongan
8.1 Waranti Pengilang
This JVC LT-32EM75 television typically comes with a Waranti pengilang selama 1 tahun from the date of purchase. This warranty covers defects in materials and workmanship under normal use. Please retain your proof of purchase for warranty claims. For specific terms and conditions, refer to the warranty card included with your product or visit the official JVC support webtapak.
8.2 Sokongan Pelanggan
If you encounter issues not covered in the troubleshooting section or require further assistance, please contact JVC customer support. You can usually find contact information (phone number, email, or support website) on the official JVC webtapak atau dalam dokumentasi yang disediakan bersama TV anda.
Note: JVC does not sell extended warranties for this specific model.