pengenalan
Thank you for choosing the Peakeep Twin Bell Analog Alarm Clock. This classic-style alarm clock is designed to provide a loud, effective alarm for heavy sleepers, while also featuring a silent sweeping second hand for undisturbed rest. Its vintage design and clear 3D dial make it a functional and attractive addition to any room.

Imej: Depan view of the Peakeep 4 Inches Twin Bell Loud Alarm Clock in pink, showcasing its classic design and clear 3D dial.
Persediaan
1. Pemasangan Bateri
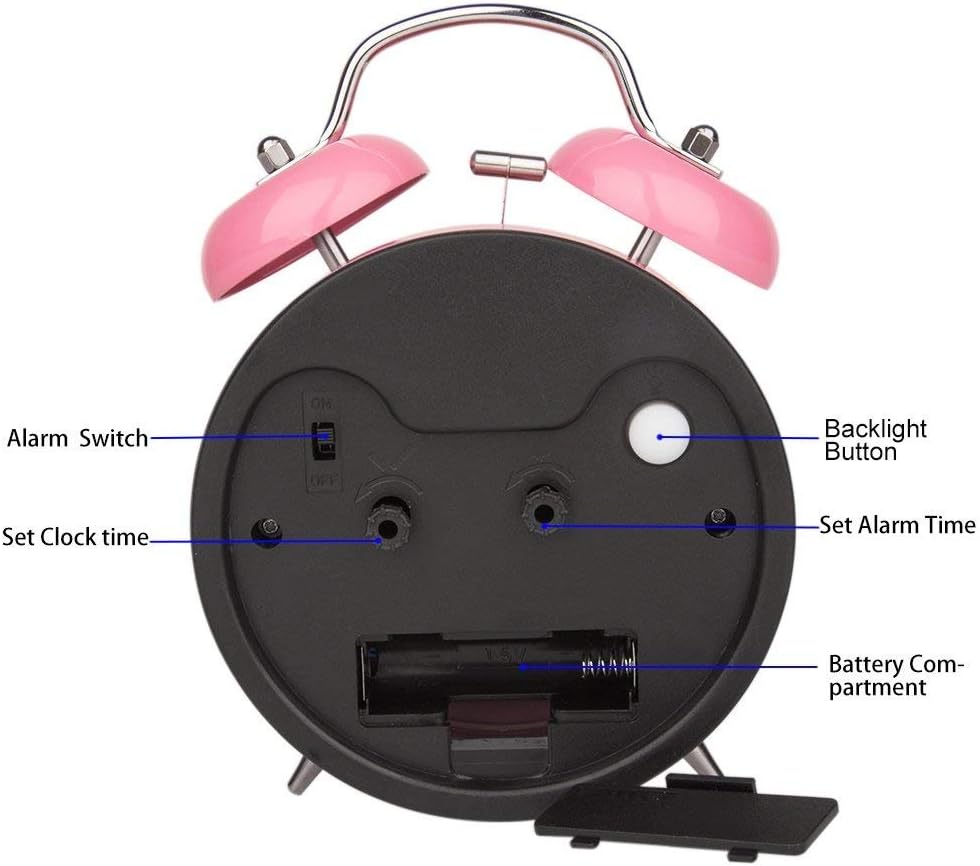
Your Peakeep alarm clock requires one (1) AA 1.5V battery (not included).
- Cari petak bateri di belakang jam.
- Buka penutup petak bateri.
- Insert one AA battery, ensuring the polarity (+ and -) matches the indicators inside the compartment.
- Tutup penutup petak bateri dengan selamat.
Imej: Belakang view of the alarm clock, highlighting the battery compartment for easy access and replacement.
2. Menetapkan Masa
Untuk menetapkan masa semasa:
- Locate the "Set Clock Time" knob on the back of the clock.
- Rotate this knob in the direction of the arrow until the hour and minute hands display the correct time.

Imej: Terperinci view of the back of the alarm clock, showing the "Set Clock Time" and "Set Alarm Time" knobs, and the "Alarm Switch".
3. Menetapkan Penggera
To set your desired alarm time:
- Locate the "Set Alarm Time" knob on the back of the clock.
- Rotate this knob in the direction of the arrow until the alarm hand points to your desired wake-up time.
- Ensure the "Alarm Switch" (ON/OFF toggle) is in the "ON" position for the alarm to activate.
Arahan Operasi
1. Fungsi Penggera
When the set alarm time is reached, the twin bells will ring loudly. This clock does not feature a snooze button. To turn off the alarm, simply move the "Alarm Switch" on the back of the clock to the "OFF" position.
2. Fungsi Lampu Belakang
For visibility in low-light conditions or at night, press the "Backlight Button" located on the back of the clock. The dial will illuminate, allowing you to easily read the time. Release the button to turn off the backlight.

Image: The alarm clock's face illuminated by the backlight, demonstrating its visibility in the dark.
3. Operasi Senyap
The clock features a silent sweeping second hand, ensuring no distracting "tick-tock" noise, promoting a peaceful sleeping environment.
Penyelenggaraan
1. Pembersihan
To maintain the appearance and functionality of your alarm clock, keep it away from damp environments. Wipe the exterior with a soft, dry cloth as needed. Avoid using harsh chemicals or abrasive cleaners.
2. Penjagaan Bateri
If the clock will not be used for an extended period, remove the AA battery to prevent potential leakage and damage to the clock's mechanism.
Menyelesaikan masalah
- Clock not keeping accurate time: Ensure the battery is fresh and correctly installed. Replace the battery if necessary.
- Penggera tidak berbunyi: Verify that the "Alarm Switch" on the back of the clock is in the "ON" position. Check if the alarm time is correctly set. Ensure the battery is not depleted.
- Lampu latar tidak berfungsi: Press the "Backlight Button" firmly. If it still doesn't work, replace the battery.
Spesifikasi
| Ciri | Perincian |
|---|---|
| Jenama | Peakeep |
| Nombor Model | MHP3122 |
| warna | Merah jambu |
| Jenis Paparan | Analog (3D Dial) |
| Gaya | Vintage |
| Ciri Khas | Loud Alarm, Silent Sweeping Second Hand, Backlight |
| Dimensi Produk | 4.5"W x 6.5"H |
| Sumber Kuasa | Dikuasakan oleh Bateri (1 bateri AA diperlukan, tidak termasuk) |
| bahan | Metal (Iron Frame) |
| Berat Barang | 5.1 auns |
| UPC | 700355113478 |

Image: The Peakeep alarm clock with its dimensions (4.5" W x 6.5" H) clearly indicated.
Waranti dan Sokongan
This Peakeep alarm clock comes with a manufacturer's warranty for 90 days from the date of purchase. For any product-related inquiries or support, please refer to the contact information provided in your product packaging or visit the official Peakeep webtapak.
A detailed user manual is included in the product packaging for further assistance.
Image: The product packaging, illustrating the included user manual and warranty card.