1. Pengenalan
Terima kasih kerana membeliasing the ONKYO FR-V7 Center Unit Amplifier. This manual provides essential information for the safe and efficient operation of your audio system. Please read it thoroughly before use and retain it for future reference. The FR-V7 integrates a CD player, MD player, and tuner into a single compact unit, designed to deliver high-quality audio when connected to external speakers.
2. Maklumat Keselamatan
Untuk memastikan operasi yang selamat dan mengelakkan kerosakan, patuhi langkah berjaga-jaga berikut:
- Bekalan Kuasa: Sambungkan unit hanya kepada saluran keluar AC voltage dinyatakan pada panel belakang.
- Pengudaraan: Ensure adequate ventilation. Do not block ventilation openings or place the unit on soft surfaces that may impede airflow.
- Air dan Kelembapan: Jangan dedahkan unit kepada hujan atau lembapan. Jangan letakkan objek yang diisi dengan cecair, seperti pasu, pada unit.
- Objek Asing: Do not insert any metal objects or flammable materials into the unit's openings.
- Servis: Jangan cuba servis unit sendiri. Rujuk semua servis kepada kakitangan perkhidmatan yang berkelayakan.
- penempatan: Letakkan unit di atas permukaan yang stabil dan rata, jauh daripada cahaya matahari langsung, sumber haba dan habuk atau getaran yang berlebihan.
3. Produk Lebihview
The ONKYO FR-V7 is a compact audio system designed for high-fidelity sound reproduction. It features a front-loading CD player, a MiniDisc (MD) player/recorder, and an AM/FM tuner. The unit serves as the central hub for your audio setup, requiring external speakers for sound output.
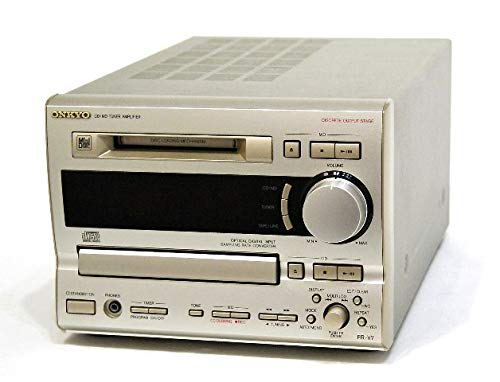
Rajah 3.1: Depan view of the ONKYO FR-V7 Center Unit Amplifier, showing the display, control buttons, and disc trays.
3.1 Kawalan Panel Hadapan
- Butang Kuasa: Menghidupkan atau mematikan unit.
- paparan: Shows current source, track information, and tuner frequency.
- Pemilih Sumber: Switches between CD, MD, Tuner, LINE 1, LINE 2, and TAPE inputs.
- Kawalan Kelantangan: Melaraskan tahap bunyi keseluruhan.
- CD Tray/MD Slot: For inserting CDs and MiniDiscs.
- Kawalan Main Semula: Play, Pause, Stop, Skip/Cari untuk CD and MD.
- Kawalan Penala: Tuning Up/Down, Preset selection.
3.2 Sambungan Panel Belakang
- Terminal Pembesar suara: Menyambung kepada pembesar suara pasif.
- LINE IN (1 & 2): Analog audio inputs for external devices (e.g., turntable pre-amp, auxiliary player).
- PITA MASUK/KELUAR: Analog audio input and output for a tape deck or other recording device.
- OPTICAL DIGITAL OUT: Digital audio output for connecting to a digital recorder or DAC.
- Terminal Antena FM/AM: For connecting radio antennas.
- Masuk Kuasa AC: Menyambung kepada bekalan kuasa utama.
4. Persediaan
4.1 Membongkar
- Carefully remove the FR-V7 unit and all accessories from the packaging.
- Simpan bahan pembungkusan untuk pengangkutan atau penyimpanan masa hadapan.
- Inspect the unit for any signs of damage. If damaged, contact your dealer.
4.2 Sambungan Pembesar suara
The FR-V7 requires external passive speakers. Ensure your speakers are compatible with the amplifier's output specifications.
- Locate the speaker terminals on the rear panel of the FR-V7.
- Connect the positive (+) terminal of the left speaker to the left (+) terminal on the FR-V7.
- Connect the negative (-) terminal of the left speaker to the left (-) terminal on the FR-V7.
- Repeat steps 2 and 3 for the right speaker.
- Ensure all connections are secure and that no bare speaker wire strands are touching each other or the unit's chassis, which could cause a short circuit.
4.3 Audio Component Connection
Sambungkan sumber audio luaran menggunakan kabel RCA.
- LINE IN 1/2: For connecting devices like a cassette deck, phono pre-amplifier, or another auxiliary audio source. Connect the RCA output cables from your device to the corresponding LINE IN jacks on the FR-V7.
- PITA MASUK/KELUAR: For connecting a tape recorder. Connect the TAPE OUT of your recorder to the TAPE IN of the FR-V7, and the TAPE IN of your recorder to the TAPE OUT of the FR-V7.
- OPTICAL DIGITAL OUT: If you wish to record the digital output of the CD or MD player, connect an optical cable from this port to the digital input of a compatible recording device.
4.4 Sambungan Antena
- Antena FM: Connect the supplied FM indoor antenna or an external FM antenna to the FM antenna terminal. For optimal reception, extend the wire fully.
- Antena AM: Connect the supplied AM loop antenna to the AM antenna terminals. Position the loop antenna for best reception.
4.5 Sambungan Kuasa
- Ensure all audio and speaker connections are made correctly.
- Plug the power cord into the AC power inlet on the rear of the FR-V7.
- Pasangkan hujung kord kuasa yang satu lagi ke soket dinding yang sesuai.
5. Arahan Operasi
5.1 Hidupkan/Mati Kuasa
Tekan ke KUASA button on the front panel to turn the unit on or off. The display will illuminate when the unit is powered on.
5.2 Pemilihan Sumber
Tekan ke SUMBER button repeatedly to cycle through the available input sources: CD, MD, TUNER, LINE 1, LINE 2, TAPE. The selected source will be indicated on the display.
5.3 Main Semula CD
- Tekan ke CD source button or select CD using the SUMBER butang.
- Tekan ke BUKA/TUTUP butang untuk membuka dulang CD.
- Letakkan CD dengan sisi label di atas ke dalam dulang.
- Tekan BUKA/TUTUP sekali lagi untuk menutup dulang.
- Tekan ke BERMAIN butang untuk memulakan main balik.
- guna JEDA, BERHENTI, SKIP (▶▶| / |◀◀), dan SEARCH (▶▶ / ◀◀) butang untuk mengawal main balik.
5.4 MD Playback and Recording
- Tekan ke MD source button or select MD using the SUMBER butang.
- Insert a MiniDisc into the MD slot with the arrow pointing inwards.
- Untuk Main Semula: Tekan ke BERMAIN button. Use playback controls similar to CD.
- Untuk Rakaman: Select the desired input source (e.g., CD, LINE 1). Insert a blank or erasable MD. Press the REC butang, kemudian tekan BERMAIN on the source device to begin recording. Refer to the display for recording status.
5.5 Operasi Penala
- Tekan ke TUNER source button or select TUNER using the SUMBER butang.
- Tekan ke BAND button to switch between FM and AM bands.
- Gunakan PENALAAN KE ATAS/KE BAWAH butang untuk menala secara manual ke stesen.
- Untuk mengimbas stesen secara automatik, tekan dan tahan butang PENALAAN KE ATAS/KE BAWAH butang.
- Stesen Pratetap: To store a station, tune to it, then press MEMORI followed by a preset number button. To recall a preset, press the corresponding preset number button.
5.6 Kawalan Kelantangan dan Nada
- Kelantangan: Putar JILID knob on the front panel to adjust the output level.
- Kawalan Nada: If available, use the BASS and TREBLE knobs (or menu options) to adjust the low and high frequency response.
6. Penyelenggaraan
6.1 Membersihkan Unit
- Sentiasa cabut kabel kuasa sebelum membersihkan.
- Gunakan kain lembut dan kering untuk mengelap permukaan luar.
- Untuk kotoran degil, ringankan dampen the cloth with a mild, non-abrasive cleaner. Do not use harsh chemicals or solvents.
- Elakkan menyembur cecair pembersih terus ke atas unit.
6.2 Disc Care (CD/MD)
- Pegang cakera di tepinya untuk mengelakkan cap jari pada permukaan mainan.
- Keep discs clean. Wipe them with a soft, lint-free cloth from the center outwards.
- Store discs in their cases when not in use to protect them from dust and scratches.
- Do not expose discs to direct sunlight or high temperatures.
7. Penyelesaian masalah
If you experience problems with your FR-V7, consult the following table before seeking professional service.
| Masalah | Kemungkinan Punca | Penyelesaian |
|---|---|---|
| Tiada kuasa | Kord kuasa diputuskan; Salur keluar kuasa rosak | Periksa sambungan kord kuasa; Cuba outlet lain |
| Tiada bunyi | Incorrect source selected; Volume too low; Speakers not connected; Speaker wires shorted | Select correct source; Increase volume; Check speaker connections; Ensure no bare wires are touching |
| CD/MD does not play | Cakera dimasukkan dengan salah; Cakera kotor atau tercalar; Format cakera tidak disokong | Reinsert disc correctly; Clean or replace disc; Ensure disc is standard audio CD/MD |
| Penerimaan radio yang lemah | Antenna not connected or poorly positioned | Connect antenna securely; Adjust antenna position for best reception |
8. Spesifikasi
Spesifikasi tertakluk kepada perubahan tanpa notis untuk penambahbaikan.
- model: FR-V7
- Fungsi: CD Player, MD Player/Recorder, AM/FM Tuner, Amplebih hidup
- Terminal Input:
- LINE Input: 2 systems (RCA)
- TAPE Input: 1 system (RCA)
- Terminal Keluaran:
- Speaker Output: 1 system (Stereo, binding post type)
- TAPE Output: 1 system (RCA)
- Optical Digital Output: 1 system
- Dimensi (W x H x D): Kira-kira 40.7 x 16.7 x 23 cm (16.0 x 6.6 x 9.1 inci)
- Berat: Kira-kira 5.52 kg (12.17 lbs)
- Keperluan Kuasa: AC 100V, 50/60Hz (Japan model)
9. Waranti dan Sokongan
ONKYO products are manufactured to high quality standards. For warranty information, please refer to the warranty card included with your purchase or contact your local ONKYO dealer. For technical support or service inquiries, please visit the official ONKYO webtapak atau hubungi bahagian perkhidmatan pelanggan mereka.
ONKYO Official Webtapak: www.onkyo.com


