Arahan Keselamatan Penting
Please read these instructions carefully before operating your ONKYO A-912 Integrated Amppengikat. Simpan manual ini untuk rujukan masa hadapan.
- Sumber Kuasa: Sambungkan unit hanya kepada sumber kuasa AC bagi volumtage ditunjukkan pada panel belakang.
- Pengudaraan: Ensure adequate ventilation. Do not block ventilation openings. Allow sufficient space around the unit for proper airflow.
- Air dan Kelembapan: Jangan dedahkan unit kepada hujan, lembapan, titisan atau percikan. Jangan letakkan objek yang diisi dengan cecair, seperti pasu, pada unit.
- haba: Jangan letakkan unit berhampiran sumber haba seperti radiator, daftar haba, dapur, atau radas lain (termasuk amppenghidup) yang menghasilkan haba.
- Servis: Jangan cuba servis produk ini sendiri. Rujuk semua perkhidmatan kepada pegawai perkhidmatan yang berkelayakan.
- Pembersihan: Cabut palam unit dari salur keluar dinding sebelum membersihkan. Gunakan kain kering untuk pembersihan.
Kandungan Pakej
Sahkan bahawa pakej anda mengandungi item berikut:
- ONKYO A-912 Bersepadu AmpUnit penguat
- Kord Kuasa AC
- Manual Pengguna (dokumen ini)
Kawalan Panel Hadapan
The front panel provides access to essential controls for operating your amplebih hidup.

Imej: Depan view of the ONKYO A-912 Integrated Amplifier. This image displays the power button, input selector, volume control, tone adjustments, and headphone jack.
- Butang Kuasa: Berpusing amphidup atau mati.
- Pemilih Input: Allows you to choose the audio source (e.g., CD, Tuner, Line, Phono).
- Kawalan Kelantangan: Melaraskan volum keluaran keseluruhan.
- Kawalan Bass/Treble: Melaraskan tindak balas frekuensi rendah dan tinggi.
- Kawalan Baki: Melaraskan keseimbangan saluran kiri/kanan.
- Jack fon kepala: Untuk menyambungkan fon kepala.
Sambungan Panel Belakang
Panel belakang menempatkan semua terminal input dan output untuk menyambungkan komponen audio anda.
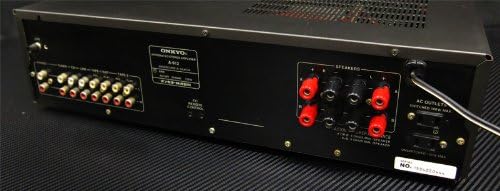
Imej: Belakang view of the ONKYO A-912 Integrated Amplifier. This image shows the speaker terminals, various RCA input jacks (CD, Tuner, Line, Phono), and the AC power inlet.
- Terminal Pembesar suara: Connect your passive speakers here. Ensure correct polarity (+ to + and - to -).
- Input Jacks (CD, Tuner, Line, Phono): Connect your audio source components using RCA cables. The Phono input is specifically for turntables.
- Terminal Darat: For connecting the ground wire from a turntable, if applicable.
- Masuk AC: Connect the supplied AC power cord here.
Panduan Persediaan
1. Sambungan Pembesar Suara
Connect your speakers to the speaker terminals on the rear panel. Ensure that the positive (+) terminal on the amplifier connects to the positive (+) terminal on the speaker, and the negative (-) terminal on the amplifier connects to the negative (-) terminal on the speaker. Use high-quality speaker wire for optimal sound.
2. Audio Component Connection
Connect your audio source components (e.g., CD player, tuner, turntable) to the corresponding input jacks on the rear panel using RCA audio cables. For a turntable, connect it to the 'Phono' input and ensure the ground wire (if present) is connected to the ampterminal tanah liifier.
3. Sambungan Kuasa
Once all audio connections are made, connect the supplied AC power cord to the AC inlet on the amplifier's rear panel, then plug the other end into a wall outlet.
Arahan Operasi
Menghidupkan/Mematikan
Press the Power button on the front panel to turn the amplifier on or off. The power indicator will illuminate when the unit is on.
Memilih Sumber Input
Rotate the Input Selector knob on the front panel to choose the desired audio source (e.g., CD, Tuner, Line, Phono) that you have connected.
Melaraskan Kelantangan
Turn the large Volume control knob clockwise to increase the volume and counter-clockwise to decrease it.
Menggunakan Kawalan Nada
Use the Bass and Treble knobs to fine-tune the low and high frequencies of the audio output to your preference. The Balance knob adjusts the relative volume between the left and right speakers.
Penggunaan Fon Kepala
Plug your headphones into the Headphone Jack on the front panel. This will typically mute the main speaker output.
Penjagaan dan Penyelenggaraan
- Pembersihan: Lap unit dengan kain lembut dan kering. Jangan gunakan pembersih yang melelas, lilin atau pelarut.
- Pengudaraan: Ensure that the ventilation openings are not blocked by dust or debris. Periodically clean them if necessary.
- Storan: Jika menyimpan unit untuk tempoh yang lama, cabut plagnya dari soket kuasa dan tutupnya untuk melindungi daripada habuk.
Menyelesaikan masalah
Jika anda mengalami masalah dengan anda amplifier, refer to the following table for possible causes and solutions.
| Masalah | Kemungkinan Punca | Penyelesaian |
|---|---|---|
| Tiada kuasa | Kord kuasa tidak disambungkan; Saluran keluar dinding tidak aktif | Ensure power cord is securely plugged in; Check wall outlet with another device. |
| Tiada bunyi | Incorrect input selected; Speaker wires loose; Volume too low; Headphones connected | Select correct input source; Check speaker connections; Increase volume; Disconnect headphones. |
| Bunyi herot | Source component issue; Speaker impedance mismatch; Volume too high | Check source component; Ensure speakers match amplifier impedance; Reduce volume. |
| Bunyi bising | Ground loop; Loose connections; Nearby interference | Ensure proper grounding for turntable; Check all cable connections; Move unit away from other electronic devices. |
Spesifikasi
- Jenama: Onkyo
- model: A-912
- Pengeluar: Onkyo
- Dimensi Pakej: 45.5 x 35 x 14.9 cm
- Berat Barang: 7.19 kg
- Bateri Diperlukan: Tidak
- ASIN: B00FRBU74G
- Tarikh Pertama Tersedia: 10 Oktober 2013
Waranti dan Sokongan Pelanggan
For warranty information or technical assistance, please refer to the warranty card included with your product or visit the official Onkyo webtapak. Simpan resit pembelian anda sebagai bukti pembelian untuk tuntutan waranti.


