1. Pengenalan
This manual provides detailed instructions for the safe and efficient operation of your Vivitek Qumi Q5 Pocket DLP Projector. Please read this manual thoroughly before using the projector and retain it for future reference. The Vivitek Qumi Q5 is a compact, high-definition LED projector designed for portability and versatility, featuring 500 lumens brightness, WXGA resolution, and various connectivity options.
2. Maklumat Keselamatan Penting
Patuhi langkah berjaga-jaga keselamatan berikut untuk mengelakkan kerosakan pada projektor dan memastikan keselamatan pengguna:
- Jangan halang bukaan pengudaraan. Pastikan aliran udara yang mencukupi di sekitar projektor.
- Jangan lihat terus ke dalam kanta projektor apabila lamp sedang dihidupkan. Cahaya terang boleh menyebabkan kerosakan mata.
- Gunakan hanya penyesuai kuasa yang dibekalkan dengan projektor.
- Jangan dedahkan projektor kepada hujan atau kelembapan untuk mengurangkan risiko kebakaran atau renjatan elektrik.
- Letakkan projektor pada permukaan yang stabil dan rata.
- Cabut plag projektor daripada salur keluar kuasa sebelum membersihkan atau apabila tidak digunakan untuk tempoh yang lama.
- Rujuk semua servis kepada kakitangan perkhidmatan yang berkelayakan.
3. Kandungan Pakej
Sahkan bahawa semua item yang disenaraikan di bawah disertakan dalam pakej anda:
- Vivitek Qumi Q5 Projector
- Penyesuai Kuasa
- Universal I/O to VGA Cable
- Kabel HDMI
- 3.5mm AV-in Cable
- Beg Bawa
- Alat Kawalan Jauh
- Panduan Mula Pantas
- Kad Waranti
4. Produk Lebihview
Familiarize yourself with the various components and features of your Vivitek Qumi Q5 projector.
4.1 Depan View

Imej 4.1: Depan view of the Vivitek Qumi Q5 projector, showing the lens and ventilation grilles.
The front of the projector features the projection lens and air vents for cooling. Ensure these vents are not obstructed during operation.
4.2 Atas View

Imej 4.2: Atas view of the Vivitek Qumi Q5 projector, highlighting the touch-sensitive control panel.
The top panel includes touch-sensitive controls for navigation and menu selection. The "Qumi" logo is also visible.
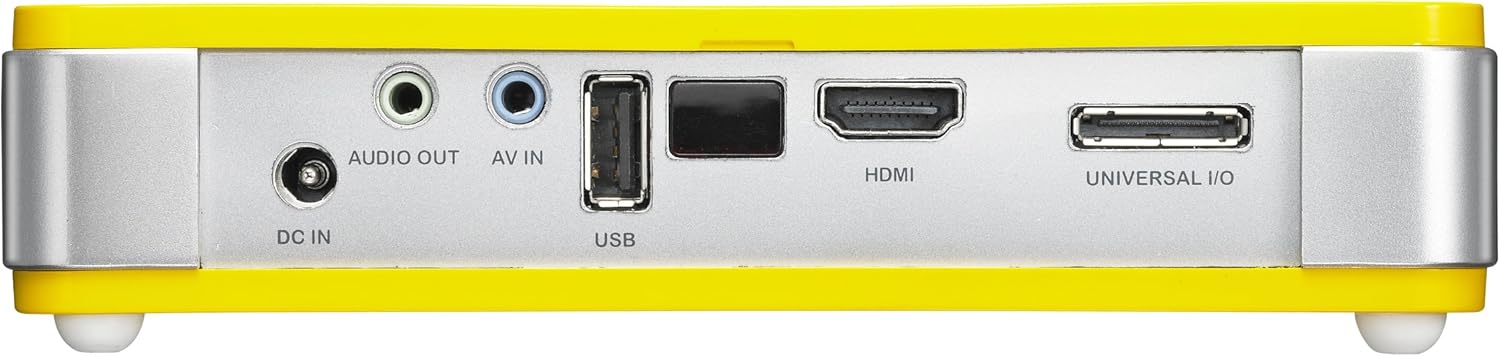
4.3 Belakang View (Pelabuhan Kesambungan)

Imej 4.3: belakang view of the Vivitek Qumi Q5 projector, displaying all input and output ports.
The rear panel houses all essential connectivity ports:
- DC DALAM: Untuk menyambungkan penyesuai kuasa.
- AUDIO KELUAR: 3.5mm jack for external speakers or headphones.
- AV DI: 3.5mm jack for composite video and stereo audio input.
- USB: Untuk menyambungkan peranti storan USB.
- HDMI: High-Definition Multimedia Interface for digital video and audio input.
- UNIVERSAL I/O: Multi-purpose port for VGA and other analog inputs via adapter.
5. Persediaan
Follow these steps to set up your Vivitek Qumi Q5 projector.
5.1 Powering On the Projector
- Sambungkan penyesuai kuasa ke DC IN port pada projektor.
- Palamkan penyesuai kuasa ke salur keluar dinding.
- Tekan butang kuasa pada projektor atau alat kawalan jauh untuk menghidupkan peranti. Lampu penunjuk kuasa akan menyala.
5.2 Menyambungkan Sumber Input
The Qumi Q5 supports various input sources:
- HDMI: Sambungkan kabel HDMI daripada peranti sumber anda (cth., komputer riba, pemain Blu-ray) ke HDMI port pada projektor.
- VGA: Use the supplied Universal I/O to VGA cable to connect your computer's VGA output to the UNIVERSAL I/O pelabuhan.
- AV (Composite): Use the supplied 3.5mm AV-in cable to connect composite video and stereo audio devices to the AV IN pelabuhan.
- USB: Masukkan pemacu kilat USB ke dalam USB port to play media files secara langsung.
- Wayarles (Pilihan): If using an optional WiFi USB dongle, insert it into the USB port for wireless connectivity. Refer to the dongle's instructions for setup.
5.3 Melaraskan Fokus
Locate the focus wheel on the side of the projector. Rotate the wheel until the projected image appears sharp and clear on your screen or wall.
Imej 5.3: sebelah view of the Vivitek Qumi Q5, indicating the location of the focus adjustment wheel.
6. Mengendalikan Projektor
6.1 Menavigasi Menu
Use the touch-sensitive buttons on the top panel or the remote control to navigate the projector's on-screen display (OSD) menu. The menu allows you to adjust image settings, input sources, and other system configurations.
6.2 Memilih Sumber Input
Press the "Source" button on the remote control or navigate through the OSD menu to select the desired input source (HDMI, VGA, AV, USB, or Wireless).
6.3 Image Adjustments
Within the OSD menu, you can adjust various image parameters:
- Kecerahan/Kontras: Adjust for optimal image visibility.
- Warna/Warna: Fine-tune color reproduction.
- Nisbah Aspek: Select between 4:3, 16:9, or other available ratios to match your content.
- Pembetulan Keystone: Correct trapezoidal distortion if the projector is not perfectly perpendicular to the screen.
6.4 Playing Media from USB
When a USB drive is inserted, the projector's media player interface will typically launch automatically. You can browse and play supported video, audio, and image files terus dari pemacu USB.
6.5 Fungsi 3D
The Qumi Q5 is 3D-ready via DLP Link technology. To view 3D content, you will need compatible 3D source material, a 3D-capable player, and active DLP Link 3D glasses (sold separately).
7. Penyelenggaraan
Penyelenggaraan yang betul memastikan jangka hayat dan prestasi optimum projektor anda.
7.1 Membersihkan Projektor
- Luaran: Gunakan kain lembut dan tidak berbulu sedikit dampdisapu dengan air atau larutan pembersih lembut. Jangan gunakan pembersih atau pelarut yang melelas.
- Kanta: Gently wipe the lens with a lens cleaning cloth or lens paper. Avoid touching the lens surface with your fingers.
- Pengudaraan: Use a soft brush or compressed air to clear dust from the ventilation openings.
7.2 Sumber Cahaya LED
The Qumi Q5 utilizes an LED light source with an estimated operational life of up to 30,000 hours, significantly reducing the need for lamp penggantian berbanding projektor tradisional.
7.3 Penyimpanan
When not in use for extended periods, store the projector in its carrying pouch in a cool, dry place, away from direct sunlight and extreme temperatures.
8. Penyelesaian masalah
Rujuk bahagian ini untuk penyelesaian kepada isu biasa yang mungkin anda hadapi.
| Masalah | Kemungkinan Punca | Penyelesaian |
|---|---|---|
| Tiada imej dipaparkan. |
|
|
| Imej kabur. |
|
|
| Tiada audio. |
|
|
| Projektor terlalu panas atau mati. |
|
|
9. Spesifikasi
Key technical specifications for the Vivitek Qumi Q5 projector:
- model: Qumi Q5
- Teknologi Paparan: DLP Pico chipset
- Resolusi Asli: WXGA (1280 x 720)
- Kecerahan: Sehingga Lumens 500
- Sumber Cahaya: LED (Estimated 30,000 hours operation)
- Ketersambungan: HDMI, Universal I/O (VGA), AV mini-jack, USB, Audio-out mini-jack, Wireless (via optional USB dongle)
- Memori Dalaman: 4GB
- Sedia 3D: Yes, via DLP Link
- Dimensi: 4 x 6.3 x 1.3 inci (10.16 x 16.00 x 3.30 cm)
- Berat: 1.1 paun (0.5 kg)
- Bekalan Kuasa: Penyesuai Kuasa Luaran
10. Waranti dan Sokongan
Your Vivitek Qumi Q5 projector is covered by a limited warranty. Please refer to the included Warranty Card for specific terms and conditions, including warranty period and coverage details. For technical support, service, or further inquiries, please visit the official Vivitek webtapak atau hubungi bahagian perkhidmatan pelanggan mereka. Simpan resit pembelian anda sebagai bukti pembelian untuk tuntutan waranti.


