1. Pengenalan
This manual provides instructions for the safe and effective operation of the Voltcraft VC155 Digital Hand-held Multimeter. The VC155 is designed for measuring and displaying electrical parameters within the CAT III 600V category. It offers functions for measuring direct and alternating voltage, resistance, acoustic continuity, diode testing, non-contact 230V/AC voltage testing, electric current (10A, mA, µA), and K-type temperature measurement.
Please read this manual thoroughly before using the device to ensure proper handling and to prevent potential hazards.
2. Maklumat Keselamatan
Observe all safety precautions to prevent electric shock, injury, or damage to the meter or the equipment under test.
- The device is rated for Measurement Category CAT III 600V. Do not exceed these limits.
- Always ensure the test leads are in good condition and properly connected before making measurements.
- Jangan cuba mengukur voltage or current on circuits exceeding the specified maximum input values.
- The two measuring inputs are secured against overload. The voltage in the measuring circuit must not exceed 600V.
- This digital multimeter is equipped with ceramic high-performance fuses for protection. Do not bypass or use incorrect fuses.
- Only operate the device with a 9V block battery. Ensure correct polarity during installation.
- Do not use the meter if it appears damaged or if the battery cover is not properly closed.
- Avoid working alone when performing high-voltage ukuran.
- Simpan tangan dan jari di belakang penghalang probe semasa pengukuran.
3. Ciri dan Komponen Produk

Rajah 3.1: Depan view of the Voltcraft VC155 Digital Multimeter with connected test leads.

Rajah 3.2: Sisi view of the Voltcraft VC155 Digital Multimeter with its integrated kickstand extended for hands-free operation.
Ciri-ciri Utama:
- paparan: 2000 counts digital display.
- Julat Pengukuran: Manual range selection.
- Fungsi Tahan: Freezes the displayed measurement value.
- Fungsi lampu latar: Illuminates the display for use in low-light conditions.
- Fungsi Obor: Integrated flashlight for illuminating the work area.
- Vol. Bukan KenalantagUjian e (NCV): Mengesan AC voltage tanpa sentuhan langsung.
- Reka Bentuk Teguh: 2-component housing with soft rubber protection for durability and grip.
Komponen:
- Paparan LCD: Shows measurement values, units, and function indicators.
- Butang TAHAN: Toggles data hold function.
- BACK LIGHT Button: Activates/deactivates display backlight and torch.
- Suis Putar: Selects measurement functions and ranges.
- Bicu Input COM: Input biasa (negatif) untuk semua ukuran.
- VΩmAµA Input Jack: Input positif untuk voltage, rintangan, diod, kesinambungan dan ukuran arus kecil.
- 10A max Input Jack: Positive input for high current (up to 10A) measurements.
- Vol. Bukan Kenalantage (NCV) Sensor: Located at the top of the meter.
4. Persediaan
4.1 Pemasangan Bateri
The Voltcraft VC155 requires one 9V block battery for operation. The battery is included with the device.
- Pastikan multimeter dimatikan.
- Cari petak bateri di bahagian belakang peranti.
- Tanggalkan skru penahan dan tanggalkan penutup bateri.
- Connect the 9V battery to the battery clips, observing correct polarity (+ and -).
- Letakkan bateri ke dalam petak dan gantikan penutup, selamatkannya dengan skru.
4.2 Sambungan Plumbum Ujian
Sambungan petunjuk ujian yang betul adalah penting untuk pengukuran yang tepat dan selamat.
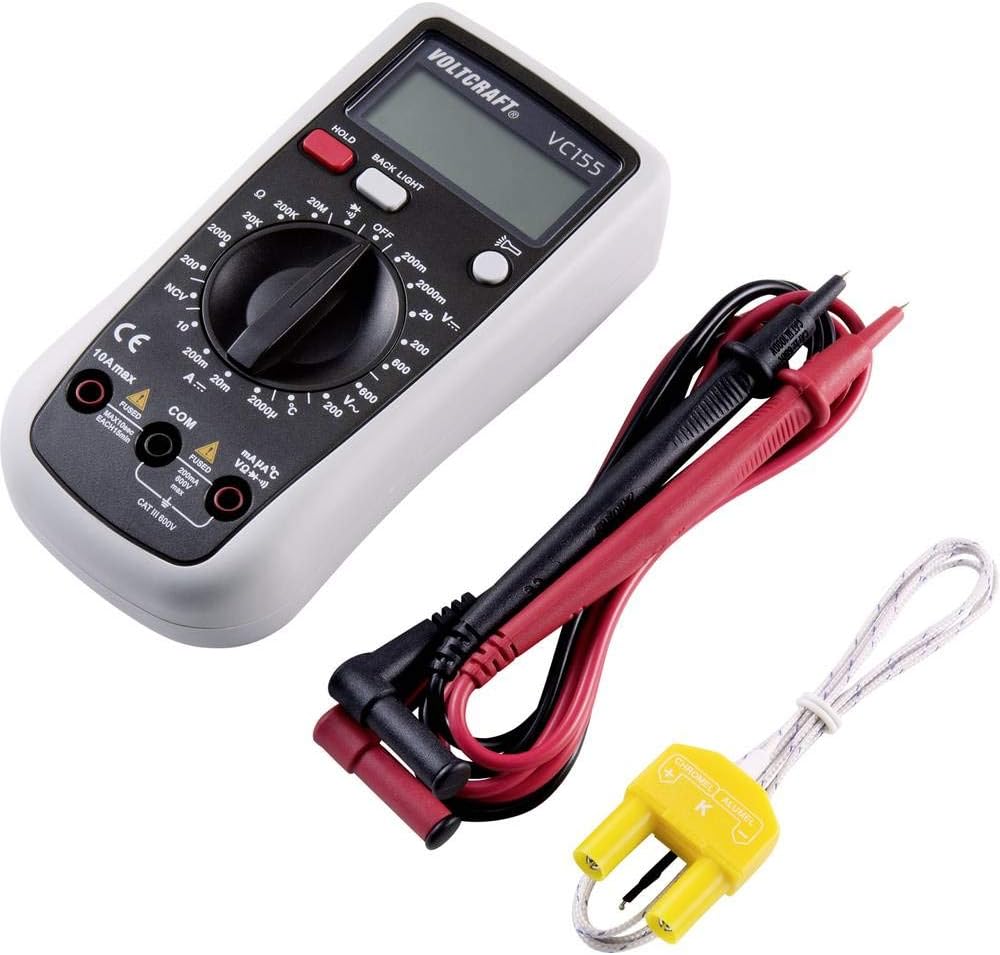
Figure 4.1: Voltcraft VC155 Multimeter showing connected test leads and the K-type temperature sensor.
- Sentiasa sambungkan hitam ujian membawa kepada COM bicu input.
- Untuk voltage, resistance, diode, continuity, and small current (mA/µA) measurements, connect the merah ujian membawa kepada VΩmAµA bicu input.
- For high current (up to 10A) measurements, connect the merah ujian membawa kepada 10A maks bicu input.
- Ensure connections are firm and secure.
4.3 Temperature Sensor Connection
To measure temperature, use the provided K-type temperature sensor.
- Connect the K-type temperature sensor's plug into the VΩmAµA dan COM input jacks, observing polarity (positive to VΩmAµA, negative to COM).
5. Arahan Operasi
Turn the rotary switch to the desired function to power on the multimeter. Turn it to the "OFF" position to power off.
5.1 DC Jldtage Pengukuran (V=)
- Set the rotary switch to the desired "V=" range (e.g., 200mV, 2V, 20V, 200V, 600V).
- Sambungkan plumbum ujian merah ke VΩmAµA bicu dan petunjuk ujian hitam ke COM jek.
- Sambungkan kuar ujian secara selari merentasi komponen atau litar yang hendak diukur.
- Baca voltagnilai e pada paparan.
5.2 AC Jldtage Pengukuran (V~)
- Set the rotary switch to the desired "V~" range (e.g., 200V, 600V).
- Sambungkan plumbum ujian merah ke VΩmAµA bicu dan petunjuk ujian hitam ke COM jek.
- Sambungkan kuar ujian secara selari merentasi vol ACtage sumber.
- Baca voltagnilai e pada paparan.
5.3 Pengukuran Arus DC (A=)
- PERHATIAN: Jangan sekali-kali sambungkan meter secara selari dengan voltantage sumber semasa mengukur arus. Ini boleh meniup fius atau merosakkan meter.
- Set the rotary switch to the desired "A=" range (e.g., 200µA, 2mA, 20mA, 200mA, 10A).
- For µA/mA ranges, connect the red test lead to the VΩmAµA jack. For 10A range, connect the red test lead to the 10A maks jack. Connect the black test lead to the COM jek.
- Buka litar di mana arus akan diukur dan sambungkan meter secara bersiri.
- Baca nilai semasa pada paparan.
5.4 Pengukuran Rintangan (Ω)
- Set the rotary switch to the desired "Ω" range (e.g., 200Ω, 2kΩ, 20kΩ, 200kΩ, 2MΩ, 20MΩ).
- Sambungkan plumbum ujian merah ke VΩmAµA bicu dan petunjuk ujian hitam ke COM jek.
- Pastikan litar atau komponen dinyahtenagakan sebelum mengukur rintangan.
- Sambungkan kuar ujian merentasi komponen.
- Baca nilai rintangan pada paparan.
5.5 Ujian Kesinambungan (•))))
- Set the rotary switch to the "•)))" position.
- Sambungkan plumbum ujian merah ke VΩmAµA bicu dan petunjuk ujian hitam ke COM jek.
- Pastikan litar dinyahtenagakan.
- Sambungkan kuar ujian merentasi litar atau komponen.
- If continuity exists (resistance below approximately 50Ω), the buzzer will sound. The display will show the resistance value.
5.6 Ujian Diod (→|)
- Set the rotary switch to the "→|" position.
- Sambungkan plumbum ujian merah ke VΩmAµA bicu dan petunjuk ujian hitam ke COM jek.
- Pastikan diod dicabut dari litar.
- Sambungkan kuar merah ke anod dan kuar hitam ke katod diod. Paparan akan menunjukkan vol ke hadapantage penurunan.
- Balikkan kuar. Paparan harus menunjukkan "OL" (Gelung Terbuka) untuk diod yang baik.
5.7 Bukan Kenalan Voltage (NCV) Test
- Tetapkan suis putar ke kedudukan "NCV".
- Hold the top of the multimeter near an AC voltage sumber (cth, wayar hidup atau alur keluar).
- Meter akan mengeluarkan bunyi bip dan penunjuk NCV akan menyala jika volum ACtage dikesan.
5.8 Pengukuran Suhu (°C/°F)
- Set the rotary switch to the "°C" or "°F" position.
- Connect the K-type temperature sensor to the VΩmAµA dan COM jek.
- Place the tip of the temperature sensor on or near the object whose temperature is to be measured.
- Baca nilai suhu pada paparan.
5.9 Fungsi HOLD
- Tekan ke TAHAN button during a measurement to freeze the current reading on the display.
- Tekan ke TAHAN butang sekali lagi untuk melepaskan bacaan dan kembali kepada pengukuran langsung.
5.10 Backlight and Torch Function
- Tekan ke LAMPU BELAKANG button to activate the display backlight.
- Tekan dan tahan butang LAMPU BELAKANG button to activate the integrated torch.
- Tekan ke LAMPU BELAKANG button again to turn off the backlight or torch.
6. Penyelenggaraan
6.1 Pembersihan
- Turn off the meter and disconnect all test leads before cleaning.
- Lap kes dengan iklanamp cloth and a mild detergent. Do not use abrasives or solvents.
- Ensure no moisture enters the meter's casing.
6.2 Penggantian Bateri
When the battery symbol appears on the display, the 9V battery needs to be replaced.
- Turn off the meter and disconnect all test leads.
- Unscrew the retaining screw(s) on the battery compartment cover on the rear of the device.
- Remove the old battery and replace it with a new 9V block battery, observing correct polarity.
- Gantikan penutup bateri dan kencangkannya dengan skru.
6.3 Penggantian Fius
The current input jacks are protected by ceramic high-performance fuses. If the meter fails to measure current, the fuse may need replacement. Fuse replacement should only be performed by qualified personnel.
- Sekering: F1: F 200mA/250V, F2: F 10A/250V (specific fuse ratings are typically printed near the fuse holder or in a more detailed service manual).
- Always replace with fuses of the exact same type and rating.
7. Penyelesaian masalah
| Masalah | Kemungkinan Punca | Penyelesaian |
|---|---|---|
| Tiada paparan atau paparan malap | Bateri mati atau lemah. | Ganti bateri 9V. |
| Bacaan yang salah | Incorrect function/range selected; poor test lead connection; damaged test leads. | Verify function and range; ensure secure connections; inspect and replace damaged leads. |
| Cannot measure current | Blown fuse in the current input circuit. | Gantikan fius yang sesuai (rujuk Bahagian 6.3). |
| "OL" (Lebihan) dipaparkan | Measurement exceeds the selected range; open circuit (for resistance/continuity). | Select a higher range; check for open circuits or proper connection. |
8. Spesifikasi
| Parameter | Nilai |
|---|---|
| Paparan | 2000 kiraan |
| Kategori Pengukuran | CAT III 600V |
| DC Voltage (V=) | Ranges: 200mV, 2V, 20V, 200V, 600V; Basic Accuracy: 0.5% |
| Vol. ACtage (V~) | Ranges: 200V, 600V; Basic Accuracy: 0.1V ~600V AC reading range |
| DC Current (A=) | Ranges: 200µA, 2mA, 20mA, 200mA, 10A |
| Rintangan (Ω) | Ranges: 200Ω, 2kΩ, 20kΩ, 200kΩ, 2MΩ, 20MΩ; 10MΩ DC resistance, 4.5MΩ AC resistance |
| Ujian Kesinambungan | Audible buzzer below approx. 50Ω |
| Ujian Diod | ya |
| Vol. Bukan Kenalantage (NCV) | Yes (230V/AC test) |
| Pengukuran Suhu | K-type sensor input |
| Sumber Kuasa | 1 x 9V block battery (included) |
| Dimensi (L x W x H) | 5.91 x 2.95 x 1.5 inci (15.0 x 7.5 x 3.8 cm) |
| Berat badan | 7.1 auns (200 gram) |
9. Waranti dan Sokongan
Voltcraft products are manufactured to high-quality standards and are subject to strict quality controls. For information regarding warranty terms, technical support, or service, please refer to the documentation provided with your purchase or contact your local Voltcraft dealer or customer service center.
You can also visit the official Voltcraft website for further assistance and product information.


