pengenalan
This manual provides detailed instructions for the operation and maintenance of your Eton Grundig G2 AM/FM/Shortwave Radio Recorder. Please read this manual thoroughly before using the device to ensure proper function and longevity.
Kandungan Pakej
Sahkan bahawa semua item terdapat dalam pakej:
- Eton Grundig G2 Radio Recorder
- Kord Kuasa
- Bateri boleh dicas semula
- Manual Pengguna (dokumen ini)
Produk Selesaiview
Familiarize yourself with the various components and controls of your Grundig G2 radio.

Figure 1: Front Panel Controls and Display. This image shows the front of the Eton Grundig G2 radio, highlighting the LCD display, dual speakers, numeric keypad, and various function buttons for power, volume, tuning, and mode selection.

Figure 2: Portable Use Example. The radio is shown being held by two hands, demonstrating its compact and portable design suitable for use in various environments, such as outdoor events.

Figure 3: Rear Panel and Battery Compartment. This image displays the back of the radio, including the battery cover, product information, and ventilation grilles.

Figure 4: Top Panel with Micro SD Slot. A close-up of the top edge of the radio, showing the Micro SD card slot for media playback and recording storage.
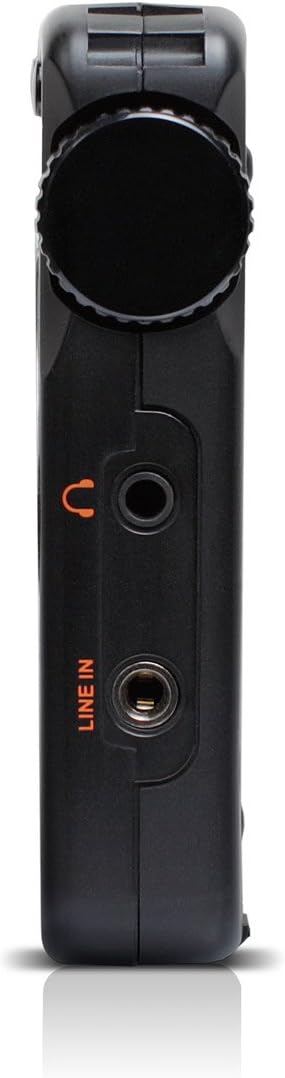
Rajah 5: Panel Sebelah Kiri. ini view highlights the headphone jack and line-in audio input on the left side of the device.

Rajah 6: Panel Sebelah Kanan. This image shows the USB port, microphone input, and power switch located on the right side of the radio.
Persediaan
1. Pemasangan dan Pengecasan Bateri
- Cari petak bateri di bahagian belakang radio (rujuk Rajah 3).
- Open the compartment cover and insert the provided rechargeable battery, ensuring correct polarity.
- Tutup penutup petak bateri dengan selamat.
- Connect the power cord to the radio's power input and a suitable power outlet. The radio will begin charging. Allow approximately four hours for a full charge during initial use.
2. Kuasa Awal Hidup
- Ensure the battery is installed or the power cord is connected.
- Tekan ke kuasa button (usually located on the top left of the front panel) to turn on the radio.
- The LCD display will illuminate.
Arahan Operasi
Hidupkan/Mati Kuasa
Tekan ke kuasa butang untuk menghidupkan atau mematikan unit.
Pelarasan Kelantangan
Gunakan V- dan V+ buttons to decrease or increase the volume level.
Radio Tuning (AM/FM/SW)
The Grundig G2 offers five tuning methods:
- Pemilihan Band: Tekan ke FM, MW (AM), or SW buttons to select the desired frequency band.
- Jog Tuning: Rotate the tuning knob (often labeled MENU/MASUK or similar) to manually scan frequencies.
- Penalaan Manual: Gunakan Anak panah atas/bawah butang untuk melaraskan kekerapan langkah demi langkah.
- Penalaan automatik: Tekan dan tahan butang Anak panah atas/bawah butang untuk mengimbas secara automatik stesen yang tersedia seterusnya.
- ATS (Auto Tuning Storage): Tekan dan tahan butang SET button to automatically scan and store strong stations in the current band.
- Memory Tuning: Use the numeric keypad (0-9) to directly enter a stored station number or frequency.
Station Memory Storage
Untuk menyimpan stesen:
- Tune ke stesen yang dikehendaki.
- Tekan ke SET button. The memory location number will flash on the display.
- Use the numeric keypad or tuning knob to select a memory location.
- Tekan SET again to confirm. The station is now stored.
The radio supports up to 248 station memory storage locations.
MP3 and WMA Playback
The Grundig G2 can play MP3 and WMA audio files daripada kad Mikro SD.
- Insert a Micro SD card containing MP3/WMA files into the Micro SD slot (refer to Figure 4).
- Tekan ke RADIO/MP3 button to switch to MP3 mode.
- Gunakan Main/Jeda, Trek Seterusnya/Sebelumnya butang untuk mengawal main balik.
Fungsi Rakaman
The radio supports recording of radio broadcasts and external audio via the microphone or line-in input.
- Pastikan kad Micro SD dimasukkan.
- To record radio: Tune to the desired station. Press the REC butang (jika ada, atau kombinasi seperti MENU/MASUK then select record).
- To record via microphone: Ensure the radio is in recording mode. Speak into the built-in microphone.
- To record via line-in: Connect an external audio source to the BARIS MASUK jack (refer to Figure 5). Ensure the radio is in recording mode.
- Tekan ke BERHENTI button to end recording. Recordings are saved to the Micro SD card.
Tetapan Bahasa
The radio supports multiple display languages. To change the language:
- Tekan ke MENU/MASUK butang.
- Navigate through the menu options using the tuning knob or arrow buttons until you find "Language" or a similar setting.
- Select the desired language and confirm.
Penyelenggaraan
- Pembersihan: Use a soft, dry cloth to clean the radio's exterior. Do not use liquid cleaners or abrasive materials.
- Storan: When not in use for extended periods, store the radio in a cool, dry place. Remove the battery if storing for several months.
- Penjagaan Bateri: Recharge the battery regularly to maintain its lifespan. Avoid fully discharging the battery frequently.
- Antena: Kendalikan antena teleskopik dengan berhati-hati untuk mengelakkan kerosakan.
Menyelesaikan masalah
| Masalah | Kemungkinan Punca | Penyelesaian |
|---|---|---|
| Radio tidak dihidupkan. | Battery is discharged or not installed correctly. Power cord is not connected. | Ensure battery is charged and correctly inserted. Connect the power cord. |
| Penerimaan radio yang lemah. | Weak signal. Antenna not extended. Interference from other electronics. | Extend the telescopic antenna fully. Reposition the radio. Move away from interfering devices. |
| MP3/WMA filetidak bermain. | Micro SD card not inserted or corrupted. Incorrect file format. | Ensure Micro SD card is properly inserted. Verify files are MP3 or WMA format. Try a different Micro SD card. |
| Rakaman tidak berfungsi. | No Micro SD card inserted. Card full. | Masukkan kad Mikro SD. Padam kad lama files untuk mengosongkan ruang. |
| Paparan menunjukkan masa yang salah. | Time not set or ATS not used. | Manually set the time or use the ATS function on an FM station that broadcasts RDS time data. |
Spesifikasi
| Nombor Model | NG2B |
| Dimensi (L x W x H) | 7.5 x 3.5 x 0.8 inci |
| Berat badan | 9.6 auns |
| Pancaragam Radio Disokong | AM, FM, Shortwave (SW) |
| Tuning Methods | Jog, Manual, Auto, Memory, ATS |
| Pratetap Memori | 248 stesen |
| Main Balik Audio | MP3, WMA (via Micro SD card) |
| Rakaman | Radio broadcasts, Microphone, Line-in |
| Ketersambungan | USB |
| Sumber Kuasa | Rechargeable Battery, Corded Electric |
| Komponen yang Disertakan | Power Cord, Battery |
Waranti dan Sokongan
For warranty information and technical support, please refer to the official Eton or Grundig webtapak atau hubungi bahagian perkhidmatan pelanggan mereka. Simpan bukti pembelian anda untuk tuntutan waranti.
Nota: Terma jaminan khusus mungkin berbeza mengikut rantau dan peruncit.


