1. Pengenalan
This manual provides detailed instructions for the installation, operation, and maintenance of your Pioneer DEH-80PRS CD Receiver. Please read this manual thoroughly before using the product to ensure proper operation and to prevent damage.
The Pioneer DEH-80PRS is an advanced car audio CD receiver designed for superior sound quality, featuring a 3-Way Active Crossover Network, Auto EQ, Auto Time Alignment, Bluetooth connectivity, and HD Radio capabilities.

Figure 1: Pioneer DEH-80PRS CD Receiver
2. Maklumat Keselamatan
Langkah-langkah Keselamatan Penting:
- Do not attempt to install or service this product yourself. Refer installation and service to qualified personnel.
- Do not operate this product in any way that distracts you from safe driving. Always observe traffic regulations.
- Pastikan kelantangan pada tahap yang anda masih boleh mendengar bunyi luar, seperti siren kenderaan kecemasan.
- Elakkan daripada mendedahkan unit kepada kelembapan atau suhu yang melampau.
Amaran Proposisi 65:
Produk ini mengandungi bahan kimia yang diketahui oleh Negeri California untuk menyebabkan kanser dan kecacatan kelahiran atau bahaya pembiakan lain.
3. Kandungan Pakej
Verify that all items are present in the box before proceeding with installation:
- Pioneer DEH-80PRS CD Receiver
- Alat Kawalan Jauh
- External Microphone for Auto EQ/Time Alignment
- Pendawaian abah-abah
- Kabel Sambungan USB
- RCA Cables (for pre-outs)
- Installation Hardware (screws, mounting cage)
- Manual Pemilik (dokumen ini)

Figure 2: Included accessories for the DEH-80PRS
4. Produk Lebihview
4.1 Kawalan Panel Hadapan
The front panel features a large rotary volume knob, various function buttons for source selection, menu navigation, and audio adjustments, and a multi-line display. The display provides information on the current source, track, radio station, and audio settings.

Figure 3: Front panel of the DEH-80PRS and remote control
4.2 Sambungan Panel Belakang
The rear panel provides connections for power, speakers, external amplifiers (RCA pre-outs), USB devices, and the external microphone. It also includes a fuse for protection.
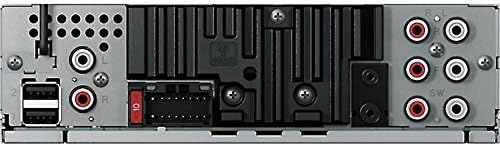
Figure 4: Rear panel showing power, speaker, and RCA connections
5. Persediaan dan Pemasangan
Professional installation is recommended for optimal performance and to avoid damage to your vehicle's electrical system. Ensure the vehicle's battery is disconnected before starting installation.
5.1 Sambungan Pendawaian
- Connect the wiring harness to the vehicle's power, ground, and speaker wires according to the wiring diagram provided in the separate installation guide.
- Connect the RCA pre-out cables to your external amppengalir untuk saluran hadapan, belakang dan subwoofer.
- Connect the external microphone to the designated input for Auto EQ and Auto Time Alignment functions.
- Connect any USB devices or storage via the USB extension cable.
5.2 Tetapan Awal
After installation, reconnect the vehicle's battery. The unit will power on. Follow the on-screen prompts for initial setup, including language selection and clock settings.
Penting: The DEH-80PRS features a switch on the chassis to select between Standard (STD) mode and Network (NW) mode for the 3-Way Active Crossover. Ensure this switch is set correctly for your speaker configuration before performing audio adjustments. Changing this switch requires a system reset.
6. Arahan Operasi
6.1 Operasi Asas
- Hidupkan/Mati Kuasa: Tekan butang SRC (Sumber) untuk menghidupkan unit. Tekan dan tahan SRC untuk mematikannya.
- Kawalan Kelantangan: Rotate the large rotary knob to adjust the volume.
- Pemilihan Sumber: Press the SRC button repeatedly to cycle through available sources (CD, Tuner, USB, SD, Bluetooth Audio, AUX).
6.2 Main Semula CD
Insert a CD into the disc slot. Playback will begin automatically. Use the track skip buttons to navigate between tracks. Press the BAND button to switch between CD text display modes.
6.3 Tuner Operation (AM/FM/HD Radio)
Select the Tuner source. Press the BAND button to switch between FM1, FM2, FM3, and AM bands. Use the seek buttons to find stations. For HD Radio, the unit will automatically detect and tune to HD Radio broadcasts where available.
6.4 Kesambungan Bluetooth
The DEH-80PRS supports Bluetooth for audio streaming and hands-free calling.
- Berpasangan: Enable Bluetooth on your mobile device. On the DEH-80PRS, navigate to the Bluetooth menu and select 'Pairing'. Select 'Pioneer DEH-80PRS' from your device's Bluetooth list. Enter the PIN if prompted (default is '0000').
- Penstriman Audio: Once paired, select 'Bluetooth Audio' as the source to stream music from your device.
- Panggilan Bebas Tangan: When a call comes in, the unit will display the caller ID. Press the phone button to answer or end a call.
6.5 Main Semula USB/SD
Insert a USB device into the USB port or an SD card into the SD card slot. The unit will automatically detect and begin playback of compatible audio files. Use the navigation buttons to browse folders and tracks.
6.6 Advanced Audio Settings
The DEH-80PRS offers extensive audio customization for audiophile-grade sound.
- 3-Way Active Crossover Network: This feature allows precise control over the frequency ranges sent to your tweeters, mid-range speakers, and subwoofers. Access this in the Audio menu to set crossover points and slopes for each channel. This is especially powerful in Network mode.
- Persamaan Automatik: Use the supplied microphone to automatically equalize the sound output to your vehicle's acoustics. Place the microphone in the listening position (e.g., driver's headrest), ensure the car is quiet with windows closed, and initiate the Auto EQ process from the Audio menu.
- Auto Time Alignment: This feature measures the distance from each speaker to the listening position and adjusts the sound output timing to ensure all sound reaches the listener simultaneously, creating a more focused soundstage. Use the same microphone placement as Auto EQ and initiate from the Audio menu.
- Manual EQ/Sound Adjustments: For further fine-tuning, the unit provides a 16-band graphic equalizer, listening position selector, and other manual sound controls.
7. Penyelenggaraan
7.1 Membersihkan Unit
Wipe the front panel with a soft, dry cloth. Do not use harsh chemicals or abrasive cleaners. For stubborn dirt, lightly dampen kain dengan air.
7.2 Bateri Alat Kawalan Jauh
If the remote control stops responding, replace the lithium coin cell battery (CR2025). Refer to the remote control's specific instructions for battery replacement.
8. Penyelesaian masalah
Jika anda menghadapi masalah, rujuk jadual di bawah untuk masalah dan penyelesaian yang biasa.
| Masalah | Kemungkinan Punca | Penyelesaian |
|---|---|---|
| Tiada kuasa | Blown fuse; incorrect wiring | Check the fuse; verify wiring connections. |
| Tiada bunyi | Volume too low; incorrect source; speaker wiring issue | Increase volume; select correct source; check speaker connections. |
| Bluetooth tidak bersambung | Device not in pairing mode; unit not discoverable | Ensure both devices are in pairing mode; delete previous pairings and try again. |
| CD error | Dirty or scratched disc; disc inserted incorrectly | Clean the disc; ensure it is inserted correctly. |
Jika masalah berterusan selepas mencuba penyelesaian ini, hubungi sokongan pelanggan Pioneer atau juruteknik perkhidmatan yang berkelayakan.
9. Spesifikasi
- Dimensi Produk: 11.7 x 6.4 x 8.9 inci
- Berat Barang: 2.64 paun (1.2 Kilogram)
- Nombor Model Item: DEH80PRS
- Bateri: 1 bateri Lithium Metal diperlukan (untuk alat kawalan jauh)
- Teknologi Komunikasi Tanpa Wayar: Bluetooth
- Teknologi Ketersambungan: berwayar
- Ciri Khas: CD Player, 3-Way Active Crossover Network, Auto EQ, Auto Time Alignment
- Peranti Serasi: Pembesar suara, Telefon Pintar
- Jenis Penyambung: Bicu 3.5mm, USB
- Mod Output Audio: Stereo
- Konfigurasi Saluran Bunyi Sekeliling: 5.1 (via pre-outs)
- Pengeluar: perintis
- Tarikh Mula-mula Tersedia: 16 Januari 2012
10. Waranti dan Sokongan
For warranty information, please refer to the separate warranty card included with your product or visit the official Pioneer website. For technical support, product registration, or to find authorized service centers, please contact Pioneer customer service directly.
You can typically find support contact details on the official Pioneer webtapak: www.pioneerelectronics.com


