pengenalan
The Elenco Edu-Toys 6-in-1 Solar Kit (Model EDU-38006) provides an engaging educational experience for building six different motor-driven models powered by solar energy. This kit allows users to explore the principles of solar power and mechanical assembly without the need for batteries. The models include a Solar Windmill, Solar Airboat, Solar Helicopter, Solar Robot, Solar Plane, and Solar Wheeler.

Maklumat Keselamatan
- Sentiasa gunakan di bawah pengawasan orang dewasa.
- Keep away from young children due to small parts.
- Jangan menelan mana-mana bahagian.
- Dispose of waste materials responsibly.
- Follow all instructions in the manual for safe use and assembly.
Komponen
The kit contains the following main components:
- 1 Mini Motor
- 1 Panel Suria
- 44 pieces of plastic components (various shapes for different models)
- Manual Arahan (dokumen ini)
Arahan Perhimpunan
Before beginning assembly, carefully detach all plastic components from their sprues. Use a small pair of clippers or a hobby knife for clean cuts, and smooth any rough edges with fine sandpaper if necessary. Refer to the detailed diagrams in the included physical instruction manual for specific part identification and connection points for each model. Only one model can be assembled at a time.
1. Solar Windmill
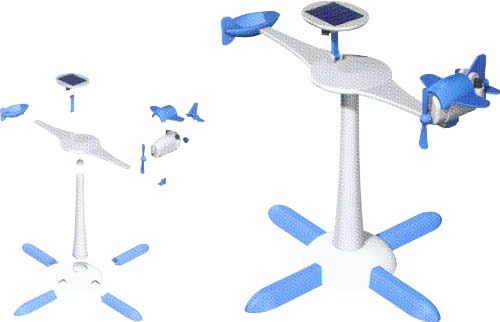
Assemble the base and central shaft. Attach the windmill blades to the motor, ensuring they rotate freely. Secure the solar panel to the top of the shaft and connect the motor wires as indicated in the manual.
2. Solar Airboat

Construct the airboat's body from the provided plastic components. Mount the motor and propeller at the rear, ensuring the propeller faces backward. Attach the solar panel to the designated support and connect the motor wires.
3. Solar Helicopter

Assemble the helicopter body and attach the main rotor blades to the motor. Secure the tail rotor in its position. Mount the solar panel on top of the helicopter and connect the motor wires according to the manual.
4. Solar Robot
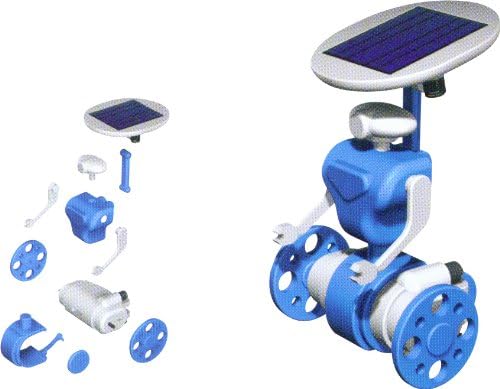
Construct the robot's main body and attach the wheels to the motor's axle. Ensure the wheels are securely fastened and can rotate freely. Position the solar panel on the robot's head or back and connect the motor wires.
5. Solar Plane
Assemble the plane's fuselage and wings. Attach the propeller to the motor at the front of the plane. Secure the solar panel to the top of the plane's body or wing structure and connect the motor wires as shown in the manual.
6. Solar Wheeler

Construct the chassis for the wheeled vehicle. Attach the wheels to the motor's axle and ensure smooth rotation. Mount the solar panel on a support structure above the chassis and connect the motor wires.
Arahan Operasi
The Edu-Toys 6-in-1 Solar Kit operates solely on solar power, requiring no batteries. For optimal performance:
- Ensure Proper Assembly: Double-check all connections and ensure that the motor and propeller/wheels are free to move without obstruction.
- Cahaya matahari langsung: Place the assembled model in direct, strong sunlight. The solar panel requires sufficient light intensity to generate enough electricity to power the motor. Overcast conditions or indoor lighting (even bright lamps) may not provide adequate power.
- Orientasi Panel Suria: Angle the solar panel directly towards the sun for maximum exposure.
- Perhatikan Pergerakan: Once exposed to sufficient sunlight, the motor should activate, causing the model to move or its parts to rotate.
Penyelenggaraan
- Pembersihan: Gently wipe the solar panel and plastic components with a soft, dry cloth to remove dust and dirt. Avoid using abrasive cleaners or solvents.
- Storan: Store the kit and its components in a cool, dry place away from direct sunlight when not in use. This helps prevent degradation of plastic parts and the solar panel.
- Pemeriksaan: Periodically inspect all parts for any damage or wear. Replace any broken components if possible, or contact support for assistance.
Menyelesaikan masalah
- Model is not moving or moving slowly:
- Ensure the model is in direct, strong sunlight. Indoor lighting is often insufficient.
- Check that the solar panel is angled directly towards the sun.
- Verify all wire connections between the solar panel and the motor are secure. Ensure wires are firmly threaded into the motor's spring terminals for good contact.
- Confirm that no parts are obstructing the motor's movement or the rotation of propellers/wheels.
- Clean the solar panel surface if it appears dirty or dusty.
- Plastic parts do not snap together easily:
- Ensure you are using the correct parts for the specific model you are building.
- Gently apply pressure. If parts are too tight, carefully trim any excess plastic from the connection points.
- Wires are difficult to connect to the motor springs:
- Bend the spring slightly to create a small gap.
- Stretch the wire taut and slide it into the gap, ensuring it is pinched securely when the spring returns to its position. Good contact is crucial for power transmission.
Spesifikasi
| Dimensi Produk | 7.25 x 3 x 8.5 inci |
| Berat Barang | 8 auns |
| Nombor Model Item | EDU-38006 |
| Umur Disyorkan Pengilang | 10 - 14 tahun |
| Tarikh Mula-mula Tersedia | 7 November 2010 |
Waranti dan Sokongan
Elenco Electronics LLC stands behind the quality of its products. For specific warranty information or technical support regarding your Edu-Toys 6-in-1 Solar Kit, please refer to the contact information provided on the product packaging or visit the official Elenco website. Please have your model number (EDU-38006) available when contacting support.