Manual Pengguna Projektor LCD NEC NP-P350X
Model: NP-P350X
1. Pengenalan
Terima kasih kerana membeliasing the NEC NP-P350X LCD Projector. This manual provides essential information for the safe and efficient use of your projector. Please read this manual thoroughly before operating the unit and keep it for future reference. The NP-P350X is designed for professional installation environments, offering high brightness, excellent contrast, and versatile connectivity for various presentation needs.
2. Maklumat Keselamatan
Always observe the following safety precautions to prevent fire, electric shock, or injury.
- Jangan sekat bukaan pengudaraan. Pastikan ruang yang mencukupi di sekeliling projektor untuk aliran udara yang betul.
- Jangan dedahkan projektor kepada hujan atau lembapan.
- Jangan buka projektor casing. Rujuk semua servis kepada kakitangan perkhidmatan yang berkelayakan.
- Gunakan hanya kord kuasa yang dibekalkan bersama projektor atau pengganti yang sesuai.
- Avoid looking directly into the lens when the projector is on, as the bright light can damage your eyes.
- Disconnect the power cord from the wall outlet if the projector will not be used for an extended period.
3. Kandungan Pakej
Sahkan bahawa semua item yang disenaraikan di bawah disertakan dalam pakej anda:
- NEC NP-P350X Projector Unit
- Kord Kuasa
- Kawalan Jauh dengan Bateri
- Kabel VGA
- Manual Pengguna (dokumen ini)
- CD-ROM (Software/Drivers)
4. Persediaan
4.1 Penempatan Fizikal
The NP-P350X projector can be placed on a table, mounted on the ceiling, or used for front or rear projection. Ensure the projection surface is flat and perpendicular to the projector lens for optimal image geometry. Maintain adequate distance from the screen based on desired image size.
4.2 Menyambung Peranti
The NEC NP-P350X offers a wide range of input and output ports for various devices. Refer to the image below for port identification.
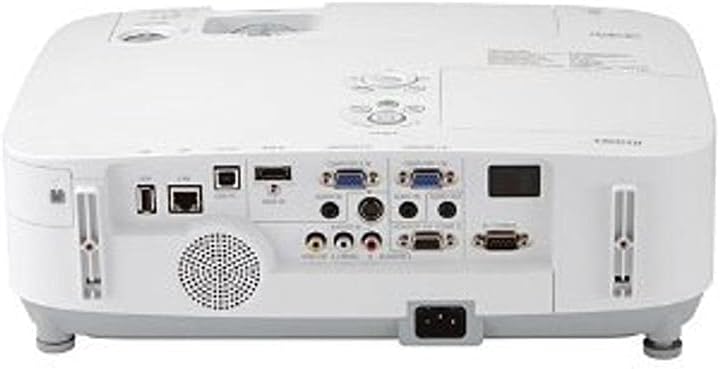
This image displays the rear panel of the NEC NP-P350X projector, highlighting its comprehensive array of connectivity options. From left to right, key ports include USB-A, USB-B, LAN (RJ45), two VGA (D-sub 15-pin) inputs, S-Video, composite video (RCA), audio inputs (RCA and 3.5mm mini-jack), audio output (3.5mm mini-jack), and a serial port (RS-232C). The power input socket is located at the bottom center.
To connect a device:
- Connect your video source (e.g., computer, DVD player) to the appropriate input port on the projector (e.g., VGA, HDMI, S-Video, Composite Video).
- For audio, connect your audio source to the corresponding audio input jacks.
- For network control or data transfer, connect an Ethernet cable to the RJ45 LAN port.
- Plug the power cord into the projector's AC inlet and then into a grounded electrical outlet.
4.3 Hidupkan/Mati Kuasa
- Hidupkan kuasa: Press the power button on the projector's control panel or the remote control. The power indicator light will turn green.
- Matikan: Press the power button twice. The projector will enter cooling mode, and the power indicator will blink. Once cooling is complete, the indicator will turn red. Do not unplug the projector during the cooling cycle.
5. Beroperasi
5.1 Operasi Asas
- Pemilihan Input: Use the 'Input' button on the remote or control panel to cycle through available input sources (e.g., Computer 1, Computer 2, Video, S-Video, HDMI).
- Navigasi Menu: Press the 'Menu' button to access the On-Screen Display (OSD). Use the arrow keys to navigate and 'Enter' to select options. Press 'Menu' again to exit.
5.2 Pelarasan Imej
- Fokus: Putar cincin fokus pada lensa sehingga imej tajam.
- Zum: Laraskan gelang zum pada kanta untuk menukar saiz imej.
- Pembetulan Keystone: If the image appears trapezoidal, use the 'Keystone' function in the OSD menu to correct it.
- Kecerahan/Kontras: Adjust these settings in the 'Picture' menu of the OSD to suit your viewpersekitaran.
5.3 Ciri Lanjutan
- Kawalan Rangkaian: The projector supports network control via the RJ45 port, allowing remote management and monitoring. Refer to the network guide on the CD-ROM for detailed setup.
- Mod Eko: Activate Eco Mode to reduce lamp power consumption, extend lamp life, and lower fan noise. This can be found in the 'Setup' menu.
6. Penyelenggaraan
Penyelenggaraan berkala memastikan prestasi optimum dan memanjangkan jangka hayat projektor anda.
6.1 Pembersihan
- Kanta: Gunakan kain lembut dan bebas lin yang direka khusus untuk kanta optik. Jangan gunakan pembersih yang kasar.
- Casing: Lap projektor casing with a soft, dry cloth. For stubborn dirt, use a cloth lightly dampdisapu dengan air dan detergen lembut, kemudian lap kering.
6.2 Lamp Penggantian
Lamp life indicator will notify you when the lamp perlu diganti. Sentiasa gunakan pengganti NEC tulenamps.
- Turn off the projector and unplug the power cord. Allow the projector to cool down for at least 45 minutes.
- Cari lamp cover (usually on the top or side) and remove the screw(s) securing it.
- Carefully pull out the old lamp modul.
- Masukkan l baruamp modul, memastikan ia diletakkan dengan betul.
- Gantikan lamp cover and secure it with the screw(s).
- Tetapkan semula lamp timer in the projector's OSD menu.
6.3 Pembersihan/Penggantian Penapis
The air filter prevents dust from entering the projector. Clean it regularly, especially in dusty environments.
- Matikan projektor dan cabut palam kord kuasa.
- Locate the air filter cover (refer to the projector diagram in the full manual).
- Remove the filter and clean it using a vacuum cleaner or by gently tapping out the dust. If heavily soiled or damaged, replace it with a new filter.
- Reinsert the clean/new filter and close the cover.
7. Penyelesaian masalah
Jika anda menghadapi masalah dengan projektor anda, rujuk kepada masalah dan penyelesaian biasa berikut:
| Masalah | Kemungkinan Punca | Penyelesaian |
|---|---|---|
| Tiada imej dipaparkan | Incorrect input source selected; Loose cable connection; Projector in standby mode. | Select correct input source; Check all cable connections; Press power button to wake up. |
| Imej kabur | Lensa tidak fokus. | Laraskan cincin fokus pada lensa. |
| Imej adalah trapezoid | Projektor tidak berserenjang dengan skrin. | Adjust projector angle or use keystone correction in the OSD menu. |
| Projektor terlalu panas dan mati | Blocked ventilation; Dirty air filter. | Ensure clear ventilation paths; Clean or replace air filter. |
| Alat kawalan jauh tidak berfungsi | Bateri mati; Halangan antara alat kawalan jauh dan projektor. | Gantikan bateri; Pastikan garis penglihatan yang jelas kepada penerima IR. |
8. Spesifikasi
Detailed technical specifications for the NEC NP-P350X Projector:
- model: NP-P350X
- Jenis Paparan: LCD; 0.63" LCD with MLA
- Resolusi Asli: XGA (1024 x 768)
- Resolusi Maksimum: UXGA (1600 x 1200)
- Kecerahan: 3500 Lumen
- Nisbah Kontras: 2000:1
- Aspect Ratio(s): 16:9 (Asli), 4:3 (Serasi)
- Teknologi Ketersambungan: HDMI, Wireless (optional adapter), VGA (D-sub 15-pin), S-Video, Composite Video, USB-A, USB-B, RJ45 (LAN), RS-232C
- Ciri Khas: Pembesar suara terbina dalam
- Dimensi Produk: 19 x 15.5 x 9 inci
- Berat Barang: 11.95 paun
- Pengeluar: Nectron
- Pertama Tersedia: 3 Februari 2011
9. Waranti dan Sokongan
For warranty information and technical support, please refer to the warranty card included with your product or visit the official NEC Display Solutions website. Keep your purchase receipt as proof of purchase for warranty claims. Online resources, FAQs, and driver downloads may also be available on the manufacturer's support pages.


