pengenalan
Welcome to the Greenlee DM-810A True RMS Digital Multimeter user manual. This document provides essential information for the safe and effective operation, maintenance, and troubleshooting of your device. The DM-810A is designed for accurate measurement of AC/DC voltage, AC/DC current, resistance, capacitance, frequency, and continuity, making it a versatile tool for electrical professionals.
Maklumat Keselamatan
Untuk memastikan operasi dan operasi meter yang selamat, ikuti arahan ini. Kegagalan untuk mematuhi amaran ini boleh mengakibatkan kecederaan atau kematian yang teruk.
- Always read and understand the entire instruction manual before using the meter.
- Jangan melebihi had input maksimum untuk sebarang fungsi.
- Berhati-hati apabila bekerja dengan voltagadalah melebihi 30V AC RMS, puncak 42V atau 60V DC. Ini voltagia menimbulkan bahaya kejutan.
- Always use the proper terminals, function, and range for your measurements. The DM-810A features a Beep-Jack audible and visible warning to guard against improper A and mA terminal plug-in.
- Periksa wayar ujian untuk penebat yang rosak atau logam yang terdedah sebelum setiap penggunaan. Gantikan jika rosak.
- Jangan gunakan meter jika ia kelihatan rosak atau jika bekasnya terbuka.
- Pastikan penutup bateri ditutup dengan selamat sebelum beroperasi.
- Adhere to local and national safety codes. Use personal protective equipment (PPE) such as approved safety glasses and electrically insulated gloves when necessary.
Produk Selesaiview
This section identifies the key parts and controls of your Greenlee DM-810A multimeter.

Rajah 1: Depan view of the Greenlee DM-810A Digital Multimeter, showing the display, function selector dial, and input jacks.
- paparan: Large LCD for clear readings, often with dual display capability.
- Function Selector Dial: Used to select the desired measurement function (e.g., V~, V-, A~, A-, Ω, CAP, Hz, Continuity).
- Bicu Input:
- COM: Input biasa (negatif) untuk semua ukuran.
- VΩHz: Input positif untuk voltage, rintangan, kekerapan dan ukuran kapasiti.
- mAμA: Positive input for milliampere dan mikroampsebelum pengukuran semasa.
- A: Positive input for ampsebelum pengukuran semasa.
- Butang:
- PILIH: Toggles between functions on a single dial position (e.g., AC/DC voltage, diod/kesinambungan).
- RANGE: Manually selects measurement range or returns to auto-ranging.
- △: Delta function for relative measurements.
- DIBERI: Membekukan bacaan paparan semasa.
Persediaan
Pemasangan Bateri
The Greenlee DM-810A requires batteries for operation. Refer to the back of the meter for the battery compartment. Use a screwdriver to open the compartment, insert the specified batteries (typically AA or 9V, check the compartment label), observing correct polarity, and then securely close the cover.
Menghubungkan petunjuk ujian
Sentiasa pastikan wayar ujian disambungkan dengan betul sebelum mengambil ukuran.
- Masukkan petunjuk ujian hitam ke dalam COM bicu input (biasa).
- Insert the red test lead into the appropriate positive input jack based on the measurement you intend to make:
- Untuk voltage, resistance, capacitance, or frequency, use the VΩHz jek.
- Untuk miliampere or microampere current, use the mAμA jek.
- Untuk ampere current, use the A jek.
- The meter's Beep-Jack feature will provide an audible and visible alert if the function selector is set to a current measurement (A or mA) but the test lead is incorrectly plugged into a voltage/resistance jack, or vice-versa. This helps prevent damage to the meter and ensures correct setup.
Arahan Operasi
This section details how to perform various measurements with your DM-810A multimeter.
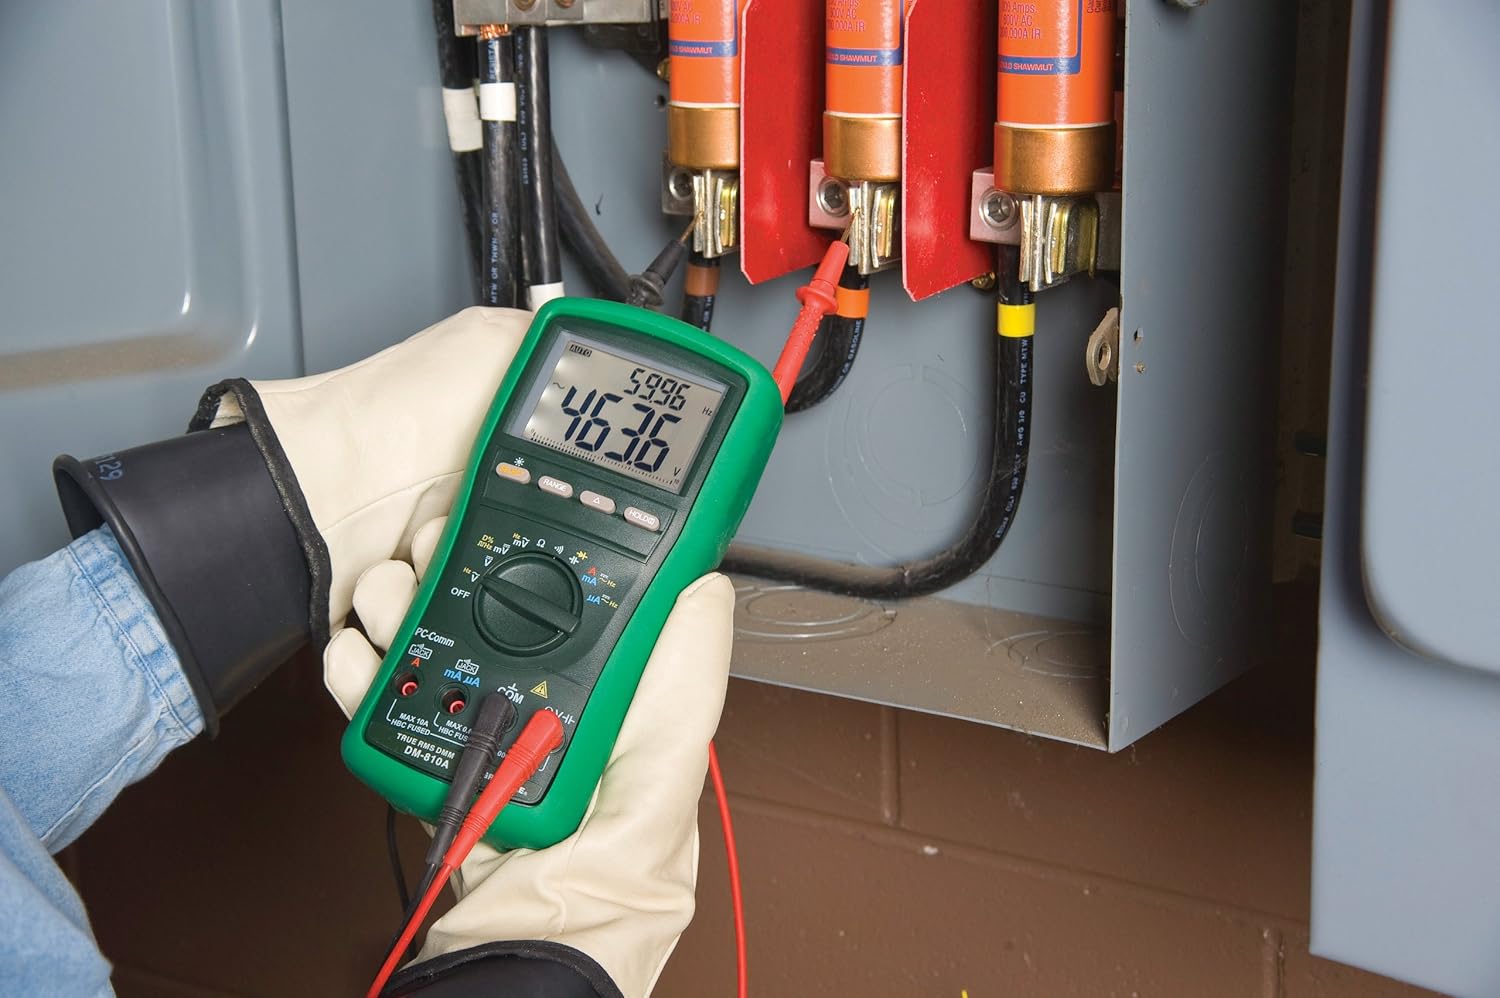
Rajah 2: The Greenlee DM-810A Digital Multimeter being used to take measurements within an electrical panel, demonstrating practical application.
Mengukur Vol. AC/DCtage
- Set the function selector to V~ (AC Voltage) atau V- (Vol DCtage). Use the SELECT button to toggle if both are on one position.
- Sambungkan plumbum ujian hitam ke COM dan ujian merah membawa kepada VΩHz.
- Connect the test probes in parallel across the circuit or component to be measured.
- Baca voltagnilai e pada paparan.
Mengukur Arus AC/DC
Penting: Current measurements require the meter to be connected in series with the circuit. Ensure the circuit is de-energized before connecting the meter.
- Nyahtenagakan litar.
- Set the function selector to A~ (AC Current) or A- (DC Current), or mA~ / mA-.
- Sambungkan plumbum ujian hitam ke COM. Connect the red test lead to mAμA for small currents or A for larger currents (up to 10A). The Beep-Jack warning will activate if leads are in the wrong jacks for the selected function.
- Open the circuit where the current is to be measured and connect the meter in series.
- Hidupkan semula litar dan baca nilai arus.
- De-energize the circuit before disconnecting the meter.
Mengukur Rintangan (Ω)
- De-energize the circuit or component.
- Set the function selector to Ω.
- Sambungkan plumbum ujian hitam ke COM dan ujian merah membawa kepada VΩHz.
- Sambungkan kuar ujian merentasi komponen.
- Baca nilai rintangan.
Measuring Capacitance (CAP)
- Pastikan kapasitor dinyahcas sepenuhnya sebelum pengukuran.
- Set the function selector to CAP.
- Sambungkan plumbum ujian hitam ke COM dan ujian merah membawa kepada VΩHz.
- Sambungkan kuar ujian merentasi terminal kapasitor.
- Baca nilai kapasitans.
Measuring Frequency (Hz)
- Set the function selector to Hz.
- Sambungkan plumbum ujian hitam ke COM dan ujian merah membawa kepada VΩHz.
- Sambungkan prob ujian merentasi sumber isyarat.
- Baca nilai frekuensi.
Ujian Kesinambungan
- De-energize the circuit or component.
- Set the function selector to the continuity symbol (often shared with diode test, use SELECT to toggle).
- Sambungkan plumbum ujian hitam ke COM dan ujian merah membawa kepada VΩHz.
- Connect the test probes across the circuit path or component.
- An audible beep indicates continuity (low resistance). The display will show the resistance value.
Penyelenggaraan
Pembersihan
Lap meter dengan iklanamp kain dan detergen lembut. Jangan gunakan bahan pelelas atau pelarut. Pastikan meter kering sepenuhnya sebelum digunakan.
Penggantian Bateri
When the battery indicator appears on the display, replace the batteries immediately to ensure accurate readings. Follow the battery installation steps outlined in the Setup section.
Penggantian Fius
If the current measurement functions cease to work, the internal fuses may need replacement. Refer to the meter's internal diagram (usually accessible by opening the battery compartment or back casing) for fuse specifications and replacement instructions. Always replace fuses with those of the specified type and rating to maintain safety and performance.
Menyelesaikan masalah
This section provides solutions for common issues encountered during the operation of your DM-810A multimeter.
| Masalah | Kemungkinan Punca | Penyelesaian |
|---|---|---|
| Tiada paparan atau paparan malap | Bateri mati atau lemah | Gantikan bateri. |
| Bacaan yang salah | Incorrect function/range selected; Damaged test leads; External interference | Verify function and range; Inspect and replace test leads; Move away from strong electromagnetic fields. |
| Pengukuran arus tidak berfungsi | Blown fuse; Incorrect lead connection | Check and replace fuses; Ensure leads are in the correct A or mA jacks. |
| Beep-Jack warning active | Test leads connected to incorrect input jacks for the selected function | Adjust test lead connections to match the selected function on the dial. |
| Continuity test not beeping | Open circuit; High resistance | Ensure the circuit is closed; Check for breaks in the circuit or component. |
Spesifikasi Teknikal
The following table outlines the key technical specifications for the Greenlee DM-810A Digital Multimeter.
| Ciri | Nilai |
|---|---|
| Jenama | Greenlee |
| Model | DM-810A |
| Jenis Pengukuran | Multimeter Digital True RMS |
| Sumber Kuasa | Dikuasakan Bateri |
| Gaya | digital |
| Berat Barang | 16 auns (1 paun) |
| Dimensi Produk (L x W x H) | 10 x 10 x 12 inci |
| Pensijilan | CE, CSA, UL |
| UPC | 783310087434 |
Waranti dan Sokongan
Maklumat Waranti
The Greenlee DM-810A Digital Multimeter comes with a Waranti pengilang selama 1 tahun. Waranti ini melindungi kecacatan pada bahan dan mutu kerja di bawah penggunaan biasa. Sila simpan bukti pembelian anda untuk tuntutan waranti.
Sokongan Pelanggan
For technical assistance, warranty service, or to inquire about replacement parts, please contact Greenlee customer support. Refer to the official Greenlee webtapak atau pembungkusan produk untuk maklumat hubungan terkini.


