1. Pengenalan
Thank you for choosing the Craftsman Digital 400A AC Clamp-On Ammeter, Model 82372. This instrument is designed for safe and accurate measurement of AC current without breaking the circuit, as well as AC/DC voltage, resistance, frequency, capacitance, continuity, diode, and temperature. Please read this manual thoroughly before use to ensure proper operation and to prevent potential hazards.
2. Maklumat Keselamatan
WARNING: To avoid electric shock or personal injury, read and understand all safety information before using this meter.
- Sentiasa mematuhi kod keselamatan tempatan dan nasional.
- Jangan gunakan meter jika ia kelihatan rosak atau jika wayar ujian rosak.
- Jangan gunakan lebih daripada vol yang dinilaitage, seperti yang ditandakan pada meter, antara terminal atau antara mana-mana terminal dan tanah bumi.
- Berhati-hati apabila bekerja dengan voltagadalah melebihi 30V AC RMS, puncak 42V atau 60V DC. Ini voltagia menimbulkan bahaya kejutan.
- Simpan jari di belakang pelindung jari pada petunjuk ujian semasa pengukuran.
- Jangan kendalikan meter di sekeliling gas, wap atau habuk yang boleh meletup.
- Before measuring current, ensure the meter is set to the correct function and range.
- Putuskan sambungan wayar ujian daripada litar sebelum menukar fungsi.
- Gantikan bateri dengan segera apabila penunjuk bateri rendah muncul.
- This meter is rated for Category III - 600V.
3. Produk Lebihview
The Craftsman Digital 400A AC Clamp-On Ammeter features a compact design for measurements in tight locations and an extra-large 4000 count LCD screen for clear readings.
3.1 Meter Components

Figure 1: Top Section of the Ammeter
This image displays the upper portion of the Craftsman Digital 400A AC Clamp-On Ammeter. Visible components include the clamp jaw for non-contact current measurement, the rotary function dial with settings for AC current (2A, 20A, 200A, 400A), resistance (Ω), DC voltage (VDC), AC voltage (VAC), and OFF. The yellow 'MAX' button and 'HOLD' button are also shown, along with the 'AUTO POWER OFF' indicator.
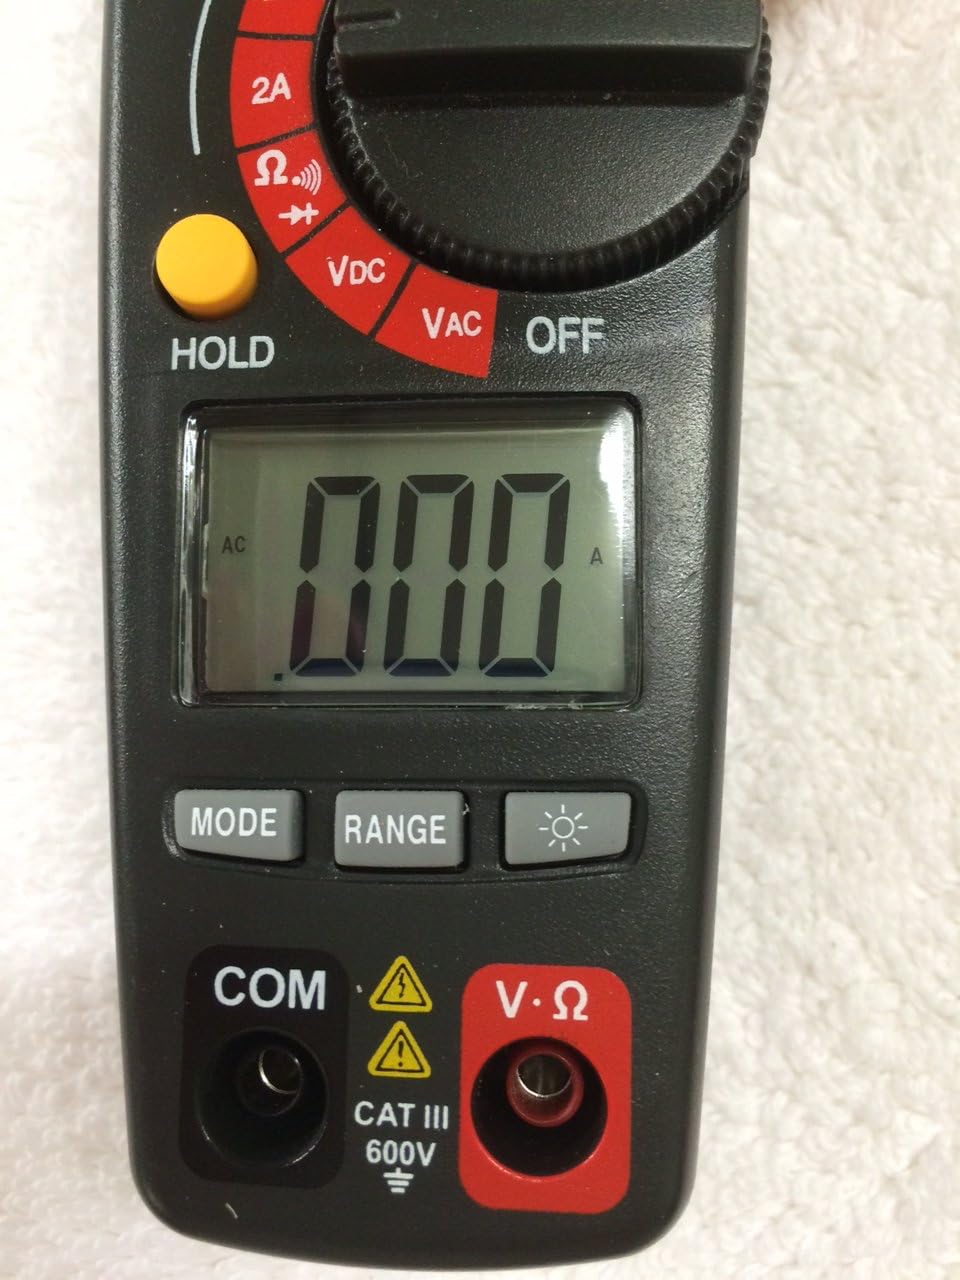
Figure 2: Bottom Section of the Ammeter
This image shows the lower part of the Craftsman Digital 400A AC Clamp-On Ammeter. Key features include the large LCD display, the 'MODE' button, 'RANGE' button, and the backlight button (indicated by a light bulb icon). Below the display are the input jacks: 'COM' (common) and 'V·Ω' (voltage/resistance) with a CAT III 600V safety rating warning.
- Clamp rahang: Used for non-contact AC current measurements.
- Dail Fungsi: Selects the desired measurement function (AC Current, Voltage, Resistance, etc.) and turns the meter ON/OFF.
- Paparan LCD: Menunjukkan bacaan ukuran, unit dan penunjuk fungsi.
- Butang MAX: Toggles between maximum value hold and normal operation.
- Butang TAHAN: Membekukan bacaan semasa pada paparan.
- Butang MOD: Selects between different functions within a dial setting (e.g., AC/DC voltage, kesinambungan/diod).
- Butang RANGE: Manually selects measurement range or returns to auto-ranging.
- Butang Lampu Belakang: Activates the display backlight for improved visibility in low light.
- Input Jacks (COM, V·Ω): Untuk menyambungkan petunjuk ujian untuk voltage, resistance, continuity, diode, capacitance, and frequency measurements.
4. Persediaan
4.1 Pemasangan Bateri
The meter requires batteries for operation. To install or replace batteries:
- Ensure the meter is OFF and disconnect any test leads.
- Cari penutup petak bateri di belakang meter.
- Tanggalkan skru penahan dan tanggalkan penutup.
- Insert new batteries, observing correct polarity (+ and -).
- Gantikan penutup petak bateri dan kencangkannya dengan skru.
Note: The meter features auto power off to conserve battery life.
5. Arahan Operasi
Before taking any measurements, ensure the meter is in good condition and the test leads are properly connected (if applicable).
5.1 Measuring AC Current (Clamp Fungsi)
This function allows non-contact measurement of AC current up to 400A.
- Turn the function dial to the desired AC current range (2A, 20A, 200A, or 400A).
- Tekan clamp pencetus untuk membuka clamp Rahang.
- Enclose a single conductor (not a bundle of wires) within the clamp rahang. Pastikan rahang ditutup sepenuhnya.
- Baca nilai semasa AC pada paparan LCD.
Nota: Untuk bacaan yang tepat, pastikan hanya satu konduktor berada di dalam litaramp Rahang.
5.2 Mengukur Vol. AC/DCtage
The meter measures AC/DC voltage sehingga 600V.
- Insert the black test lead into the COM jack and the red test lead into the V·Ω jack.
- Turn the function dial to the VDC or VAC position.
- If measuring DC voltage, press the MODE button to select DC if necessary.
- Sambungkan kuar ujian merentasi litar atau komponen yang hendak diukur.
- Baca voltagnilai e pada paparan LCD.
5.3 Mengukur Rintangan (Ω)
Measures resistance in Ohms (Ω).
- Insert the black test lead into the COM jack and the red test lead into the V·Ω jack.
- Putar dail fungsi ke kedudukan Ω.
- Pastikan litar atau komponen dinyahtenagakan sebelum mengukur rintangan.
- Sambungkan kuar ujian merentasi komponen.
- Baca nilai rintangan pada paparan LCD.
5.4 Continuity and Diode Test
These functions are typically accessed via the Ω setting using the MODE button.
- Insert the black test lead into the COM jack and the red test lead into the V·Ω jack.
- Putar dail fungsi ke kedudukan Ω.
- Press the MODE button repeatedly until the continuity symbol (a speaker icon) or diode symbol (a triangle with a line) appears on the display.
- For continuity: Connect probes across the circuit. A continuous beep indicates a complete circuit.
- For diode: Connect probes across the diode. A forward bias voltage drop will be displayed. Reverse bias should show OL (open loop).
5.5 Measuring Frequency and Capacitance
The meter supports frequency and capacitance measurements, typically accessed through the V·Ω input and MODE button.
- Insert the black test lead into the COM jack and the red test lead into the V·Ω jack.
- Turn the function dial to the appropriate setting (often shared with voltage or resistance, requiring MODE selection).
- Press the MODE button until the frequency (Hz) or capacitance (F) symbol appears.
- Connect the test probes to the circuit or component.
- Baca nilai pada paparan LCD.
5.6 Temperature Measurement (Type K Thermometer)
The meter includes a Type K thermometer for surface or air temperature measurements.
- Ensure the meter is OFF and disconnect any test leads.
- Insert the Type K thermocouple probe into the designated input jacks (usually marked with 'TEMP' or shared with V·Ω, check meter markings).
- Turn the function dial to the temperature setting (often marked with °C or °F).
- Letakkan hujung termokopel pada atau berhampiran objek yang suhunya hendak diukur.
- Baca suhu pada paparan LCD.
5.7 Data Hold and Max Hold
- Butang TAHAN: Tekan butang HOLD untuk membekukan bacaan semasa pada paparan. Tekan sekali lagi untuk melepaskan.
- Butang MAX: Press the MAX button to capture and display the maximum measured value. Press again to exit MAX hold.
6. Penyelenggaraan
6.1 Pembersihan
Lap meter dengan iklanamp cloth and mild detergent. Do not use abrasives or solvents. Keep the clamp jaw free of dust and debris.
6.2 Penggantian Bateri
Refer to Section 4.1 for battery installation/replacement instructions. Replace batteries when the low battery indicator appears on the display to ensure accurate readings.
6.3 Penyimpanan
If the meter is not used for an extended period, remove the batteries to prevent leakage. Store the meter in a cool, dry place away from direct sunlight.
7. Penyelesaian masalah
| Masalah | Kemungkinan Punca | Penyelesaian |
|---|---|---|
| Meter tidak dihidupkan. | Bateri mati atau tidak dipasang dengan betul. | Periksa kekutuban bateri; menggantikan bateri. |
| "OL" (Lebihan) dipaparkan. | Measurement exceeds selected range or meter's maximum capacity. | Select a higher range or ensure measurement is within meter's specifications. |
| Bacaan yang tidak tepat. | Low battery, incorrect function/range, poor test lead connection, external interference. | Replace batteries, verify function/range, ensure secure connections, move away from strong magnetic fields. |
| No reading for AC current. | Multiple conductors in clamp jaw, DC current being measured. | Ensure only one AC conductor is in the clamp. This meter measures AC current only. |
8. Spesifikasi
| Ciri | Spesifikasi |
|---|---|
| Jenama | tukang |
| Model | 82372 |
| Jenis Pengukuran | Ammeter (Clamp-Hidup) |
| Julat Semasa AC | Sehingga 400A |
| AC / DC Voltage Julat | Sehingga 600V |
| Rintangan | ya |
| Kekerapan | ya |
| Kapasitansi | ya |
| Ujian Kesinambungan | ya |
| Ujian Diod | ya |
| Pengukuran Suhu | Termometer Jenis K |
| Paparan | 4000 Count LCD |
| Accuracy (AC Current) | 3.0% (VAC) - Note: Product description states 3.0% (VAC) for AC/DC current, which is unusual. Assuming it refers to AC current accuracy. |
| Penilaian Keselamatan | Category III - 600V |
| Sumber Kuasa | Dikuasakan Bateri |
| Ciri Khas | One-touch auto zero, belt holster, molded rubber holster, auto on/off, Data Hold, Max Hold. |
9. Waranti dan Sokongan
For warranty information and technical support, please refer to the official Craftsman webtapak atau hubungi perkhidmatan pelanggan mereka. Simpan resit pembelian anda sebagai bukti pembelian untuk sebarang tuntutan waranti.
Craftsman Customer Service: Sila layari www.craftsman.com/support for the latest support information and contact details.


