1. Pengenalan
Thank you for choosing the Voltcraft VC-11 Digital Multimeter. This portable, Category III, 250V multimeter with a 2000-count display is designed for accurate electrical measurements in various applications. This manual provides essential information for safe operation, proper use, and maintenance of your device. Please read it thoroughly before use and keep it for future reference.
2. Maklumat Keselamatan
WARNING: Electrical shock hazard. Improper use of this meter can cause damage, shock, injury, or death. Read and understand this manual before operating the meter.
- Always ensure the meter is in good working condition and the test leads are not damaged.
- Jangan gunakan lebih daripada vol yang dinilaitage, seperti yang ditanda pada meter, antara terminal atau antara mana-mana terminal dan tanah.
- Gunakan sangat berhati-hati apabila bekerja dengan voltages above 25V AC RMS or 35V DC. These voltagia menimbulkan bahaya kejutan.
- Sentiasa putuskan sambungan petunjuk ujian daripada litar sebelum menukar fungsi atau julat.
- Do not operate the meter with the battery cover removed or loosened.
- Adhere to local and national safety codes. Use personal protective equipment (PPE) such as approved safety glasses and electrically insulated gloves.
3. Produk Lebihview
The Voltcraft VC-11 is a compact digital multimeter featuring a clear LCD display, a rotary function switch, and input jacks for test leads. It is designed for measuring DC/AC voltage, DC current, resistance, and includes diode and continuity test functions.
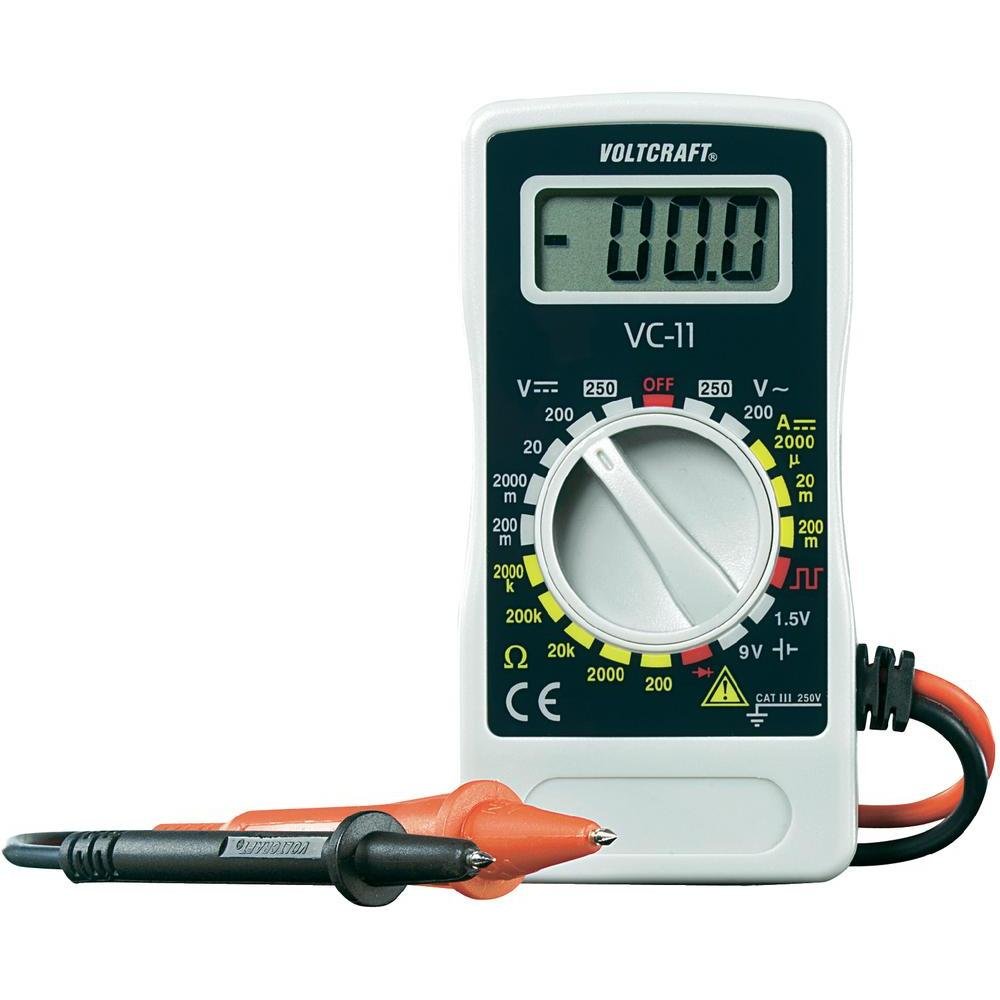
Rajah 1: Depan view of the Voltcraft VC-11 Digital Multimeter with test leads connected. This image shows the LCD display, rotary switch, and input terminals.

Rajah 2: Bersudut view of the Voltcraft VC-11 Digital Multimeter, highlighting the compact design and the CE marking.

Figure 3: The Voltcraft VC-11 Digital Multimeter shown with its test leads detached, illustrating the input ports.
3.1 Komponen
- Paparan LCD: Menunjukkan bacaan ukuran, unit dan penunjuk fungsi.
- Suis Putar: Digunakan untuk memilih fungsi dan julat pengukuran.
- Bicu Input: Ports for connecting the test leads (COM, VΩmA).
- Petunjuk Ujian: Red and black leads for connecting to the circuit under test.
4. Persediaan
4.1 Pemasangan Bateri
The Voltcraft VC-11 requires a 9V battery for operation (not included). To install or replace the battery:
- Pastikan multimeter dimatikan dan putuskan sambungan semua petunjuk ujian.
- Cari penutup petak bateri di belakang meter.
- Gunakan pemutar skru untuk menanggalkan skru yang mengikat penutup bateri.
- Keluarkan penutup dengan berhati-hati.
- Connect a new 9V battery to the battery clip, observing correct polarity.
- Place the battery into the compartment and replace the cover, securing it with the screw.
4.2 Menghubungkan Petunjuk Ujian
Always connect the black test lead to the 'COM' (common) jack. Connect the red test lead to the appropriate input jack based on the desired measurement:
- Untuk Voltage (V), Resistance (Ω), Diode, and Continuity measurements, connect the red lead to the 'VΩmA' jack.
- For Current (A) measurements, connect the red lead to the 'VΩmA' jack (for mA range).
5. Arahan Operasi
Before taking any measurement, ensure the test leads are correctly connected and the rotary switch is set to the desired function and range.
5.1 Mengukur DC Voltage (V=)
- Tetapkan suis putar kepada Vol DC yang dikehendakitage (V=) range (e.g., 200mV, 2V, 20V, 200V, 250V). If the voltage is unknown, start with the highest range and decrease as needed.
- Connect the black test lead to the 'COM' jack and the red test lead to the 'VΩmA' jack.
- Sambungkan kuar ujian secara selari merentasi komponen atau litar yang hendak diukur.
- Baca voltagnilai e pada paparan LCD.
5.2 Mengukur Vol ACtage (V~)
- Tetapkan suis putar kepada Vol AC yang dikehendakitagjulat e (V~) (cth., 200V, 250V).
- Connect the black test lead to the 'COM' jack and the red test lead to the 'VΩmA' jack.
- Connect the test probes in parallel across the AC source or component.
- Baca voltagnilai e pada paparan LCD.
5.3 Measuring DC Current (A=)
- Set the rotary switch to the desired DC Current (A=) range (e.g., 2000µA, 20mA, 200mA).
- Connect the black test lead to the 'COM' jack and the red test lead to the 'VΩmA' jack.
- AMARAN: To measure current, the meter must be connected in series with the circuit. Break the circuit and insert the meter.
- Connect the test probes in series with the circuit.
- Baca nilai semasa pada paparan LCD.
5.4 Mengukur Rintangan (Ω)
- Pastikan litar dinyahtenagakan sebelum mengukur rintangan.
- Set the rotary switch to the desired Resistance (Ω) range (e.g., 200Ω, 2kΩ, 20kΩ, 200kΩ, 2000kΩ).
- Connect the black test lead to the 'COM' jack and the red test lead to the 'VΩmA' jack.
- Sambungkan kuar ujian merentasi komponen yang hendak diukur.
- Baca nilai rintangan pada paparan LCD.
5.5 Ujian Diod
- Pastikan litar dinyahtenagakan.
- Set the rotary switch to the Diode symbol (usually next to resistance).
- Connect the black test lead to the 'COM' jack and the red test lead to the 'VΩmA' jack.
- Sambungkan kuar merah ke anod dan kuar hitam ke katod diod. Paparan akan menunjukkan vol ke hadapantage penurunan.
- Balikkan prob. Paparan hendaklah menunjukkan 'OL' (Beban Lebih) untuk diod yang baik.
5.6 Ujian Kesinambungan
- Pastikan litar dinyahtenagakan.
- Set the rotary switch to the Continuity symbol (usually next to diode/resistance).
- Connect the black test lead to the 'COM' jack and the red test lead to the 'VΩmA' jack.
- Sambungkan kuar ujian merentasi litar atau komponen.
- If the resistance is below a certain threshold (typically 30-50Ω), the meter will emit an audible beep, indicating continuity.
6. Penyelenggaraan
6.1 Pembersihan
Lap meter dengan iklanamp kain dan detergen lembut. Jangan gunakan bahan pelelas atau pelarut. Pastikan meter kering sepenuhnya sebelum digunakan.
6.2 Penggantian Bateri
When the battery symbol appears on the LCD display, the 9V battery needs to be replaced. Refer to section 4.1 for battery installation instructions.
7. Penyelesaian masalah
| Masalah | Kemungkinan Punca | Penyelesaian |
|---|---|---|
| Tiada paparan atau paparan malap | Bateri mati atau lemah | Ganti bateri 9V. |
| Bacaan yang salah | Incorrect function/range selected Poor test lead connection Damaged test leads | Select the correct function and range. Ensure test leads are firmly connected. Inspect and replace damaged test leads. |
| "OL" (Lebihan) dipaparkan | Measurement exceeds selected range Open circuit (for resistance/current) | Select a higher range. Check for breaks in the circuit. |
8. Spesifikasi
- Jenama: KERA VOLTCRAFT
- Nombor Model: VC11
- Pengeluar: KERA VOLTCRAFT
- Berat produk: Approximately 9.07 g (without packaging)
- Dimensi Pakej: 14.8 x 8 x 3.6 cm
- Penilaian Kategori: CAT III 250V
- paparan: 2000 Kiraan
- Sumber Kuasa: Bateri 9V (tidak termasuk)
9. Maklumat Waranti
This product is covered by a standard manufacturer's warranty. Please refer to the warranty card included with your purchase or contact your retailer for specific terms and conditions. The warranty typically covers defects in materials and workmanship under normal use.
10. Sokongan Pelanggan
For technical assistance, troubleshooting, or service inquiries, please contact Voltcraft customer support or your local distributor. Contact information can usually be found on the manufacturer's webtapak atau pada pembungkusan produk.


