1. Pengenalan
This manual provides detailed instructions for the installation, setup, operation, and maintenance of the Intermatic FM1D20A-24 Electronic 24-Hour/7-Day Timer Module. Please read this manual thoroughly before attempting to install or operate the device to ensure proper function and safety.
2. Maklumat Keselamatan
AMARAN: Risk of electric shock. Installation and servicing of this device should be performed by qualified personnel only. Disconnect power at the circuit breaker or fuse before installing or servicing. Follow all national and local electrical codes.
- Ensure the power supply matches the device's voltage rating (24V).
- Jangan melebihi kadar arus maksimum 16A.
- Jauhkan peranti daripada kelembapan dan suhu yang melampau.
- Jangan cuba membuka atau membaiki peranti sendiri. Rujuk kepada kakitangan perkhidmatan yang berkelayakan.
3. Kandungan Pakej
Sahkan bahawa semua komponen hadir semasa membongkar:
- 1 x Intermatic FM1D20A-24 Electronic 24-Hour/7-Day Timer Module
4. Produk Lebihview
The Intermatic FM1D20A-24 is an electronic timer module designed for precise 24-hour and 7-day scheduling. It features a digital display and intuitive controls for programming up to 20 ON/OFF operations.
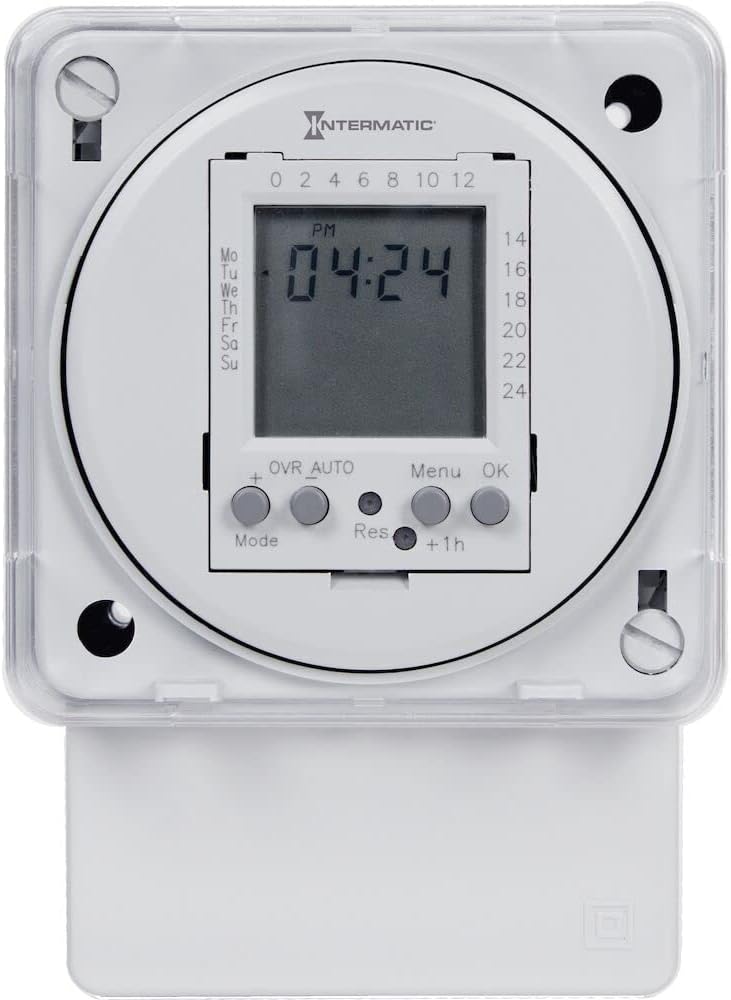
Rajah 1: Depan view of the Intermatic FM1D20A-24 Timer Module, showing the digital display and control buttons.

Rajah 2: jarak dekat view of the timer module's display, indicating current time and day, along with the 'Mode', '+', 'OVR AUTO', 'Res', 'Menu', 'OK', and '+1h' buttons.

Rajah 3: sebelah view of the timer module, illustrating its compact design and potential mounting points for surface or DIN rail installation.
5. Pemasangan
The FM1D20A-24 timer module supports both surface and DIN rail mounting.
5.1 Pemasangan
- Lekapan Permukaan: Secure the module to a flat surface using appropriate screws through the designated mounting holes.
- Pemasangan Rel DIN: Attach the module to a standard DIN rail by snapping it into place.
5.2 Pendawaian
PENTING: All wiring must comply with local and national electrical codes. Ensure power is disconnected before wiring.
- Connect the 24V power supply to the designated input terminals.
- Connect the load (device to be controlled) to the output terminals. The timer module features an SPDT (Single Pole Double Throw) switch style.
- Sahkan semua sambungan selamat sebelum memulihkan kuasa.
6. Persediaan
6.1 Kuasa Permulaan
Upon initial power-up, the display may be blank or show default settings. The internal clock will need to be set.
6.2 Menetapkan Waktu dan Hari Semasa
- Press the 'Mode' button to enter the time setting mode.
- Use the '+' button to adjust the hour, minute, and day.
- Tekan 'OK' untuk mengesahkan setiap tetapan dan beralih ke tetapan seterusnya.
- Once the time and day are set, press 'OK' to exit the setting mode.
6.3 Pengaturcaraan Peristiwa HIDUP/MATI
The timer supports up to 20 ON/OFF operations.
- Press the 'Menu' button to access the programming menu.
- Navigate through the program slots (P1 ON, P1 OFF, P2 ON, P2 OFF, etc.) using the '+' button.
- For each program slot, press 'OK' to select it.
- Use the '+' button to set the desired time and day(s) for the ON or OFF event.
- Tekan 'OK' untuk mengesahkan setiap tetapan.
- Repeat for all desired ON/OFF events.
- Press 'Menu' to exit the programming mode.
7. Arahan Operasi
7.1 Manual Override (OVR AUTO)
The 'OVR AUTO' button allows for temporary manual control of the output, overriding the programmed schedule. Pressing it will toggle the output state (ON/OFF) and return to automatic operation at the next scheduled event.
7.2 Time Adjustment (+1h)
The '+1h' button can be used for quick adjustment of the current time, typically for daylight saving time changes. Pressing it will advance the current time by one hour.
7.3 Reset Function (Res)
The 'Res' (Reset) button is typically a recessed button that requires a pointed object (like a pen tip) to press. This button will reset the timer to its factory default settings, erasing all programmed events and resetting the clock. Use with caution.
8. Penyelenggaraan
The Intermatic FM1D20A-24 timer module requires minimal maintenance.
- Pembersihan: Lap bahagian luar peranti dengan kain lembut dan kering. Jangan gunakan pembersih atau pelarut yang melelas.
- Bateri: This device does not require user-replaceable batteries for operation or memory retention.
- Pemeriksaan: Periksa sambungan pendawaian secara berkala untuk kesesakan dan tanda-tanda haus atau kerosakan.
9. Penyelesaian masalah
9.1 Display is Blank
- Check if the power supply (24V) is connected and active.
- Pastikan semua sambungan pendawaian selamat.
9.2 Programmed Events Not Executing
- Sahkan bahawa waktu dan hari semasa ditetapkan dengan betul.
- Check that the programmed ON/OFF times and days are accurate.
- Ensure the timer is not in manual override mode (check 'OVR AUTO' status).
- Confirm the load is properly connected and functional.
9.3 Peranti Tidak Membalas
- Attempt a soft reset by pressing the 'Res' button with a pointed object. Note that this will erase all settings.
- If the issue persists, disconnect power for a few minutes and then restore it.
10. Spesifikasi
| Nombor Model | FM1D20A-24 |
| Jenama | Intermatik |
| taip | Electronic 24-Hour/7-Day Timer Module |
| Voltage | 24V |
| Kekerapan | 50/60Hz |
| Penilaian Semasa | 16A |
| Max. Number of Operations | 20 (HIDUP/MATI) |
| Jenis Pemasangan | Surface, DIN Rail |
| Tukar Gaya | SPDT |
| bahan | plastik |
| Dimensi Produk | 2.06"D x 83"W x 4"H |
| Berat Barang | 0.01 Auns |
| Pensijilan | UL (Canada and US), CE |
11. Waranti dan Sokongan
For warranty information, please refer to the manufacturer's description or contact Intermatic customer support directly. Technical assistance and further support can be obtained through the official Intermatic webtapak atau pusat perkhidmatan yang dibenarkan.
Pengeluar: Intermatic Incorporated
Webtapak: www.intermatic.com


