1. Produk Lebihview
The Polaroid JXM122 is a portable AM/FM weather band radio designed for reliable reception and ease of use. It features a digital display, programmable station presets, and an integrated NOAA All Hazards Alert System. This manual provides instructions for proper setup, operation, and maintenance of your radio.
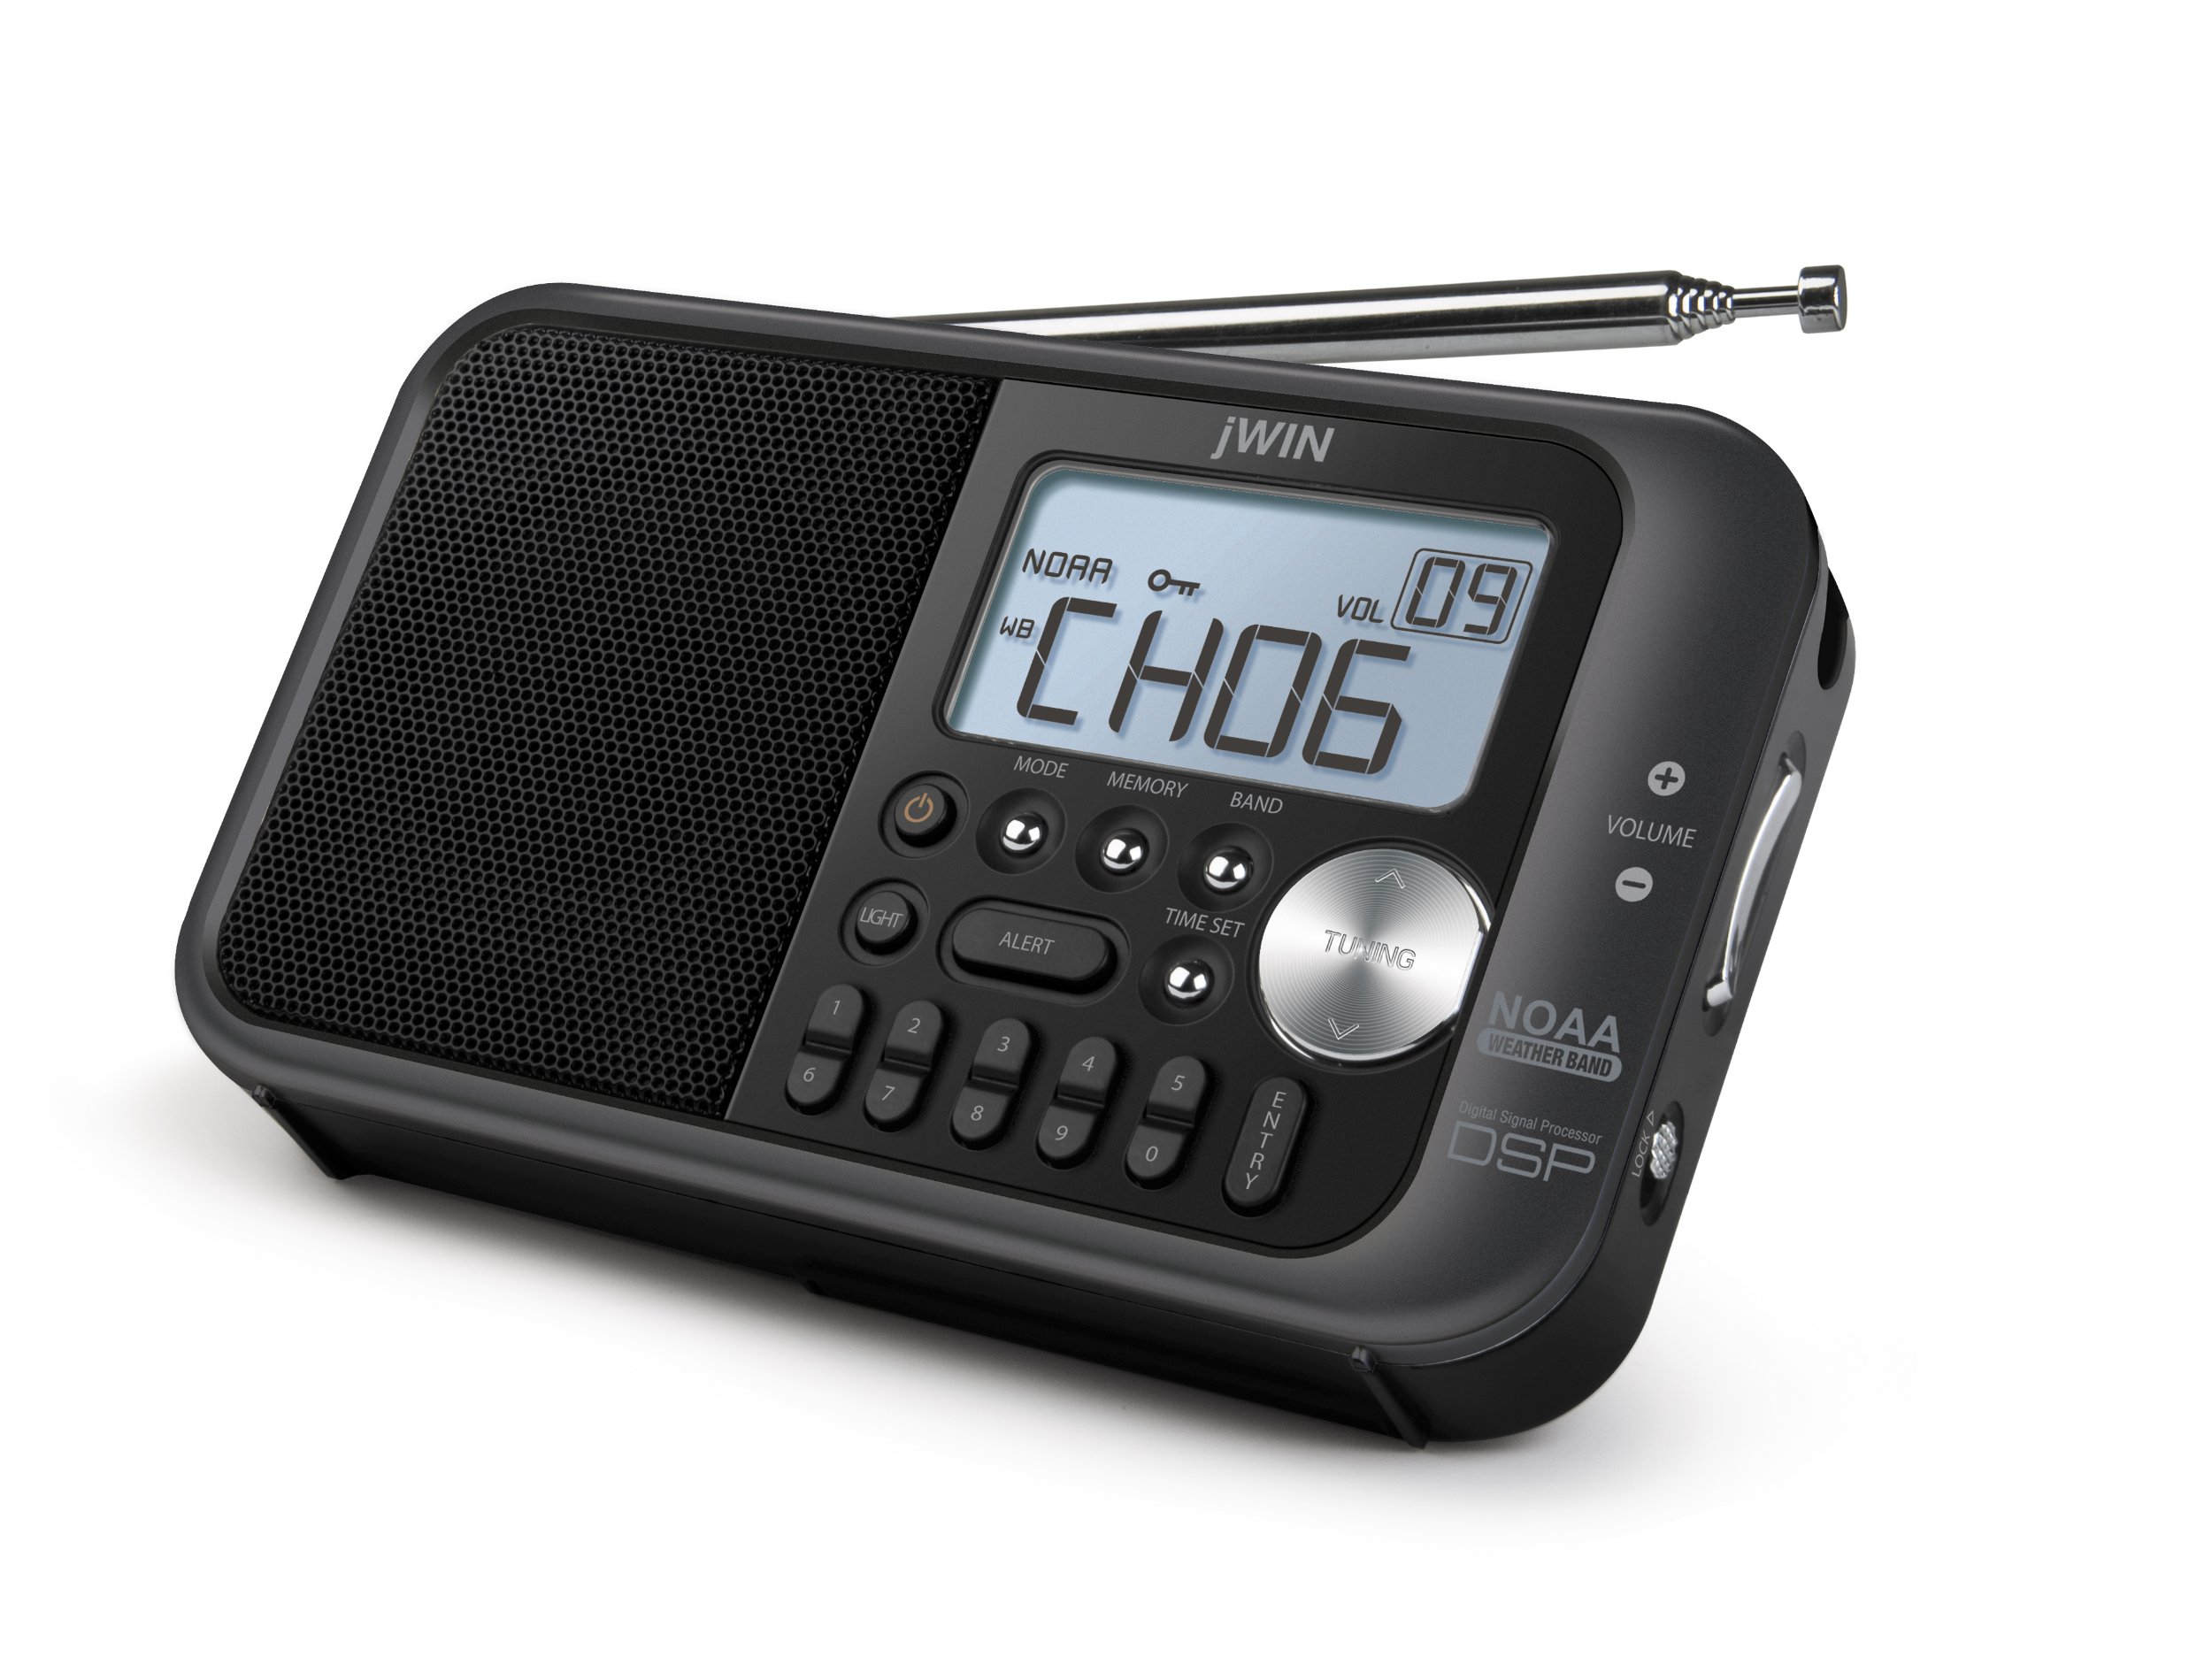
Rajah 1: Depan view of the Polaroid JXM122 radio, highlighting the speaker, digital display, control buttons, and telescopic antenna.
Komponen Utama:
- Penceramah: Located on the left side of the front panel.
- Paparan LCD Digital: Shows frequency, time, band, and other indicators.
- Antena Teleskopik: Extendable for improved reception.
- Butang Kawalan: Including MODE, MEMORY, BAND, TIME SET, TUNING, LIGHT, ALERT.
- Kawalan Kelantangan: '+' and '-' buttons for adjusting audio output.
- Kunci Suis: Mencegah butang ditekan secara tidak sengaja.
- Stand Terbina dalam: For upright positioning.
- Tali Tangan: Untuk kebolehgunaan.
2. Persediaan
2.1 Mengkuasakan Unit
The JXM122 radio can be powered by either an AC adapter or 3 AA batteries.
2.1.1 Pemasangan Bateri
- Cari penutup petak bateri di belakang radio.
- Luncurkan atau tanggalkan penutup untuk membuka.
- Insert 3 AA-size batteries, ensuring correct polarity (+/-) as indicated inside the compartment.
- Gantikan penutup petak bateri dengan selamat.
Note: When replacing batteries, it is recommended to keep the unit connected to AC power if possible to retain saved settings.
2.1.2 AC Power Adapter Connection
- Locate the DC IN jack on the side of the radio.
- Insert the small plug of the supplied AC power adapter into the DC IN jack.
- Palamkan hujung satu lagi penyesuai kuasa AC ke soket dinding standard.
2.2 Pelarasan Antena
For optimal reception, extend the telescopic antenna fully. Adjust its angle and direction to achieve the clearest signal for FM and Weather Band broadcasts. For AM reception, the radio uses an internal antenna; rotating the entire unit may improve signal quality.
3. Arahan Operasi
3.1 Hidupkan/Mati Kuasa
Tekan ke KUASA button (often integrated with the MODE button or a separate button) to turn the radio on or off.
3.2 Pemilihan Band
Tekan ke BAND button repeatedly to cycle through available bands: AM, FM, and Weather Band (WB).
3.3 Stesen Tala
Gunakan MENALA up (∧) or down (∨) buttons to manually adjust the frequency. Press and hold the TUNING buttons for automatic scanning to the next available station.
3.4 Setting and Recalling Presets
The radio allows for 10 AM and 10 FM programmable presets.
3.4.1 Menyimpan Pratetap
- Tune to the desired station using the TUNING buttons.
- Tekan ke MEMORI button. The preset number on the display will flash.
- Use the TUNING buttons to select the desired preset number (0-9).
- Tekan ke MEMORI butang sekali lagi atau MASUK butang untuk mengesahkan dan menyimpan stesen.
3.4.2 Mengingat semula Pratetap
Tekan ke PRESET buttons (numbered 0-9, or use MEMORY and TUNING) to cycle through or directly select saved stations.
3.5 Kawalan Kelantangan
Gunakan JILID + butang untuk meningkatkan kelantangan dan JILID - butang untuk mengurangkannya.
3.6 NOAA All Weather/Hazards Alert System
When in Weather Band (WB) mode, press the ALERT button to activate or deactivate the NOAA alert function. When active, the radio will automatically switch to a NOAA weather alert broadcast if a warning is issued.
3.7 Menetapkan Jam
Tekan dan tahan butang MASA DITETAPKAN button. While the time is flashing, use the TUNING buttons to adjust the hours and minutes. Press TIME SET again to confirm.
3.8 Paparan Lampu Belakang
Tekan ke CAHAYA button to illuminate the LCD display. The backlight may have a timed duration or can be set to stay on, depending on the model's specific settings.
3.9 Fungsi Kunci
Luncurkan KUNCI switch (located on the side of the radio) to the 'Lock' position to disable all buttons and prevent accidental operation. Slide it back to the 'Unlock' position to resume normal function.
4. Penyelenggaraan
4.1 Pembersihan
Wipe the radio's exterior with a soft, dry cloth. Do not use abrasive cleaners, waxes, or solvents, as these can damage the finish. Avoid getting moisture into any openings.
4.2 Penjagaan Bateri
Jika radio tidak akan digunakan untuk tempoh yang lama, tanggalkan bateri untuk mengelakkan kebocoran dan potensi kerosakan pada unit tersebut.
5. Penyelesaian masalah
- Tiada Kuasa:
- Pastikan bateri dipasang dengan betul dan tidak habis.
- Verify the AC adapter is securely connected to both the radio and a working power outlet.
- Check if the LOCK switch is engaged.
- Penerimaan yang lemah:
- Fully extend and adjust the telescopic antenna for FM/WB.
- Rotate the entire radio for better AM reception.
- Alihkan radio daripada peranti elektronik lain yang boleh menyebabkan gangguan.
- Display Not Working/Garbled:
- Replace batteries or ensure stable AC power.
- Jika masalah berterusan, hubungi sokongan pelanggan.
- Tiada Bunyi atau Kelantangan Rendah:
- Increase the volume using the VOLUME + button.
- Ensure no headphones are connected if you intend to use the built-in speaker.
6. Spesifikasi
- Nombor Model: JXM122
- Dimensi Produk: 8.5 x 2 x 4 inci
- Berat Barang: 8 auns
- Pancaragam Radio Disokong: AM, FM, Weather Band (NOAA)
- Teknologi Paparan: LCD dengan lampu latar putih
- Sumber Kuasa: 3 x AA batteries or Corded Electric (AC Adapter included)
- Ciri Khas: Portable, Digital Clock Display, Programmable Presets (10 AM, 10 FM)
- warna: putih
7. Waranti dan Sokongan
This product typically includes a warranty card with purchase. Please refer to the warranty card for specific terms and conditions regarding coverage and duration. For technical support or service inquiries, please contact the manufacturer or your retailer.