1. Pengenalan
Thank you for choosing the iScooter i14 Electric Scooter with Seat. This manual provides essential information for the safe assembly, operation, and maintenance of your new electric scooter. Please read it thoroughly before your first ride and keep it for future reference. Proper use and care will ensure optimal performance and longevity of your scooter.
2. Maklumat Keselamatan
Your safety is paramount. Always wear a helmet and appropriate protective gear (knee pads, elbow pads) when riding. Familiarize yourself with local laws and regulations regarding electric scooter use. Do not ride in adverse weather conditions or on slippery surfaces. Avoid riding under the influence of alcohol or drugs. Regular maintenance checks are crucial for safe operation.
- Sentiasa memakai topi keledar dan alat pelindung.
- Check brakes, tires, and all fasteners before each ride.
- Patuhi undang-undang dan peraturan lalu lintas tempatan.
- Jangan melebihi kapasiti berat maksimum 264 lbs.
- Avoid riding in heavy rain, snow, or on icy roads.
3. Kandungan Pakej
Selepas membuka kotak, sila sahkan bahawa semua komponen ada:
- i14 Skuter Elektrik
- Pengecas
- Manual Pengguna (dokumen ini)
- Kit Alat
4. Persediaan dan Pemasangan
Follow these steps to assemble your iScooter i14 Electric Scooter. A detailed assembly video is provided below for visual guidance.
4.1 Membuka Kotak dan Pemeriksaan Awal
Keluarkan semua komponen daripada pembungkusan dengan berhati-hati. Periksa sebarang kerosakan yang mungkin berlaku semasa penghantaran.

Figure 4.1: The iScooter i14 Electric Scooter with Seat.
4.2 Front Wheel and Fender Installation
Attach the front wheel and fender to the scooter's fork using the provided tools. Ensure all bolts are securely tightened.
4.3 Pemasangan Hendal
Insert the handlebar stem into the main frame and secure it. Adjust the handlebar height to your preference and tighten the quick-release clamp. Attach the handlebar to the stem and secure it with the provided screws.

Figure 4.2: Adjusting the height of the handlebar for comfortable riding.
4.4 Seat Installation
Insert the seat post into the designated slot on the scooter frame. Adjust the seat height for comfortable riding and secure it with the quick-release lever. Ensure the seat is firmly in place.

Figure 4.3: Adjusting the seat height to suit individual rider preferences.
4.5 Rear Basket Attachment
Secure the rear storage basket to the designated mounting points on the scooter's rear rack using the provided hardware. Ensure it is stable and can safely carry items.

Figure 4.4: The spacious rear basket for carrying personal belongings.
4.6 Panduan Video Pemasangan
Video 4.1: This video demonstrates the assembly process for the iScooter i14 Electric Scooter with Seat, including unboxing, attaching the front wheel, handlebar, seat, and rear basket.
5. Arahan Operasi
Understand the controls and features of your iScooter i14 for a safe and enjoyable ride.
5.1 Power On/Off and Key Ignition
Insert the mechanical key into the ignition slot and turn it to the 'ON' position to power on the scooter. The LCD display will illuminate. Turn the key to 'OFF' to power down.
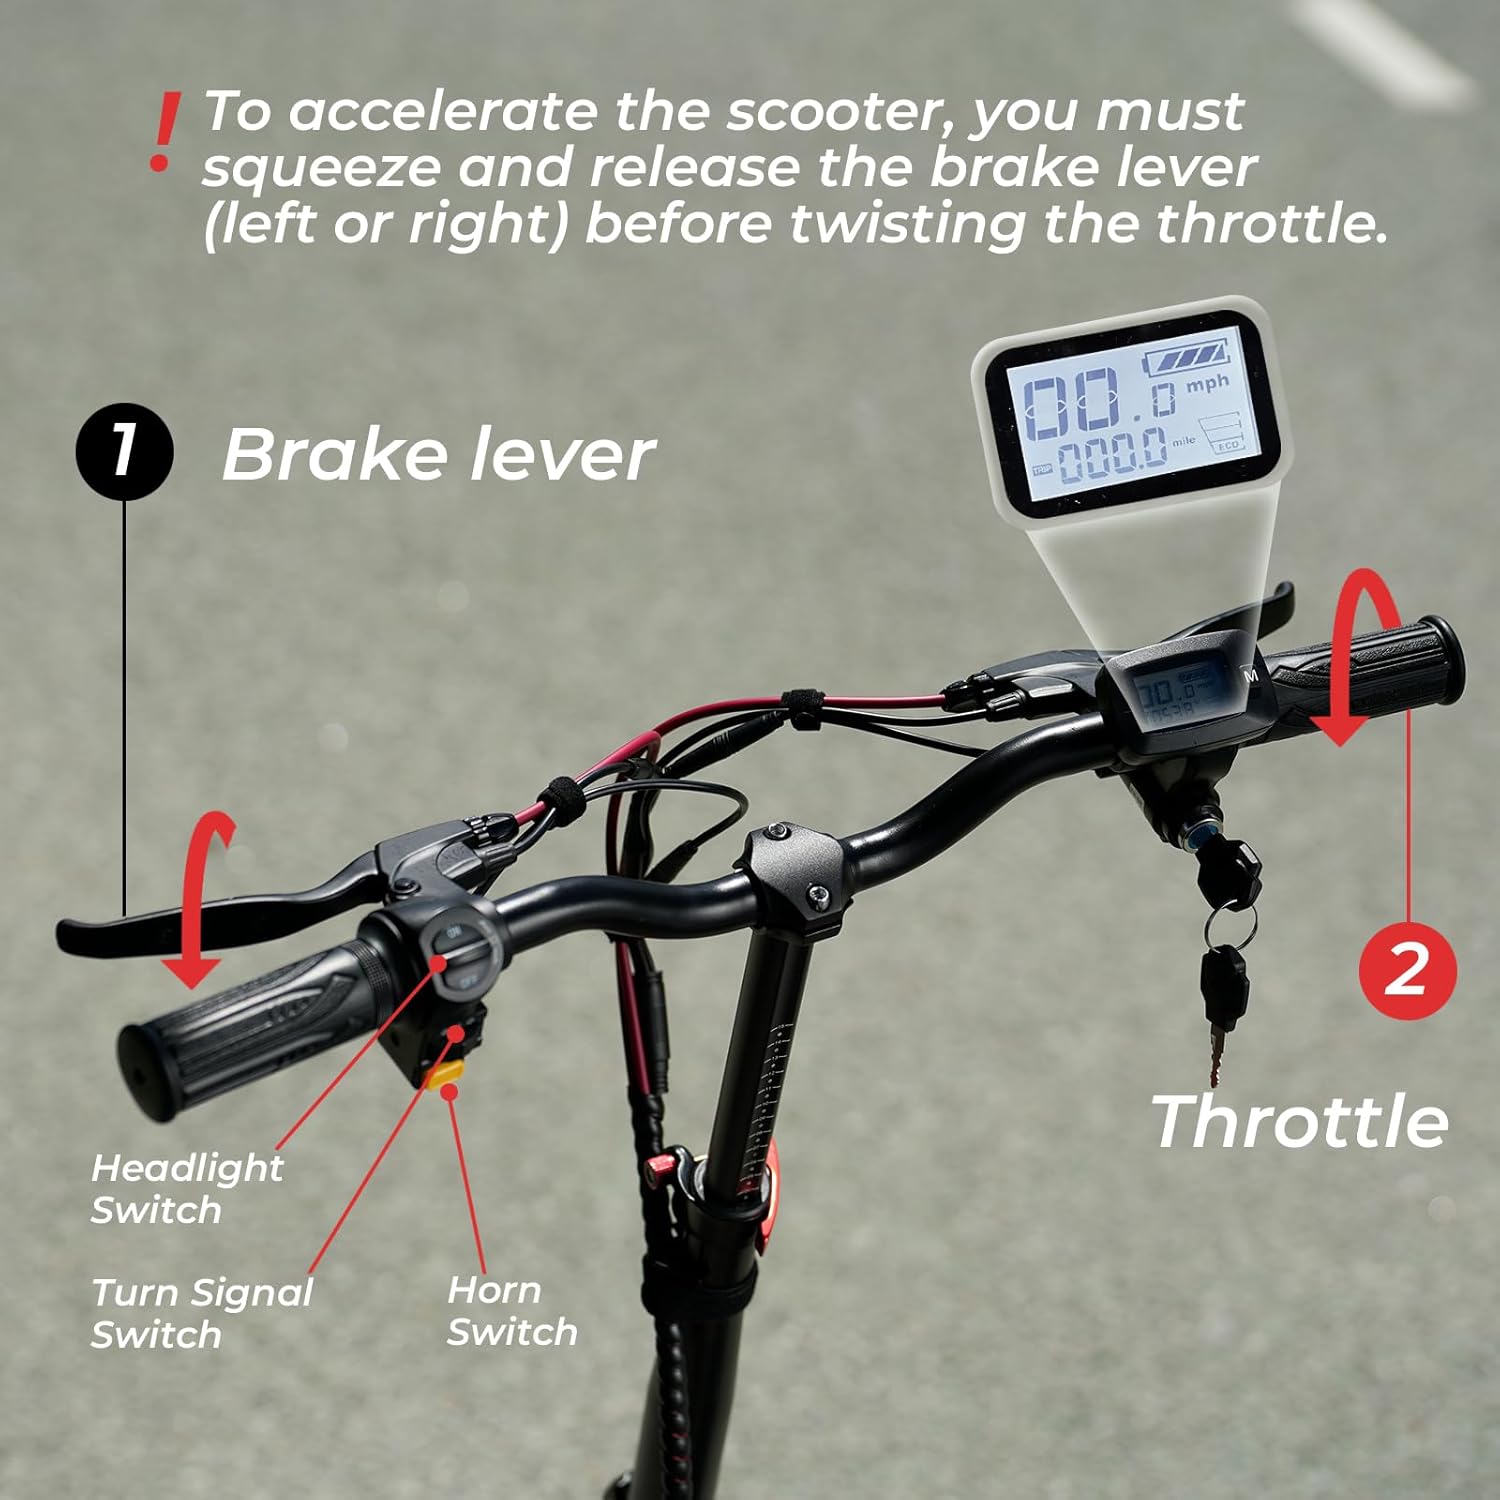
Gambar 5.1: Lebihview of the handlebar controls, including the LCD display, key ignition, and switches.
5.2 Mod Kelajuan
The iScooter i14 offers 3 adjustable speed modes: 9 MPH, 21 MPH, and 28 MPH. To switch between modes, press the 'M' button on the display twice. Select the appropriate speed mode based on your riding environment and experience level.
5.3 Operasi Pendikit
To accelerate, you must first squeeze and release either the left or right brake lever before twisting the throttle. This safety feature prevents accidental acceleration. Twist the throttle gently to control your speed.
5.4 Lampu, Hon, dan Isyarat Membelok
Use the dedicated switches on the handlebar to activate the front and rear LED lights for visibility, the horn for alerts, and the turn signals to indicate your direction to others.

Figure 5.2: The bright front LED light enhances visibility during low-light conditions.

Figure 5.3: The rear LED light ensures you are seen from behind, improving safety.
5.5 Sistem Brek
The scooter is equipped with front and rear disc brakes, along with an electric lock system, for powerful and reliable stopping performance. Apply both brake levers gently and evenly to slow down or stop. Avoid sudden, harsh braking, especially at high speeds.

Figure 5.4: The robust disc brake system provides effective stopping power.
6. Operasi Mengecas
To charge your iScooter i14, locate the charging port on the scooter's deck. Connect the charger to the port, then plug the charger into a standard wall outlet. The indicator light on the charger will typically turn red during charging and green when fully charged. A full charge takes approximately 8 hours.
Video 6.1: This video demonstrates the charging process for the iScooter i14 Electric Scooter.
7. Penyelenggaraan
Penyelenggaraan tetap memastikan umur panjang dan operasi selamat skuter anda.
- Tekanan Tayar: Check the pressure of the 14-inch pneumatic tires regularly. Maintain the recommended PSI as indicated on the tire sidewall for optimal ride comfort and range.
- Pemeriksaan Brek: Periodically inspect the front and rear disc brakes for wear and proper function. Adjust brake cables if necessary to ensure responsive braking.
- Pembersihan: Bersihkan skuter dengan iklanamp kain. Elakkan menggunakan pancutan air tekanan tinggi secara langsung pada komponen elektrik.
- Penjagaan Bateri: Store the scooter in a cool, dry place. If storing for extended periods, charge the battery to approximately 50-70% and recharge every 1-2 months to prevent deep discharge.
- Pengikat: Periksa semua skru, bolt dan mekanisme pelepas cepat secara berkala untuk memastikan ia ketat dan kukuh.
8. Penyelesaian masalah
Berikut ialah beberapa isu biasa dan potensi penyelesaiannya:
| Masalah | Kemungkinan Punca | Penyelesaian |
|---|---|---|
| Skuter tidak dihidupkan | Low battery; Key not fully turned; Loose connections | Charge battery; Ensure key is in 'ON' position; Check all visible cable connections. |
| Motor tidak terlibat | Brake lever not released before throttle; Faulty throttle; Motor issue | Ensure brake lever is released; Contact customer support if issue persists. |
| Brek terasa lemah | Pad brek haus; Kabel brek longgar; Udara dalam sistem hidraulik (jika berkenaan) | Inspect brake pads for wear and replace if needed; Adjust brake cable tension; Consult a professional for hydraulic brake issues. |
| Bunyi luar biasa semasa operasi | Komponen longgar; Serpihan pada roda/brek; Masalah motor | Check all fasteners; Inspect wheels and brakes for obstructions; Contact customer support. |
9. Spesifikasi
| Ciri | Spesifikasi |
|---|---|
| Jenama | iScooter |
| Nama Model | i14 |
| Kuasa Motor | 800W |
| Kelajuan Teratas | 28 MPH |
| Julat Jarak Maksimum | 34 Batu |
| Bateri | 48V 10.4Ah |
| Masa Mengecas | 8 Jam |
| Saiz Tayar | 14 Inci |
| Jenis Tayar | Pneumatik |
| Jenis Penggantungan | Dual Suspension (Front & Rear) |
| Gaya Brek | Double Disc Brakes & EABS Braking Systems |
| Had berat | 264 paun |
| Berat Barang | 72 paun |
| Dimensi Produk (LxWxH) | 43"L x 17"W x 45"H |
| Bahan Bingkai | aluminium |
| Ciri Khas | 800W Motor, 28MPH Top Speed, 34MILES Long Range, Dual Suspension, Adjustable Height, Adjustable Seat |
| Penggunaan yang Disyorkan | berulang alik |
10. Waranti dan Sokongan
10.1 Maklumat Waranti
iScooter offers a 12-month or 180-day warranty on different components of your product. Please refer to the specific warranty terms provided with your purchase for detailed coverage.
10.2 Sokongan Pelanggan
For any questions, concerns, or assistance with your iScooter i14, please contact our customer support team:
- Pusat Panggilan: +1 (855) 916-2366
- Live Chat/Email: support@iscooterglobal.com
Our customer support team is available to assist you.

Figure 10.1: iScooter customer support details for assistance.