
pengenalan
The Xvive AT-2 Pro is a compact, multi-functional audio testing device designed for audio professionals and enthusiasts. It integrates five essential tools: a signal generator, an XLR cable tester, a 48V phantom power checker, an XLR input meter, and a headphone/built-in speaker monitor. This manual provides instructions for the proper use and maintenance of your AT-2 Pro to ensure optimal performance and longevity.

Image: The Xvive AT-2 Pro highlighting its five core functions.
Maklumat Keselamatan
- Jangan dedahkan peranti kepada air atau kelembapan berlebihan.
- Elakkan suhu yang melampau.
- Jangan cuba membuka atau mengubah suai unit. Rujuk semua servis kepada kakitangan yang berkelayakan.
- Use only the specified USB-C cable for charging.
- Jauhkan daripada kanak-kanak.
Kandungan Pakej
Sahkan bahawa semua item terdapat dalam pakej anda:
- Xvive AT-2 Pro Audio Tester Unit
- Kabel Pengecas USB-C
- Penyesuai Jack
- Kantung Pelindung

Image: Contents of the Xvive AT-2 Pro package.
Produk Selesaiview: Controls and Features
Familiarize yourself with the various inputs, outputs, and controls on your AT-2 Pro.
Imej: Terperinci view of the AT-2 Pro's control panel.
- XLR Input/Output: Standard 3-pin XLR connectors for cable testing, signal generation, and input metering.
- 1/4" Jack Input/Output: For connecting to various audio equipment.
- 1/8" Headphone Output: Untuk memantau audio.
- Tombol Kelantangan: Adjusts headphone and built-in speaker volume.
- Signal Generator Buttons: Select 1kHz Tone or Pink Noise.
- Output Pad Switches: Adjust output level (-10dB, -20dB, -40dB).
- XLR Cable Test Button: Initiates XLR cable pin-by-pin test.
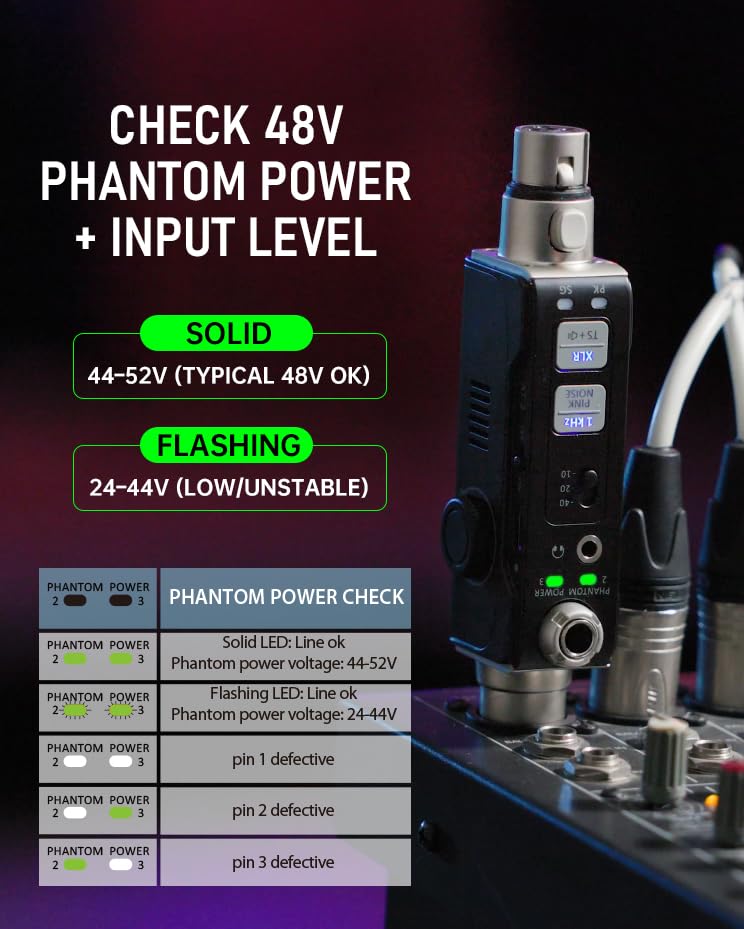
- Phantom Power Check LEDs: Indicate 48V phantom power status.
- Input Level Meter LEDs: Display signal presence (SG) and peak levels (PK).
- Port USB-C: Untuk mengecas bateri dalaman.
Persediaan dan Pengecasan
Pengecasan Awal
Before first use, fully charge the AT-2 Pro using the provided USB-C cable. Connect the cable to the USB-C port on the device and to a standard USB power adapter (not included). The charging indicator will show progress and turn off when fully charged (approximately 1.5 hours).
Menghidupkan/Mematikan
Press and hold the power button to turn the device on or off. The display will illuminate upon activation.
Mod Pengendalian
1. Signal Generator (1kHz Tone & Pink Noise)
The signal generator provides a clean test signal for various audio equipment.
- Connect the AT-2 Pro to the input of the device you wish to test (e.g., mixer, DI box, active speaker) using an XLR or 1/4" cable.
- Tekan ke Nada 1kHz or Pink Noise button to select the desired signal.
- Adjust the output level using the -10/-20/-40 dB pad switches to match the input sensitivity of the connected equipment.
- Monitor the signal through the connected equipment or via the AT-2 Pro's headphone output/built-in speaker.

Image: Signal Generator function in use.


2. XLR Cable Tester (Pin-by-Pin)
Test XLR cables for continuity and correct wiring.
- Connect both ends of the XLR cable to the AT-2 Pro's XLR input and output ports.
- Tekan ke XLR Cable Test button. The device will automatically cycle through pins 1, 2, and 3, indicating their status.
- Alternatively, you can manually select pins to test by repeatedly pressing the button.
- Green LEDs indicate a good connection for each pin. Red LEDs or no illumination indicate a fault.

Image: XLR Cable Tester in action, showing pin status.
3. 48V Phantom Power Check + XLR Input Metering
Verify phantom power supply and monitor input signal levels.
- Connect the AT-2 Pro to an XLR input that is expected to provide phantom power.
- The Pemeriksaan Kuasa Hantu LEDs will indicate the voltage: a solid light for 44-52V (typical 48V OK) and a flashing light for 24-44V (low/unstable).
- The XLR Input Meter LEDs (SG for Signal, PK for Peak) will illuminate to show signal presence and warn of very hot levels.

Image: Phantom Power Check and Input Level Meter.
4. Headphone/Built-in Speaker Monitoring
Listen to incoming audio signals directly from the device.
- Connect headphones to the 1/8" headphone output jack or use the built-in speaker.
- Adjust the volume using the dedicated volume knob.
- This feature allows for quick verification of audio signals at any point in your signal chain.

Image: Headphone Monitoring feature.
Menyelesaikan masalah
Common issues and solutions for the Xvive AT-2 Pro.
| Masalah | Kemungkinan Punca | Penyelesaian |
|---|---|---|
| Tiada kuasa | Low battery; device off | Charge the unit; press and hold power button to turn on. |
| No signal from generator | Incorrect output pad setting; incorrect cable connection | Adjust output pad; ensure cables are securely connected. |
| XLR cable test fails | Faulty cable; improper connection | Ensure cable is fully inserted; replace cable if necessary. |
| No phantom power detected | Source not providing 48V; faulty source | Verify phantom power is enabled on the source; test with another source. |
| No audio from headphone/speaker | Volume too low; no input signal | Increase volume; ensure an audio signal is present at the input. |
Spesifikasi
- model: AT-2 PRO
- Fungsi: Signal Generator (1kHz Tone, Pink Noise), XLR Cable Tester, 48V Phantom Power Checker, XLR Input Meter, Headphone/Built-in Speaker Monitor
- Output Pad Levels: -10dB, -20dB, -40dB
- Phantom Power Detection: Solid LED (44-52V), Flashing LED (24-44V)
- Bateri: Rechargeable Nonstandard Battery (included)
- mengecas: USB-C, approx. 1.5 hours for full charge
- Dimensi: 8.19 x 4.29 x 2.6 inci (anggaran)
- Berat: 5.3 auns (anggaran)
Video Produk Rasmi
Video: Seorang pegawai tamatview of the Xvive AT-2 Pro Audio Tester, demonstrating its 5-in-1 signal generator, XLR cable tester, and other features.
Waranti dan Sokongan
The Xvive AT-2 Pro Audio Tester comes with a limited manufacturer's warranty. For detailed warranty information, technical support, or service inquiries, please refer to the official Xvive weblaman web atau hubungi khidmat pelanggan mereka secara langsung. Simpan resit pembelian anda sebagai bukti pembelian untuk tuntutan jaminan.
Untuk bantuan lanjut, sila layari Xvive Store on Amazon.