pengenalan
Thank you for choosing the COWSAR Commercial Single Serve Coffee Maker. This manual provides essential information for the safe and efficient operation, maintenance, and troubleshooting of your new coffee machine. Please read it thoroughly before first use and keep it for future reference.
Produk Selesaiview
The COWSAR Commercial Single Serve Coffee Maker is designed for convenience and versatility, allowing you to brew coffee using both K-Cup capsules and ground coffee. It features instant-heat technology, multiple brew sizes, and an intuitive touchscreen interface.

Rajah 1: Depan view of the COWSAR Commercial Single Serve Coffee Maker.
Persediaan
1. Membongkar
- Keluarkan semua komponen dari pembungkusan dengan berhati-hati.
- Keluarkan sebarang filem atau pelekat pelindung daripada perkakas.
2. Pembersihan Awal
- Wash the removable water tank, drip tray, and coffee holders with warm, soapy water. Rinse thoroughly and dry.
- Lap bahagian luar pembuat kopi dengan damp kain.
3. Mengisi Tangki Air
- Remove the 40 oz detachable water tank from the back of the unit.
- Fill the tank with fresh, cold water up to the MAX fill line.
- Place the water tank back onto the coffee maker, ensuring it is securely seated.

Figure 2: Detachable 40 oz water tank and removable drip tray for easy cleaning.
Arahan Operasi
Panel Kawalan Terlaluview

Figure 3: Intuitive touchscreen interface with brew size options (6oz, 8oz, 10oz, 12oz, 14oz), ON/OFF, SIZE, and BREW buttons. Also includes 'ADD WATER' and 'CLEAN' indicators.
Brewing with K-Cup Capsules
- Pastikan tangki air diisi.
- Lift the lid of the coffee maker.
- Insert a K-Cup capsule into the capsule holder. Note that the needle in the holder will puncture the capsule.
- Tutup penutup dengan kuat.
- Place your coffee mug on the drip tray.
- Tekan ke HIDUP/MATI butang untuk menghidupkan mesin.
- Tekan ke SAIZ button repeatedly to select your desired brew size (6oz, 8oz, 10oz, 12oz, or 14oz).
- Tekan ke BREW button to start brewing. The machine will heat water instantly and dispense coffee.
- To stop brewing at any time, press the BREW butang lagi.
- After brewing, turn off and unplug the machine. Wait for the machine to cool down before carefully removing and discarding the used capsule. Clean the capsule holder to prevent scalding.
Video 1: Demonstrates the process of brewing coffee using a K-Cup capsule, including insertion, size selection, and brewing initiation.
Bancuh dengan Kopi Kisar
- Pastikan tangki air diisi.
- Lift the lid of the coffee maker.
- Remove the K-Cup capsule holder and insert the reusable ground coffee basket.
- Add your desired amount of ground coffee to the basket. Do not exceed the MAX fill line. Refer to the table below for recommended coffee powder weights based on brew size.
- Tutup penutup dengan kuat.
- Place your coffee mug on the drip tray.
- Tekan ke HIDUP/MATI butang untuk menghidupkan mesin.
- Tekan ke SAIZ button repeatedly to select your desired brew size (6oz, 8oz, 10oz, 12oz, or 14oz).
- Tekan ke BREW button to start brewing. The machine will heat water instantly and dispense coffee.
- To stop brewing at any time, press the BREW butang lagi.
- After brewing, turn off and unplug the machine. Wait for the machine to cool down before carefully removing and cleaning the ground coffee basket.
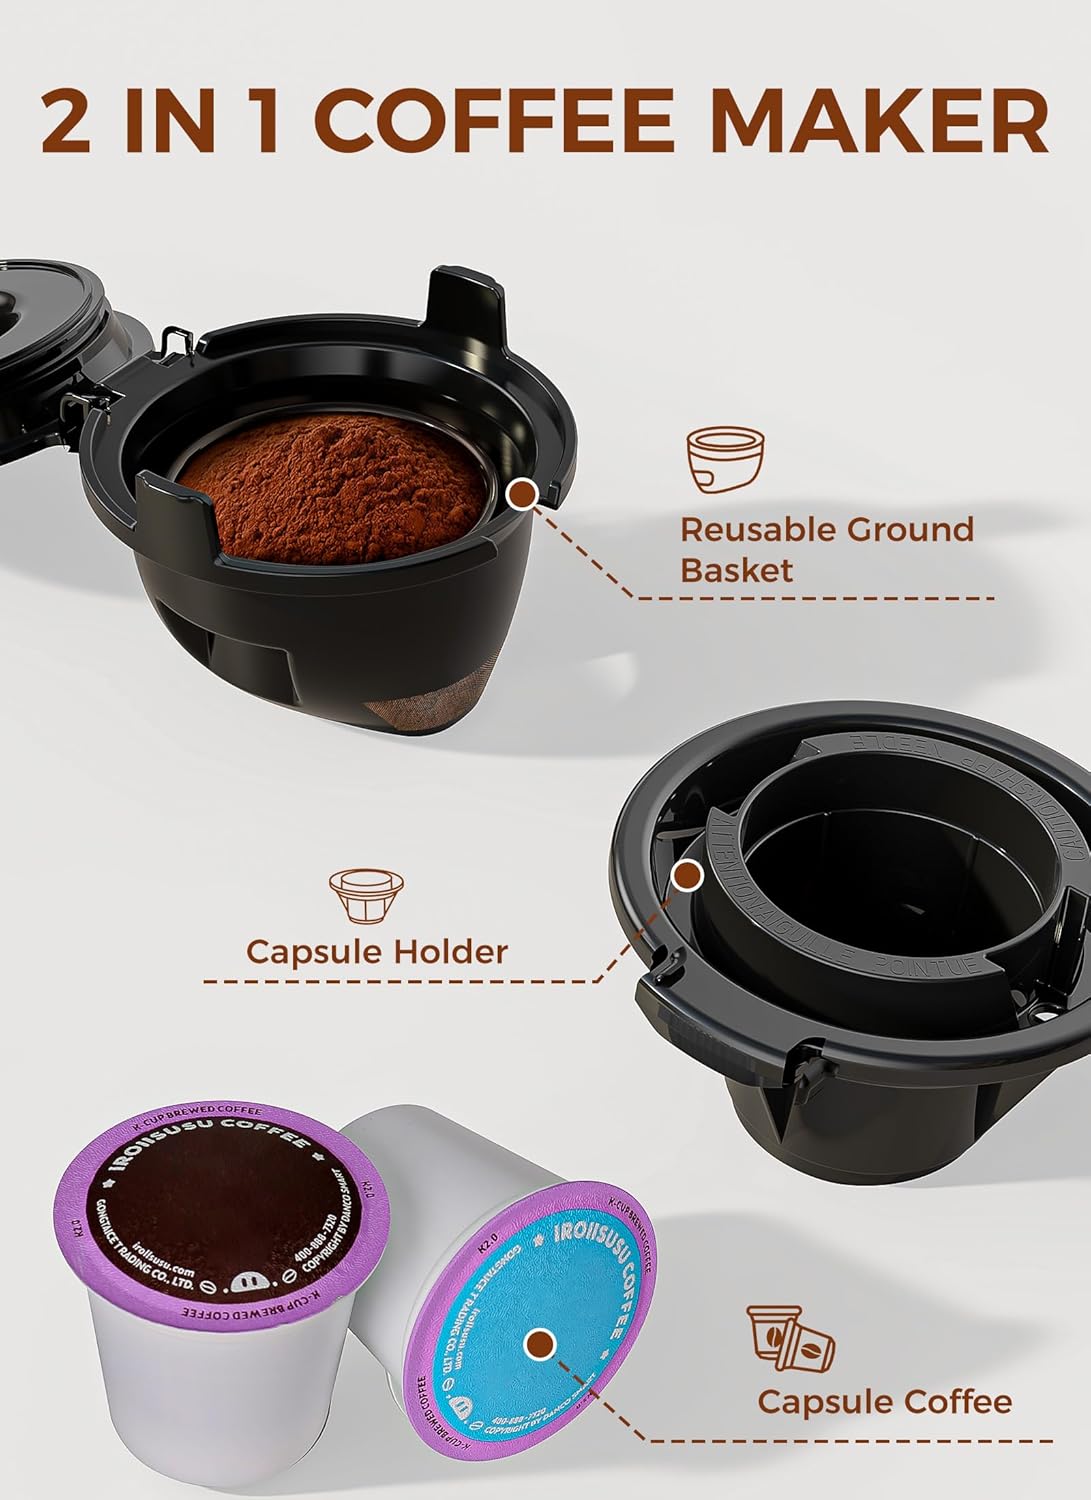
Figure 4: The 2-in-1 design allows for both K-Cup capsules and a reusable ground coffee basket.
Video 2: Illustrates the steps for brewing coffee using ground coffee, including filling the reusable filter and initiating the brew cycle.
Brew Size Options

Figure 5: The coffee maker offers five brew sizes: 6oz, 8oz, 10oz, 12oz, and 14oz.
Optimal Brewing Temperature

Figure 6: The coffee maker heats water to an ideal 190°F for optimal coffee extraction.
Penyelenggaraan
Pembersihan Harian
- Sentiasa cabut plag pembancuh kopi sebelum membersihkan.
- Remove and empty the drip tray. Wash it with warm, soapy water and rinse thoroughly.
- Remove the water tank, empty any remaining water, and wash it with warm, soapy water. Rinse thoroughly.
- Clean the K-Cup capsule holder or ground coffee basket after each use to prevent residue buildup.
- Lap bahagian luar mesin dengan iklanamp kain. Jangan rendam unit utama dalam air.
Penyahkelasan
The descaling indicator light will notify you when it's time for a deep clean (typically after 150 cycles). Regular descaling helps maintain optimal performance and extends the lifespan of your coffee maker.

Figure 7: The descaling indicator light will flash when descaling is required.
- Prepare a descaling solution using descaling powder, tablets, or liquid descaler. Follow the descaler product's instructions for mixing. For example, empty one sachet of descaling agent into 1.2 liters of water and stir to dissolve.
- Pour the descaler solution into the water tank.
- Place a large container (at least 14 oz capacity) on the drip tray to collect the solution.
- Power on the machine. Long press the BREW button until the descaling mode is activated (the blue light of the descaling indicator will be steady on).
- The machine will pump approximately 14 ounces of water per round. This process takes about 4 minutes per round.
- Repeat the descaling process until the water tank is empty.
- After descaling, clean the water tank and fill it with clean water.
- Repeat the pumping process with clean water (long press BREW button) to rinse any residual descaling solution from the machine. Perform several rinse cycles until the water tank is empty.
- Turn off and unplug the machine. Dry all parts and reassemble.
Video 3: Detailed guide on how to perform the descaling process for the coffee maker.
Fungsi Pembersihan Diri
For a quick clean, add the minimum amount of white vinegar to the water reservoir and long press the BREW button for 5 seconds to activate the self-cleaning function.

Figure 8: Illustration of the self-cleaning function using white vinegar.
Menyelesaikan masalah
- Mesin tidak dihidupkan: Pastikan kord kuasa dipasang dengan selamat ke dalam salur keluar elektrik yang berfungsi.
- Tiada pendispensan air: Check if the water tank is properly filled and seated. The 'ADD WATER' indicator will flash if the tank is low.
- Coffee not brewing properly: Ensure the K-Cup capsule or ground coffee basket is correctly inserted and the lid is fully closed. Check for any blockages in the needle or filter.
- Slow brewing or unusual noise: This may indicate a need for descaling. Follow the descaling instructions in the Maintenance section.
- Kebocoran air: Ensure the water tank and drip tray are correctly positioned and not overfilled. Check for any cracks or damage to components.
Spesifikasi
| Ciri | Perincian |
|---|---|
| Jenama | COWSAR |
| Nama Model | CM3729E-BLACK-2 |
| warna | HITAM |
| Dimensi Produk | 11.14"D x 5.51"W x 12.09"H |
| Berat Barang | 3.97 paun |
| Jenis Pembancuh Kopi | Mesin Kopi Titis |
| Ciri Khas | Compatible with Ground Coffee and Capsules, Instant-Heat, Programmable, Removable Tank |
| Jenis Input Kopi | Capsule, Ground Coffee |
| Compatible Coffee Pods | K-Cup |
| Kapasiti Tangki Air | 40 Auns |
| Saiz Brew | 6oz, 8oz, 10oz, 12oz, 14oz |
| Input Antara Muka Manusia | Skrin sentuh |
| Voltage | 120 Volt |
| Adakah Mesin Cuci Pinggan Selamat | Tidak |

Figure 9: Detailed dimensions of the coffee maker for counter space planning.

Figure 10: The integrated cord storage feature helps keep your countertop tidy when the machine is not in use.
Waranti dan Sokongan
For warranty information or technical support, please refer to the product packaging or contact COWSAR customer service directly. Keep your purchase receipt as proof of purchase for warranty claims.