fishkeeper FK092-NEW
fishkeeper Automatic Fish Feeder (Model FK092-NEW) User Manual
Arahan komprehensif untuk persediaan, operasi dan penyelenggaraan.
pengenalan
This manual provides detailed instructions for the safe and efficient use of your fishkeeper Automatic Fish Feeder, Model FK092-NEW. Please read this manual thoroughly before operating the device to ensure proper function and longevity.
Kandungan Pakej
Sahkan bahawa semua item yang disenaraikan di bawah disertakan dalam pakej anda:
- 1 x fishkeeper Automatic Fish Feeder (Model FK092-NEW)
- 1 x Desiccant Container
- 1 x Feed Outlet Chute
- 2 x Foot Supports
- 1 x 6.56ft/2m Power Cord (6V 1A)
- 3 x Feeding Reduction Clips
- 2 x Kuku
- 1 x Manual Pengguna

Persediaan
1. Pilihan Kuasa
The fishkeeper Automatic Fish Feeder offers two power supply options:
- Kuasa AC: Use the included 6.56ft/2m power cord for direct connection to an AC outlet.
- Kuasa Bateri: For cordless operation, install 4 AAA batteries (not included). This provides approximately 1-6 months of battery life.

Video: Demonstrates the power options, weather resistance, and installation methods for the fishkeeper pond feeder.
2. Pilihan Pemasangan
The feeder offers two installation methods:
- Secure to the Pond:
- Install the foot supports outwards on the base of the feeder.
- Secure the foot supports with the provided nails to a hard surface next to your pond (e.g., solid ground, wooden flooring, or tile).
- Placed on the Aquarium Cover:
- Install the feed outlet chute onto the feeder.
- Place the feeder directly on top of your indoor aquarium cover, ensuring the feed chute is positioned over the water.

Video: Demonstrates the power options, weather resistance, and installation methods for the fishkeeper pond feeder.
3. Mengisi Pengumpan
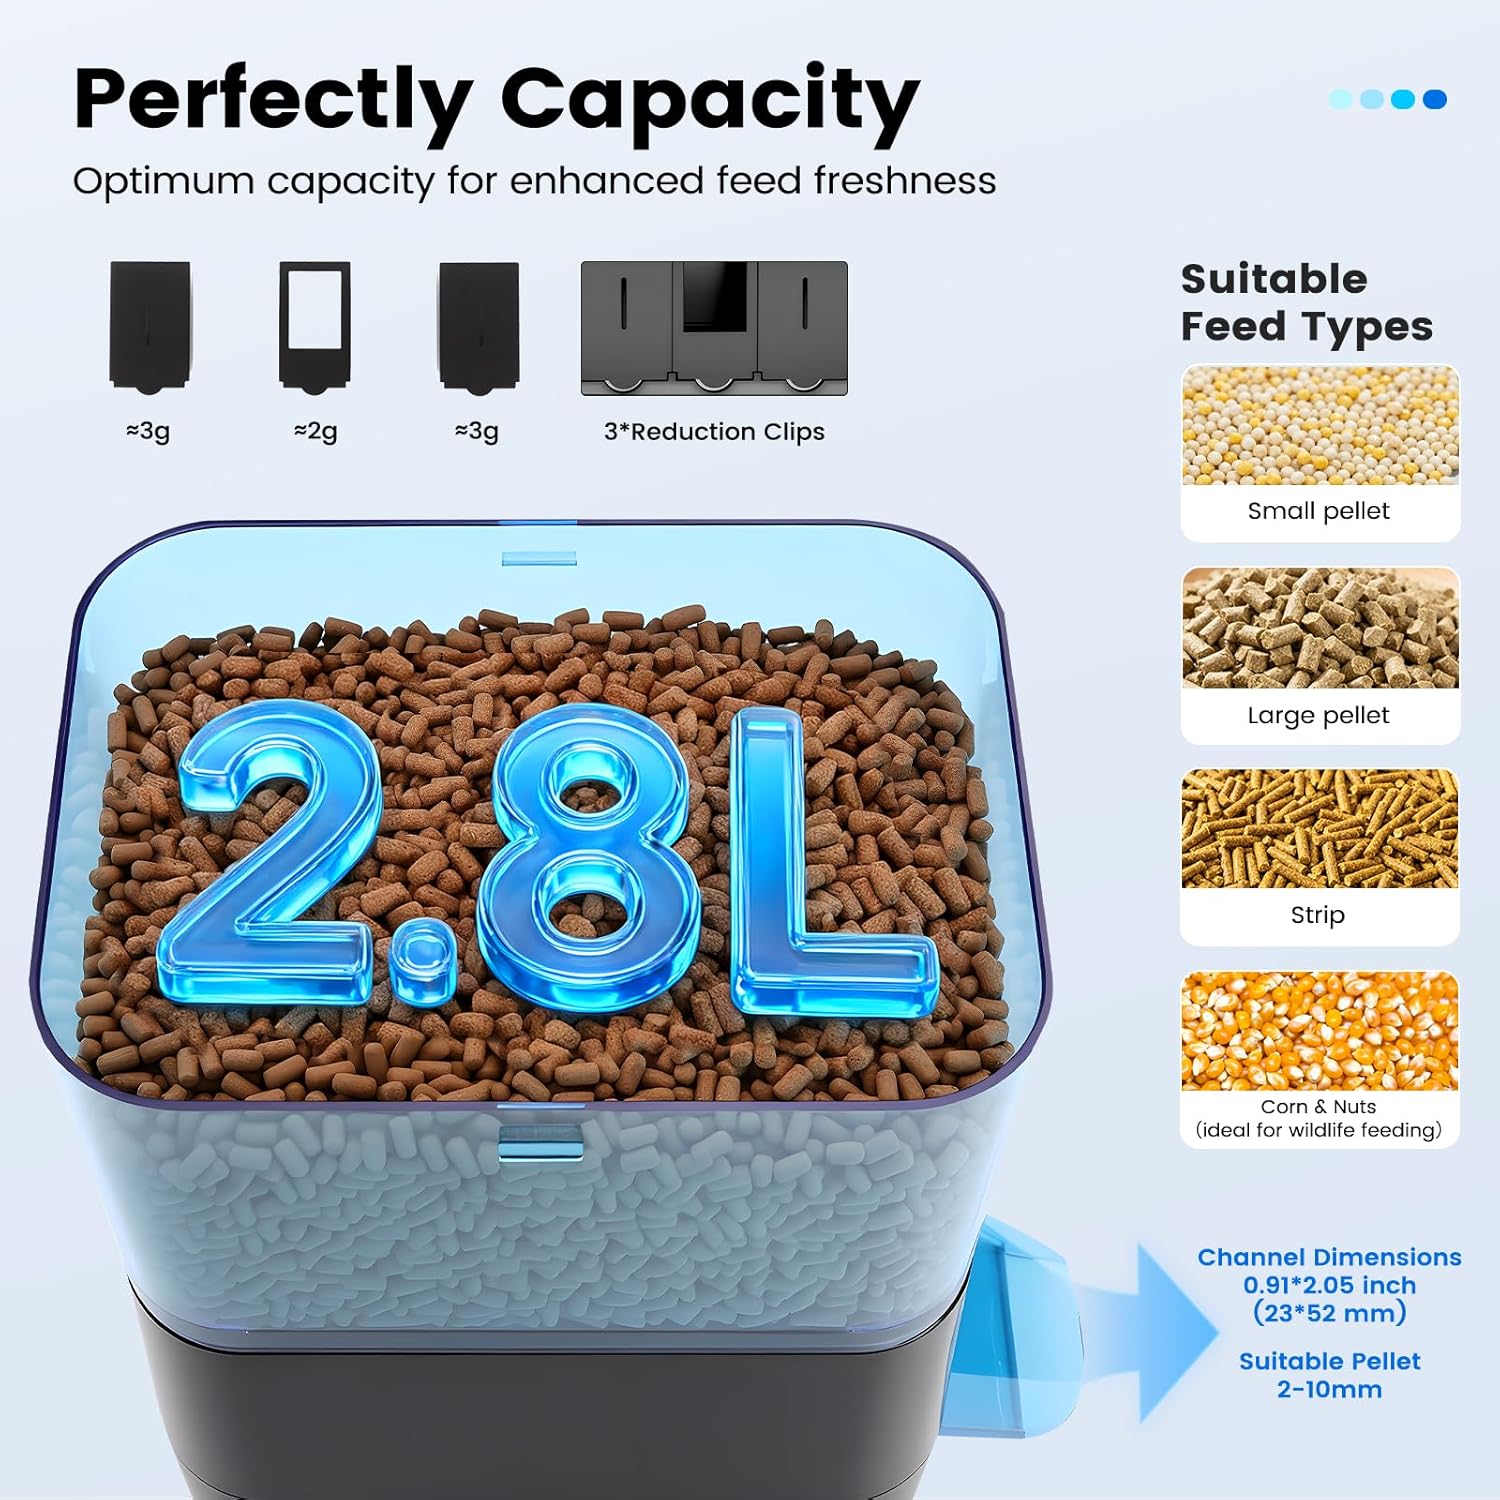
The feeder has a 2.8L capacity. To fill:
- Buka penutup atas pengumpan.
- Pour the desired fish food into the container. Ensure the food type is suitable (small pellet, large pellet, strip, corn & nuts).
- Close the lid securely. The lid features a locking mechanism to prevent accidental spillage and a dedicated desiccant slot to keep food dry (desiccant not included).
Arahan Operasi
1. LCD Display Overview
The feeder features an LCD display and control buttons for programming. Familiarize yourself with the display elements:
- ARAHAN: Button to switch between modes.
- SET: Button to confirm settings.
- +: Button to increase values or cycle through options.
- -: Button to decrease values or cycle through options.
- sekarang: Indicates current time setting.
- Vol (Feeding Volume): Indicates the number of times the feeder dispenses food per feeding session (1-99 portions).
- Masa: Indicates specific feeding times (up to 6 meals per day in Custom Mode).
- Int (Precise Mode Feeding Interval): Sets the feeding interval (e.g., "0" for daily, "1" for every other day).

2. Current Time Calibration
To set the current time on your feeder:
- Tekan ke MODE button to display the "Now" part.
- Tekan dan tahan butang SET butang selama 3 saat.
- Gunakan + or - butang untuk melaraskan jam.
- Tekan SET again to switch to minutes.
- Gunakan + or - butang untuk melaraskan minit.
- Tekan SET again to finish setting the time.
Video: Step-by-step guide on setting the current time on the feeder's LCD display.

3. Setting Up Lazy Mode (Preset Timer)
Lazy Mode offers 9 preset feeding schedules for convenience:
| Jadual | Feeding Times |
|---|---|
| 1d8 (8 meals per day) | 6:00, 8:00, 10:00, 12:00, 14:00, 16:00, 18:00, 20:00 |
| 1d6 (6 meals per day) | 6:00, 8:00, 10:00, 12:00, 14:00, 16:00 |
| 1d4 (4 meals per day) | 8:00, 12:00, 16:00, 20:00 |
| 1d3 (3 meals per day) | 8:00, 12:00, 18:00 |
| 1d2 (2 meals per day) | 8:00, 18:00 |
| 1d1 (1 meal per day) | 8:00 |
| 2d1 (1 meal every 2 days) | 8:00 |
| 3d1 (1 meal every 3 days) | 8:00 |
| 4d1 (1 meal every 4 days) | 8:00 |
To activate Lazy Mode:
- Tekan dan tahan butang MODE, SET, dan + buttons simultaneously for 3 seconds to access the preset feeding schedules.
- Tekan ke + button to cycle through and select your desired feeding schedule.
- Tekan SET to confirm the schedule. The display will automatically jump to "Vol" setting.
- Gunakan + dan - buttons to adjust the portion size (number of dispenses, 1-99).
- Tekan SET to confirm the portion setting. A small "h" icon will appear in the lower-right corner of the time display, indicating Lazy Mode is active.
Video: Step-by-step guide on setting up the Lazy Mode (preset timer) for the feeder.


4. Setting Up Custom Timed Mode (Precise Mode)
Custom Mode allows you to set up to 6 specific feeding times per day:
- First, reset to factory settings by pressing and holding SET dan - butang selama 3 saat.
- Tekan ke MODE button twice to access the "Timing" settings.
- Tekan dan tahan butang SET button for 3 seconds to start setting the first meal time.
- Gunakan + or - buttons to set the hour, then press SET to switch to minutes. Repeat for minutes.
- Tekan SET again to set the second meal time, and continue this process for subsequent meals (up to 6).
- To exit without setting additional times, press the MODE button. This will automatically jump to the "Int" setting page.
- Tekan dan tahan SET for 3 seconds to enter "Int" settings. Use + or - to adjust the feeding interval (0 for daily, 1 for every other day, etc.). Press SET untuk mengesahkan.
- Finally, for "Vol" (Feeding Volume) setting: Press the MODE button until "Vol." appears. Then press and hold SET for 3 seconds to enter "Vol." settings. Use + or - to adjust the portion (number of dispenses, 1-99) and press SET untuk mengesahkan tetapan.
Video: Step-by-step guide on setting up the Custom Timed Mode (Precise Mode) for the feeder.

5. Adjusting Food Portion Size (Using Reduction Clips)
The feeder includes 3 reduction clips to control the dispensed food portion, suitable for fish pellet sizes 2-10mm. These clips can be disassembled to achieve a larger discharge aperture if needed.


Video: Demonstrates how to adjust the food portion size using the feeder's settings and clips.
6. Removing the Reduction Clip
To remove a reduction clip for larger portions or cleaning:
- Tekan dan tahan butang - button for 3 seconds. The display will show "OPEN".
- Gently shake the feeder to help release the clip.
- Use your finger to remove the clip from the feed outlet.
Nota:
- It is recommended to adjust the "Vol" setting to achieve the desired feeding portion.
- It is recommended to remove the clip only when using large-sized pellets.

Video: Demonstrates how to adjust the food portion size using the feeder's settings and clips, including removal.
Penyelenggaraan
Regular maintenance ensures optimal performance and longevity of your fishkeeper Automatic Fish Feeder.
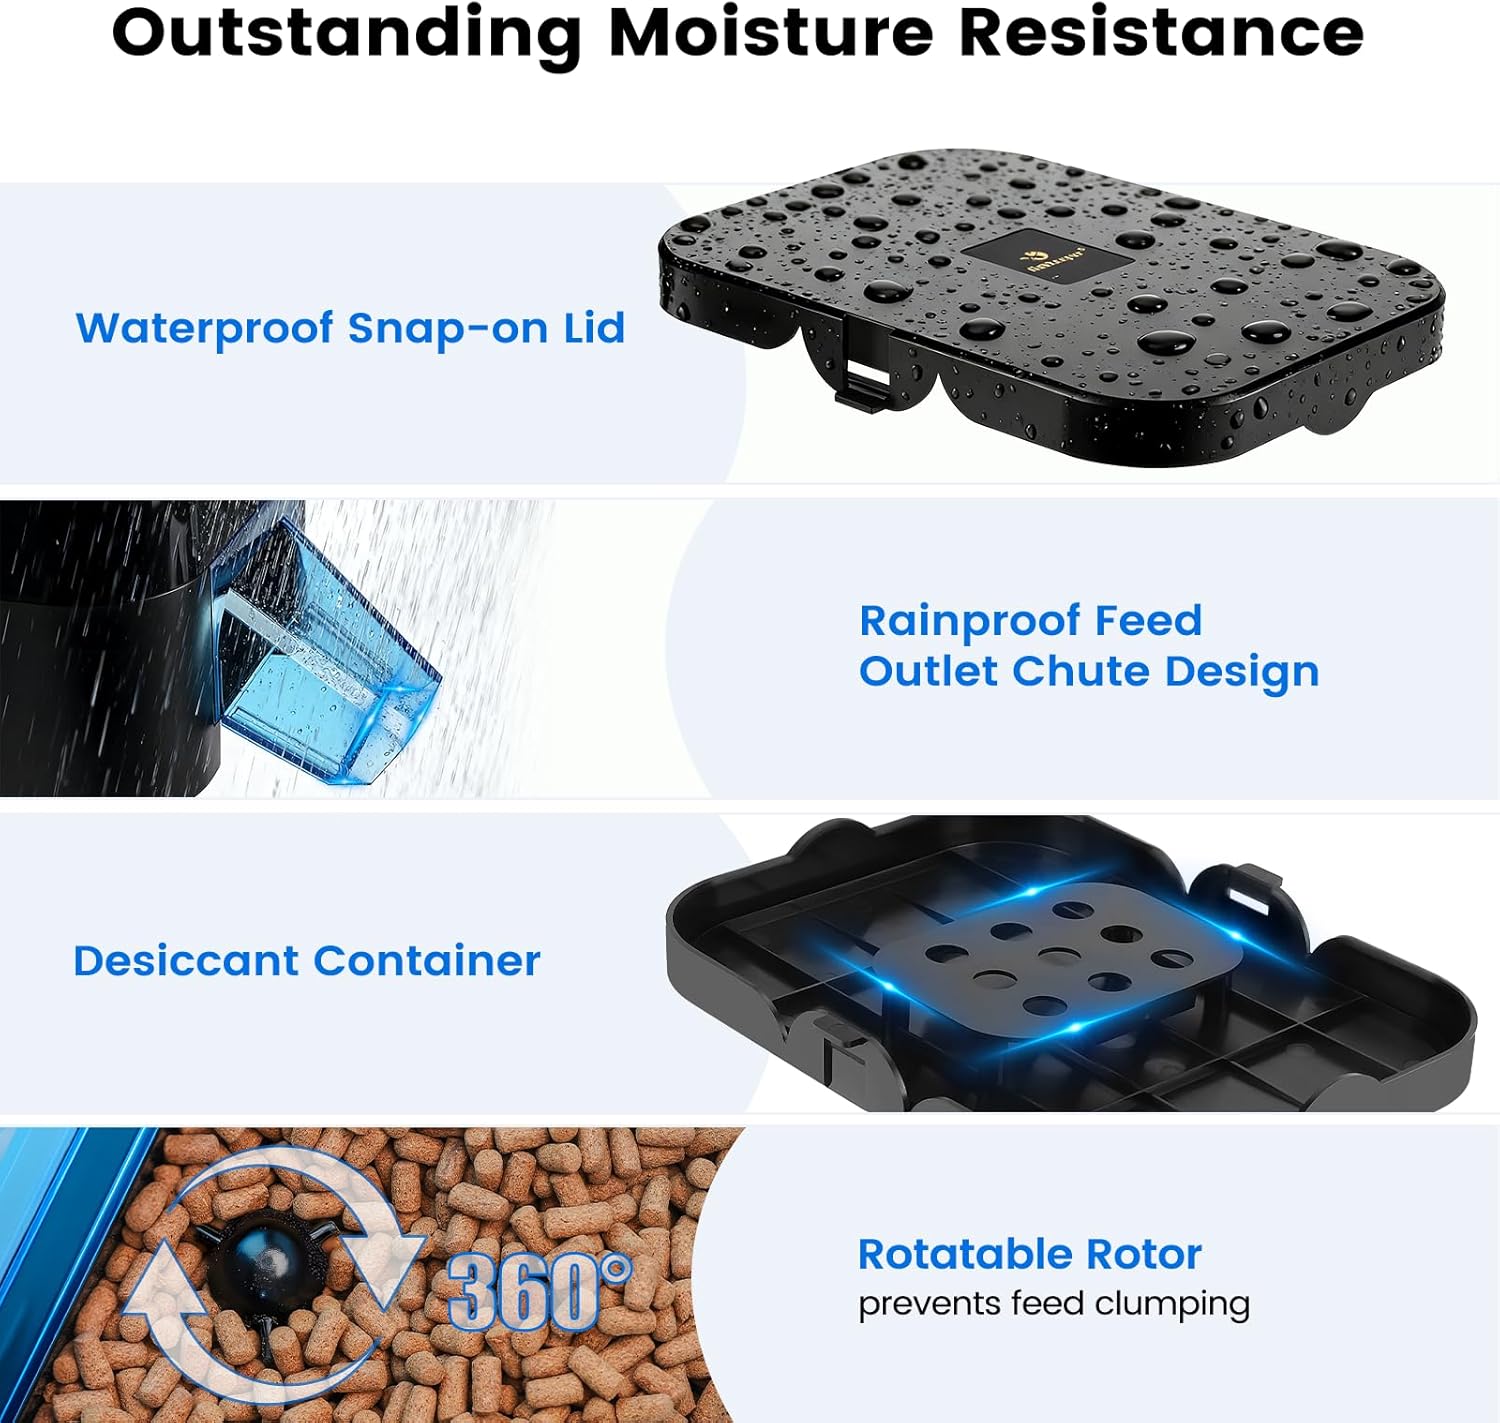
1. Preventing Moisture and Clumping
- The feeder features a waterproof snap-on lid and a rain-proof feed outlet chute design to protect food from moisture.
- Utilize the dedicated desiccant slot on the lid to insert a desiccant packet (not included) to further keep food dry and fresh.
- The internal rotatable rotor helps prevent food from clumping or getting stuck during dispensing.


2. Pembersihan
To clean the feeder:
- Ensure the feeder is powered off and disconnected from any power source.
- Remove any remaining food from the hopper.
- Disassemble the feed outlet chute and any reduction clips for thorough cleaning.
- Wipe down the interior and exterior of the feeder with a damp cloth. Avoid submerging the main unit in water.
- Clean the feed outlet chute and reduction clips with mild soap and water, then rinse thoroughly and allow to air dry completely before reassembling.
- Ensure all parts are completely dry before refilling with food and resuming operation.
Menyelesaikan masalah
If you encounter issues with your fishkeeper Automatic Fish Feeder, refer to the following common problems and solutions:
| Masalah | Kemungkinan Punca | Penyelesaian |
|---|---|---|
| Pengumpan tidak mengagihkan makanan. |
|
|
| Feeder not turning on. |
|
|
| Incorrect feeding times. |
|
|
| Feeder is unstable or tips over. |
|
|
Spesifikasi
| Ciri | Perincian |
|---|---|
| Nombor Model | FK092-NEW |
| Kapasiti | 2.8L |
| Dimensi (L x W x H) | 12 x 9.64 x 7.48 inci (30.48 x 24.48 x 18.99 cm) |
| Berat badan | 3.25 paun (1.47 kg) |
| bahan | PC |
| Pilihan Kuasa | AC (6V 1A) or 4 x AAA Batteries (not included) |
| Kekerapan Makanan | 0-99 times (programmable) |
| Saiz Bahagian | 2-8 grams per feeding (adjustable with clips) |
| Suitable Pellet Size | 2-10mm |
| Ciri Khas | Weather-Resistant, Tip-Proof Design, LCD Display, Two Timer Modes (Lazy/Custom), Rotatable Rotor, Desiccant Slot |
Waranti dan Sokongan
For warranty information or technical support, please refer to the contact details provided with your purchase or visit the official fishkeeper webtapak. Simpan resit pembelian anda untuk tuntutan waranti.
Ask a question about this manual
Ask about setup, troubleshooting, compatibility, parts, safety, or missing instructions. Manuals+ will review the question and use this page’s manual context to help answer it.