1. Pengenalan
Thank you for choosing the Haloview Byte Tango BT10 Wireless Rear View Mirror Dashcam Backup Camera System. This system provides comprehensive front and rear vehicle coverage with a 10-inch 1080P monitor, a built-in dashcam, and a wireless backup camera. This manual will guide you through the installation, operation, and maintenance of your new system to ensure optimal performance and safety.
2. Produk Lebihview
2.1 Kandungan Pakej
Haloview Byte Tango BT10 system includes the following components:
- 1 x BT10 Monitor (10-inch, 1280x320 resolution)
- 1 x Rear Camera BTC128W (with WDR Technology)
- 1 x Gasket
- Tali getah
- Micro-SD / TF Card
- Type-C to DC Power Cable
- Kabel Penukaran Kamera
- Power Adapter for Pre-wired RV
- Kabel Berpasangan
- Penyesuai Daya Rokok Ringan
- Tali Velcro
- Manual Pengguna

Figure 2.1: Included components of the Haloview BT10 system.
2.2 Ciri-ciri Utama
- 10-inch IPS Touchscreen Monitor: Provides a clear and intuitive interface for viewing and controlling the system.
- Built-in 1080P Dashcam: Captures forward-facing video with a 140° wide-angle lens.
- Wireless 1080P Backup Camera (BTC128W): Offers a 135° rear view, eliminating blind spots and aiding in safe reversing.
- Wide Dynamic Range (WDR) Technology: Improves image quality by balancing light and dark contrasts, especially useful in challenging lighting conditions.
- IP69K Waterproof Camera: Ensures durability and reliable performance in various weather conditions.
- Pilihan Kuasa Fleksibel: Can be powered via cigarette lighter socket or Type-C port (PD protocol required).
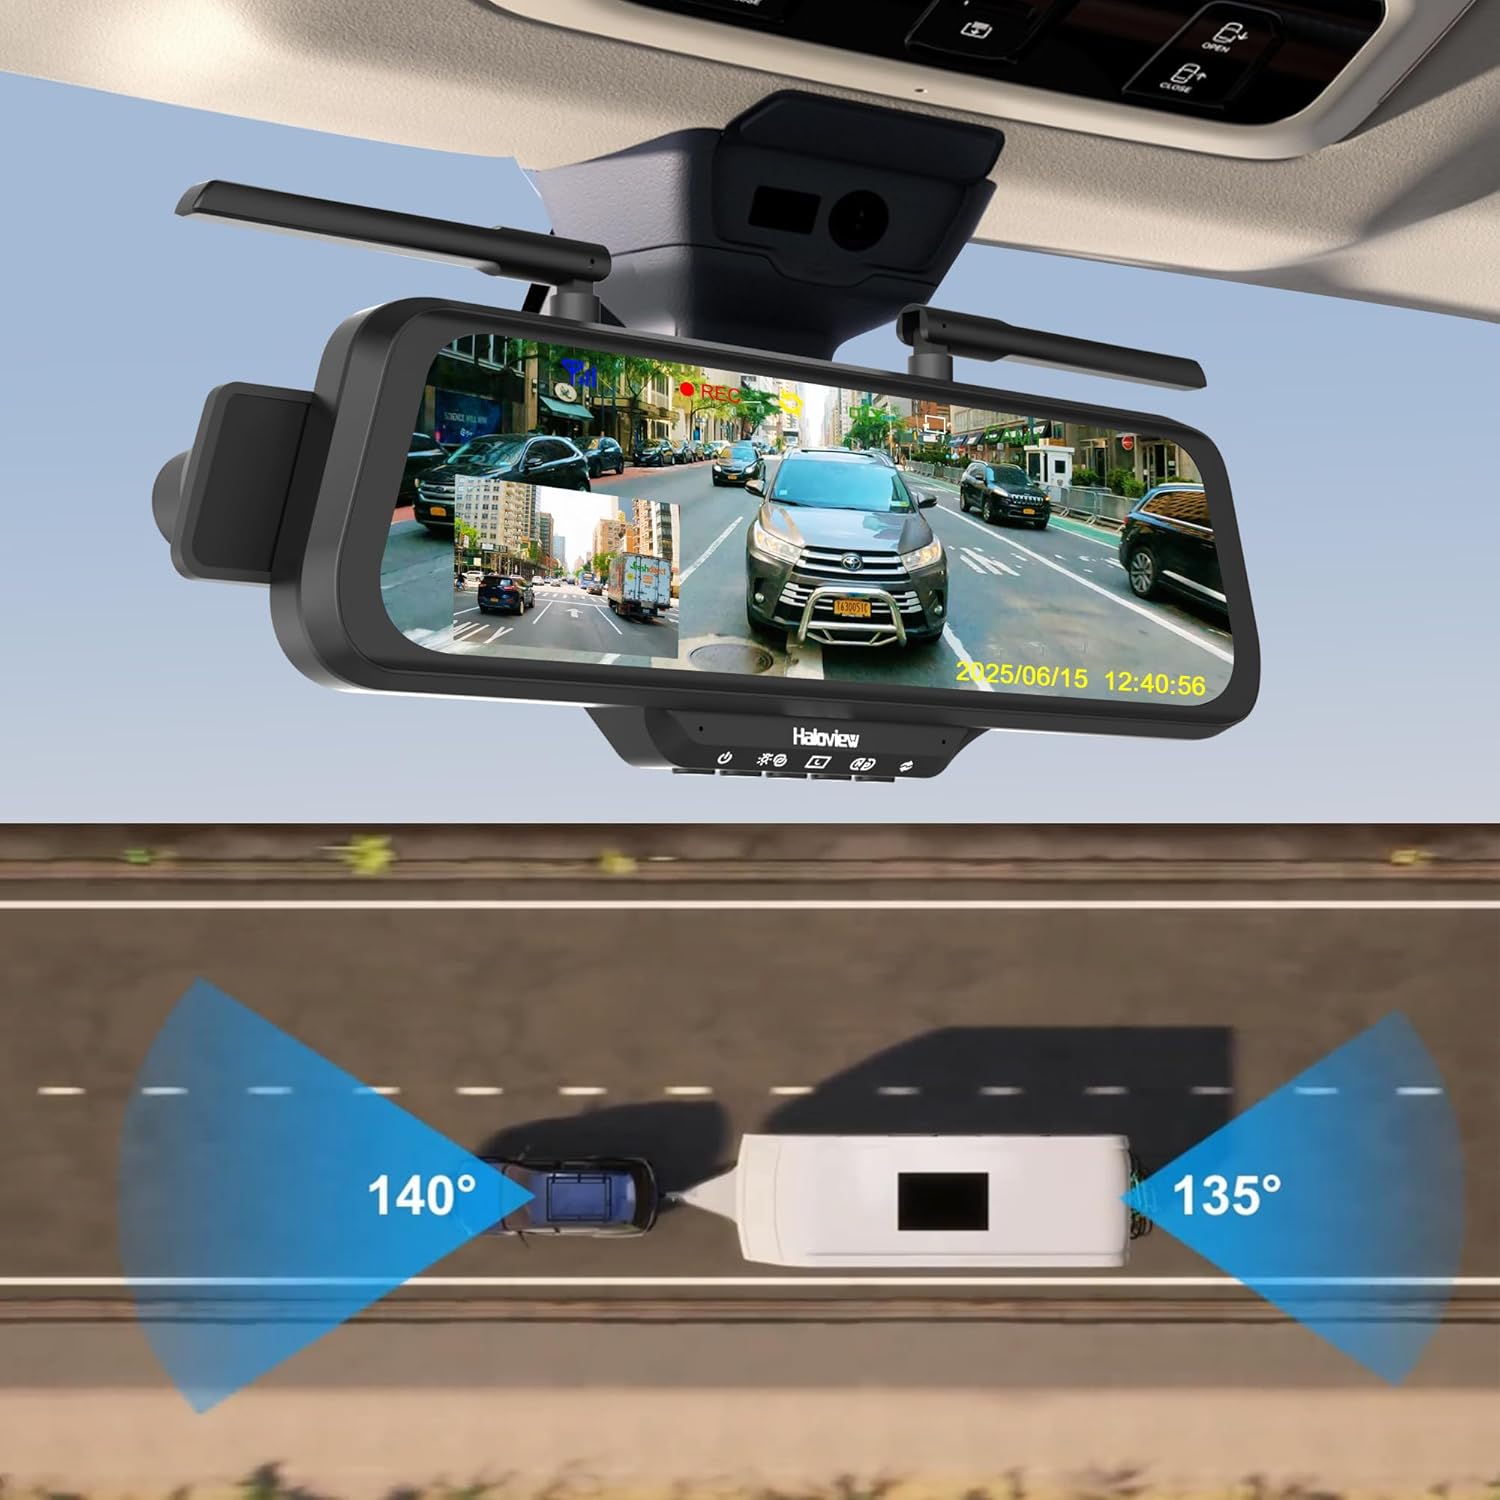
Figure 2.2: Haloview BT10 system with wide-angle views.
3. Persediaan & Pemasangan
3.1 Semakan Pra-Pemasangan
Before installing the system, please ensure the stability of your vehicle's rearview mirror. If the rearview mirror or its bracket is loose, it is recommended to replace or tighten it first. An unstable mirror may cause the streaming display to shake or fail to stay in position while driving.
3.2 Pemasangan Monitor
- Attach the BT10 monitor to your existing rearview mirror using the provided rubber straps. Ensure it is securely fastened and centered for optimal viewing.
- Adjust the monitor's angle to provide a clear view of the road ahead and the display.

Figure 3.1: Monitor and dashcam installation.
3.3 Wireless Rear Camera Installation (BTC128W)
- Choose a suitable location at the rear of your vehicle for the BTC128W camera, ensuring a clear line of sight and optimal viewsudut ing.
- Lekapkan kamera dengan selamat menggunakan perkakasan yang disediakan.
- Connect the camera to a power source (e.g., reverse light power for automatic activation when reversing, or constant power for continuous monitoring).

Figure 3.2: Wireless rear camera installation on an RV.
3.4 Sambungan Kuasa
The BT10 monitor offers flexible power options:
- Soket Pemetik Rokok: Use the provided cigarette lighter power adapter to plug into your vehicle's 12V accessory socket.
- Pelabuhan Jenis-C: Connect a Type-C cable to the monitor's Type-C port. Note that a Power Delivery (PD) protocol compatible power source is required for this option.

Figure 3.3: Flexible power options for the monitor.
4. Arahan Operasi
4.1 Operasi Asas
- Hidupkan/Mati Kuasa: The system will typically power on automatically when the vehicle starts and power off when the vehicle is turned off. A manual power button may also be available on the monitor.
- Antara muka skrin sentuh: Navigate through menus and settings by tapping and swiping on the 10-inch IPS touchscreen.
- Mod Paparan: The monitor can display the front dashcam view, kamera belakang view, or a split-screen view of both. Switch between modes via the touchscreen interface.
4.2 Dashcam Features
- Rakaman Berterusan: The built-in 1080P dashcam continuously records footage of the road ahead (140° wide-angle). Footage is stored on the Micro-SD card.
- Rakaman Gelung: When the Micro-SD card is full, the oldest files akan ditulis ganti secara automatik.
- Rakaman Kecemasan: In the event of a sudden impact or collision, the G-sensor will trigger emergency recording, locking the current footage untuk mengelakkannya daripada ditimpa.
- Tangkap Pantas: Tap the "REC" icon on the screen to manually capture a snapshot or start/stop recording.

Figure 4.1: Quick capture function on the monitor.
4.3 Backup Camera Features
- Pengaktifan Automatik: If wired to the reverse lights, the rear camera view will automatically display when the vehicle is put into reverse.
- Julat Dinamik Luas (WDR): The BTC128W camera features WDR technology, which enhances image clarity in high-contrast lighting conditions, such as bright sunlight and deep shadows, or at night.
- Full-Color Dim-Light Night Vision: Provides clear, full-color images even in low-light environments.

Figure 4.2: Wide Dynamic Range (WDR) technology comparison.
4.4 Parking Line Adjustment
The parking guidelines displayed on the monitor can be adjusted to match your vehicle's dimensions and preferences:
- Pelarasan Mendatar: Slide left/right on the touchscreen to adjust the parking lines horizontally.
- Pelarasan Menegak: Slide up/down on the touchscreen to adjust the parking lines vertically.

Figure 4.3: Adjusting parking lines on the display.
5. Penyelenggaraan
- Cleaning the Monitor: Use a soft, dry cloth to clean the monitor screen. For stubborn smudges, lightly dampen kain dengan air atau pembersih selamat skrin. Elakkan bahan kimia yang keras.
- Membersihkan Lensa Kamera: Gently wipe the camera lens with a soft, lint-free cloth to ensure clear image quality.
- Pengurusan Kad Mikro-SD: Regularly format the Micro-SD card (at least once a month) to maintain optimal recording performance and prevent data corruption. Back up important footage sebelum memformat.
- Kemas kini Firmware: Check the Haloview rasmi website periodically for any available firmware updates for your BT10 system. Follow the instructions provided with the update carefully.
6. Penyelesaian masalah
6.1 Isu dan Penyelesaian Biasa
- No Power to Monitor:
- Check if the power cable is securely connected to both the monitor and the power source (cigarette lighter or Type-C port).
- Ensure the vehicle's power outlet is functioning.
- If using Type-C, confirm the power source supports Power Delivery (PD) protocol.
- No Signal from Rear Camera:
- Verify the rear camera is receiving power.
- Ensure the camera and monitor are paired. Refer to the pairing instructions in the full user manual if re-pairing is needed.
- Check for any obstructions between the camera and monitor that might interfere with the wireless signal.
- Kualiti Imej Lemah:
- Clean the camera lens and monitor screen.
- Pastikan kamera dipasang dengan selamat dan tidak bergetar.
- Check for strong electromagnetic interference sources near the camera or monitor.
- Dashcam Not Recording:
- Ensure a Micro-SD card is inserted correctly.
- Formatkan kad Micro-SD.
- Check if the recording function is enabled in the monitor's settings.
7. Spesifikasi
| Ciri | Spesifikasi |
|---|---|
| Jenama | Haloview |
| Model | BT10 |
| Saiz Skrin | 10 Inci |
| Dimensi Produk | 11"L x 9"W x 5"H |
| Peranti Serasi | BTC128W/BTC126/BTC125W |
| Jenis Pemasangan | Lekapan Permukaan |
| Jenis Kanta | Sudut Lebar |
| Sudut Sebenar daripada View (Dashcam) | 140 Darjah |
| Bidang Dari View (Kamera Sandaran) | 135 Darjah |
| Jenis Penyambung | Tanpa wayar |
| Resolusi Tangkapan Video | 1080p |
| Media Terbina Dalam | Monitor and camera |
8. Maklumat Waranti
Haloview Byte Tango BT10 system comes with a Waranti Pengeluar 1 Tahun. This warranty covers defects in materials and workmanship under normal use. Please retain your proof of purchase for warranty claims. For specific terms and conditions, refer to the warranty card included in your package or visit the official Haloview webtapak.
9. Support & Contact Information
If you encounter any issues or have questions regarding your Haloview Byte Tango BT10 system that are not covered in this manual, please contact Haloview customer support. You can typically find contact information (email, phone, or support portal) on the official Haloview webtapak atau pada pembungkusan produk anda.
Untuk mendapatkan sumber sokongan terkini, sila layari: www.haloview.com