1. Produk Lebihview
The hygger HG247 Clip On Aquarium LED Light with Multi-Channel Controller is designed to provide comprehensive lighting solutions for freshwater aquariums. It features a 24/7 natural mode simulating sunrise, daylight, and moonlight, as well as a customizable DIY mode for time, brightness, and color adjustments. This system supports synchronized control for multiple lights, reducing cable clutter and enhancing aesthetic appeal.
2. Apa yang ada di dalam Kotak
- hygger Clip On Aquarium LED Light(s) (Model HG247)
- Multi-Channel Controller
- Independent Power Adapter
- 2-way or 3-way cable (depending on package)
- Manual Pengguna
3. Persediaan dan Pemasangan
3.1 Attaching the Lights to Your Aquarium
The hygger HG247 LED lights feature a clip-style bracket designed for easy installation on aquarium walls less than 0.9 inches thick. The body of the fish tank light can be installed horizontally or vertically.
- Attach the clip bracket to the desired position on your aquarium rim.
- Tighten the screws on the clip bracket to secure it firmly to the tank wall.
- Slide the LED light panel into the bracket. Ensure it is securely seated.


3.2 Connecting the Controller and Power
- Connect the 2-way or 3-way cable to the LED light panels.
- Connect the multi-channel controller to the 2-way or 3-way cable.
- Plug the independent power adapter into the controller.
- Palamkan penyesuai kuasa ke dalam salur keluar kuasa yang sesuai.
Nota: The multi-channel feature allows multiple lights to be connected through one controller harness, reducing cable clutter and improving aesthetics, especially for larger or multiple tanks.

4. Arahan Operasi
4.1 Fungsi Pengawal
The controller features several buttons for easy operation:
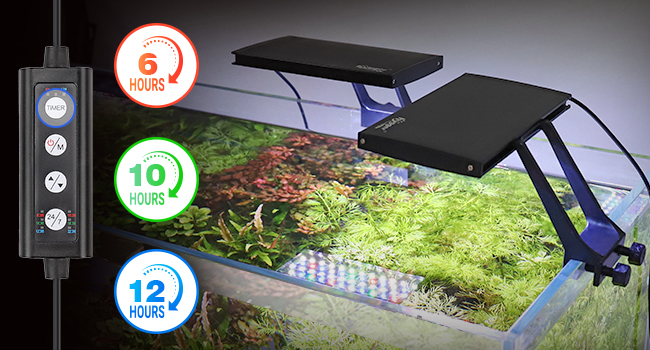
- PEMASA: Sets the lighting duration (6h, 10h, or 12h).
- ON-OFF/M: Powers the lights on/off and cycles through color options in DIY mode.
- Anak panah atas/bawah: Adjusts brightness levels (5 levels: 10%, 25%, 50%, 70%, 100%).
- 24/7: Mengaktifkan Mod Semula Jadi 24/7.

4.2 DEFAULT MODE (24/7 Natural Mode)
This mode simulates a natural 24-hour light cycle, providing a gradual transition of light intensity and color throughout the day:
- Sunrise (6:00 AM - 8:00 AM): Cahaya oren kecerunan.
- Daylight (8:00 AM - 10:00 PM): Gradient white light.
- Moonlight (10:00 PM - 10:50 PM): Gradient blue light.
- Off (Other times): Lampu dimatikan.
The overall default time period can be delayed or advanced as needed.
4.3 DIY MODE
Customize your lighting experience with the DIY mode:
- Time (TIMER key): Choose from 6 hours, 10 hours, or 12 hours.
- Brightness (Up/Down arrows): Select from 5 levels of brightness (10%, 25%, 50%, 70%, 100%).
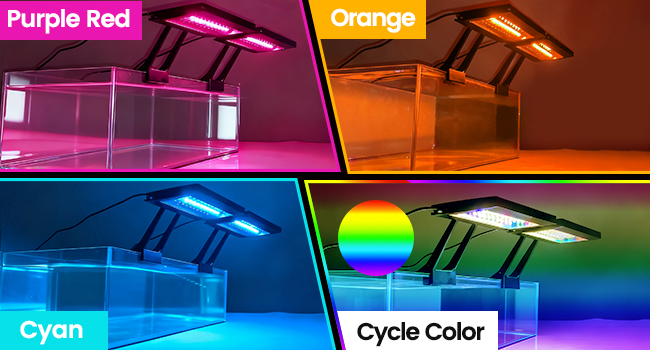
- Color (ON-OFF/M key): Cycle through White, Red, Blue, Green, Purple, Orange, Cyan, or a continuous Cycle Color.


4.4 Demonstrasi Video
Video 1: Video ini menyediakan lebih terperinciview of the hygger Clip On Aquarium LED Light with Multi-Channel Controller, demonstrating its features and functionality in an aquarium setting. It covers various lighting modes and installation aspects.
Video 2: A concise demonstration of the hygger Clip On Aquarium LED Light with Multi-Channel Controller, showcasing its ease of use and various lighting options for aquariums. This video highlights the product's versatility.
5. Spesifikasi Produk
| Ciri | Perincian |
|---|---|
| Nombor Model | HG247 |
| kuasa | 36W |
| Kuantiti LED | 3*60PCS (White: 3*29PCS, Blue: 3*11PCS, Red: 3*4PCS, Green: 3*4PCS, RGB: 3*12PCS) |
| CRI | 3*85 |
| Application (for Fish Tank long) | 30gal~60gal |
| Panjang Kord Kuasa | 67.72in + 1.97in + 50.39in |
| Input Voltage | AC100-240V |
| Keluaran Voltage | DC20V |
| Kelvin | White 3*6500K, Blue 3*455nm, Red 3*620nm, Green 3*560nm |
| Lumen | 3*770lm |
| bahan | aluminium |
| Clip Bracket Compatibility | Tank walls less than 0.9in thick |

6. Penyelenggaraan
- Pembersihan: Regularly wipe the light panels with a soft, damp kain untuk menghilangkan habuk dan kesan air. Pastikan lampu telah dicabut daripada plag sebelum membersihkan.
- Penyesuai: The separable adapter design allows for easy replacement if damaged, avoiding the need to replace the entire light unit and reducing waste.
- Pelesapan Haba: The thickened aluminum body is designed to increase heat dissipation efficiency, contributing to the long service life of the LED beads (at least 50,000 hours).
- Sentuhan Air: The light is designed to be splashproof. Avoid submerging the light unit or controller in water.

7. Penyelesaian masalah
If you encounter any issues with your hygger LED light, please refer to the following general steps:
- Tiada Kuasa: Ensure all connections are secure and the power adapter is properly plugged into a working outlet. Check if the power adapter itself is functioning.
- Lampu Tidak Bertindak Balas: Disconnect and reconnect the controller and power adapter. Ensure the controller buttons are pressed firmly.
- Incorrect Mode/Color: Cycle through the modes and colors using the controller buttons to reset or select the desired setting.
For persistent issues, please contact hygger customer support.
8. Waranti dan Sokongan
The hygger HG247 Clip On Aquarium LED Light comes with a Waranti pengilang selama 2 tahun.
For warranty claims, technical support, or any product-related inquiries, please contact hygger customer service through their official channels or the retailer where the product was purchased.