
1. Pengenalan
This manual provides detailed instructions for the setup, operation, and maintenance of your WOOPKER AK50 Stereo Amplifier. Please read this manual thoroughly before using the product to ensure proper functionality and to extend its lifespan.
1.1 Produk Selesaiview
The WOOPKER AK50 is a multi-function 2-channel stereo amplifier designed for home audio systems. It features Bluetooth 5.0 connectivity, FM radio, USB and SD card playback, and multiple input options for various audio sources. It is suitable for driving passive speakers in home theater, studio, or karaoke setups.

Image 1.1: WOOPKER AK50 Stereo Amplifier and Remote Control
This image displays the WOOPKER AK50 stereo amplifier, a compact black unit with blue illuminated knobs, alongside its black remote control. The amplifier features a central LED display, USB and SD card slots, microphone inputs, and controls for volume, bass, and treble.
1.2 Ciri-ciri Utama
- Kuasa Output: Provides a maximum output of 400W + 400W, compatible with 4-16 inch passive speakers.
- Pilihan Input Serbaguna: Supports Bluetooth, AUX, MIC, USB, and SD card inputs. Connects to external devices such as CD/DVD players, TVs, PCs, smartphones, and projectors.
- Bluetooth 5.0: Integrated Bluetooth 5.0 for stable wireless audio streaming. Optimal connection range is within 30 feet (10 meters) without obstructions.
- Kawalan Nada: Independent knobs for adjusting Bass, Treble, Microphone Volume, and Echo effects.
- Kawalan Jauh: Includes a remote for convenient adjustment of input modes and volume from a distance.
2. Arahan Keselamatan Penting
Untuk mengurangkan risiko renjatan elektrik, kebakaran atau kecederaan, sila patuhi langkah berjaga-jaga keselamatan berikut:
- Jangan dedahkan perkakas ini kepada hujan atau lembapan.
- Jangan buka casing. Rujuk semua servis kepada kakitangan yang berkelayakan.
- Pastikan pengudaraan yang betul. Jangan sekat sebarang bukaan pengudaraan.
- Letakkan unit pada permukaan yang stabil dan rata.
- Jauhkan unit daripada cahaya matahari langsung, sumber haba dan habuk yang berlebihan.
- Putuskan sambungan kord kuasa daripada alur keluar dinding jika unit itu dibiarkan tidak digunakan untuk tempoh yang lama.
- Jangan kendalikan unit dengan tangan yang basah.
3. Kandungan Pakej
Sahkan bahawa semua item yang disenaraikan di bawah disertakan dalam pakej anda:
- Stereo WOOPKER AK50 Amplebih hidup
- Alat Kawalan Jauh
- Kabel Kuasa
- Antena FM
- Manual Pengguna (dokumen ini)
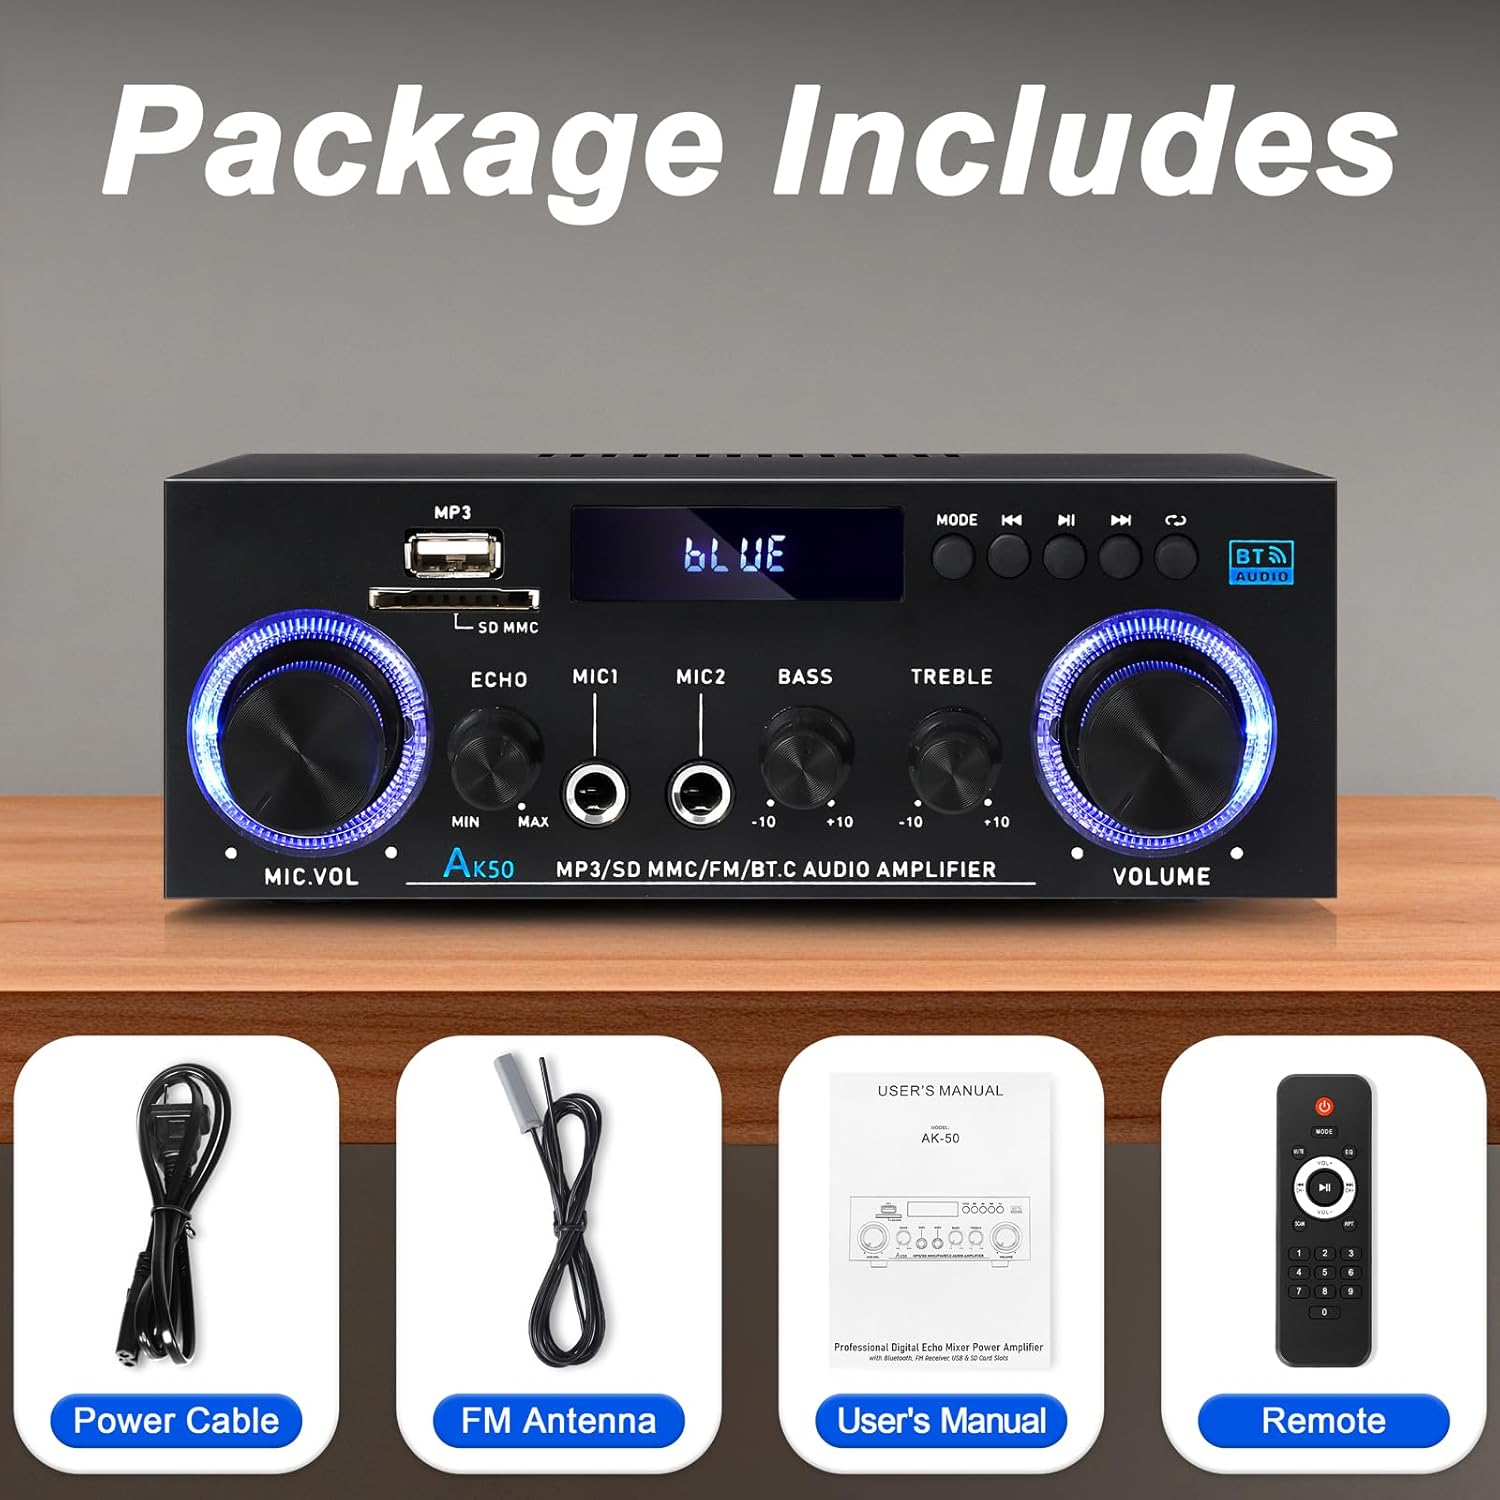
Imej 3.1: Aksesori yang disertakan
This image shows the items included in the WOOPKER AK50 package: the amplifier unit, a power cable, an FM antenna, a user's manual, and a remote control.
4. Susun atur Produk
4.1 Panel Depan

Image 4.1: Front Panel Controls and Indicators
This diagram illustrates the front panel of the AK50 amplifier, highlighting its various controls and ports. Key features include the USB/SD port, LED display, mode selection buttons, microphone inputs, and rotary knobs for microphone volume, echo, bass, treble, and master volume.
- Port USB/SD: Untuk memainkan audio files from USB drives or SD cards.
- Paparan led: Shows current mode, track information, and other status indicators.
- Butang Mod: Switches between input modes (Bluetooth, AUX, USB, SD, FM).
- Butang Sebelumnya: Navigates to the previous track/station.
- Butang Main/Jeda: Controls playback for USB/SD/Bluetooth.
- Butang Seterusnya: Navigates to the next track/station.
- Butang Kitaran: Repeats playback mode for USB/SD.
- Tombol Kelantangan Mikrofon: Melaraskan kelantangan mikrofon yang disambungkan.
- Tombol Gema: Adjusts the echo effect for microphones.
- Mic Input Jacks (MIC1, MIC2): Bicu 6.35mm untuk menyambung mikrofon.
- Tombol Bes: Melaraskan output audio frekuensi rendah.
- Tombol Treble: Melaraskan output audio frekuensi tinggi.
- Tombol Kelantangan Induk: Mengawal volum keluaran keseluruhan.
4.2 Panel Belakang

Imej 4.2: Sambungan Panel Belakang
This diagram details the rear panel of the AK50 amplifier, showing the various input and output terminals. It includes the FM antenna jack, power switch, audio input/output jacks, speaker output terminals, and power input ports.
- FM Antenna Jack: Connects to the included FM antenna for radio reception.
- Suis kuasa: Berpusing ampLifier HIDUP atau MATI.
- Audio Input Jacks (AUX/LINE): RCA jacks for connecting external audio sources (e.g., CD player, TV).
- Terminal Output Pembesar Suara: Connects to passive speakers (4-16Ω impedance).
- Input Kuasa DC 12V/5A: For DC power supply (if applicable, check model specifications).
- AC 90-240V Power Input: Connects to the main power supply using the provided power cable.
5. Panduan Persediaan
Follow these steps to set up your AK50 Stereo Amplebih hidup:
5.1 Sambungan Pembesar suara
- Memastikan amplifier is turned OFF and unplugged from the power outlet.
- Sambungkan pembesar suara pasif anda ke Terminal Keluaran Speaker on the rear panel. Ensure correct polarity (red to red, black to black) for each speaker.
- The amplifier supports speakers with an impedance of 4-16Ω.
5.2 Sambungan Sumber Audio
You can connect various audio sources to the AK50 amplebih hidup:
- AUX/LINE Input: Use RCA cables to connect devices like CD players, DVD players, TVs, or PCs to the Audio Input Jacks pada panel belakang.
- Kad USB/SD: Insert a USB flash drive or SD card (pre-loaded with audio files) into the respective port on the front panel.
- Bluetooth: Rujuk Bahagian 6.3 untuk arahan pemasangan Bluetooth.
- Antena FM: Sambungkan antena FM yang disertakan ke Jack Antena FM on the rear panel for radio reception. Extend the antenna for better signal.
5.3 Sambungan Kuasa
- Sambungkan kabel kuasa yang disediakan ke Input Kuasa AC 90-240V pada panel belakang.
- Plug the other end of the power cable into a suitable wall outlet.
- Memastikan Suis Kuasa on the rear panel is in the OFF position before plugging in.

Imej 5.1: Cthample Rajah Sambungan
This image illustrates various connection possibilities for the AK50 amplifier, including connecting to speakers, a CD player, a DVD player, a PC/laptop, and a TV/Blu-ray player. It also shows the FM antenna and power connections.
6. Arahan Operasi
6.1 Hidupkan/Mati Kuasa
After all connections are made, flip the Suis Kuasa on the rear panel to the ON position. The LED display on the front panel will illuminate.
6.2 Pemilihan Mod
Tekan ke Butang Mod on the front panel or the remote control to cycle through the available input modes: Bluetooth, AUX, USB, SD, and FM.
6.3 Kawalan Kelantangan dan Nada
- Jumlah Induk: Putar Tombol Isipadu Induk to adjust the overall sound level.
- Bes/Trebel: Gunakan Tombol Bass dan Tombol Treble to fine-tune the low and high frequencies of the audio output.
- Mic Volume/Echo: If microphones are connected, use the Tombol Kelantangan Mic to adjust their volume and the Tombol Gema to add an echo effect.

Image 6.1: Bass and Treble Controls
This image highlights the Bass and Treble control knobs on the front panel of the AK50 amplifier, indicating their function in adjusting audio frequencies.
6.4 Berpasangan Bluetooth
- Tukar amplifier to Bluetooth mode using the Butang Mod. The LED display will show "BLUE" or a similar indicator, and the unit will enter pairing mode.
- Pada peranti anda yang didayakan Bluetooth (cth., telefon pintar, tablet), dayakan Bluetooth dan cari peranti yang tersedia.
- Select "AK50" (or similar device name) from the list to pair.
- Setelah dipasangkan, amplifier will indicate a successful connection, and you can play audio from your device.
- Maintain a distance of within 30 feet (10 meters) for optimal Bluetooth performance.

Image 6.2: Bluetooth Connection
This image demonstrates the Bluetooth pairing process, showing a smartphone displaying available Bluetooth devices and the AK50 amplifier in Bluetooth mode, indicating a successful connection.

Image 6.3: Bluetooth Range
This image illustrates the effective Bluetooth range of the AK50 amplifier, indicating a maximum distance of 32 feet (10 meters) for stable wireless connection between the amplifier and a paired device.
6.5 Main Semula USB/SD
Insert a USB drive or SD card into the corresponding slot. The amplifier akan bertukar secara automatik ke mod USB/SD dan mula memainkan audio files. Menggunakan Sebelumnya, Main/Jeda, dan Seterusnya butang untuk mengawal main balik.
6.6 Operasi Radio FM
- Tukar amplifier to FM mode using the Butang Mod.
- The amplifier will automatically scan and store available FM stations.
- Gunakan Sebelumnya dan Seterusnya butang untuk menavigasi antara stesen yang disimpan.
- Adjust the FM antenna position for optimal reception.
6.7 Penggunaan Alat Kawalan Jauh
Alat kawalan jauh yang disertakan membolehkan pengendalian yang mudah amplifier from a distance. Ensure the plastic isolation sheet is removed from the battery compartment before first use.

Image 6.4: Remote Control
This image displays the remote control for the AK50 amplifier, showing buttons for power, mode selection, EQ, volume adjustment, track navigation, and numerical input for direct track selection.
7. Penyelenggaraan
Penyelenggaraan yang betul memastikan ketahanan dan prestasi optimum peranti anda amplebih hidup:
- Pembersihan: Gunakan kain lembut dan kering untuk membersihkan bahagian luar unit. Jangan gunakan pembersih cecair atau bahan kimia yang kasar.
- Pengudaraan: Pastikan bukaan pengudaraan bebas daripada habuk dan serpihan untuk mengelakkan pemanasan melampau.
- Storan: Jika menyimpan amplifier for an extended period, unplug it from the power outlet and store it in a cool, dry place.
- Kord Kuasa: Regularly inspect the power cord for any damage. If damaged, discontinue use and replace it with an appropriate cord.
8. Penyelesaian masalah
If you encounter issues with your AK50 amplifier, rujuk kepada masalah dan penyelesaian biasa berikut:
| Masalah | Kemungkinan Punca | Penyelesaian |
|---|---|---|
| Tiada kuasa | Kabel kuasa tidak disambungkan; Suis kuasa dimatikan; Soket kuasa rosak. | Check power cable connection; Turn power switch ON; Test outlet with another device. |
| Tiada keluaran bunyi | Speakers not connected; Incorrect input mode; Volume too low; Audio source issue. | Check speaker connections and polarity; Select correct input mode; Increase master volume; Verify audio source is playing. |
| Bluetooth tidak bersambung | Amplifier not in Bluetooth mode; Device not in pairing mode; Too far from amplebih hidup. | Tukar amplifier to Bluetooth mode; Ensure device Bluetooth is ON and searching; Move device closer to amplebih hidup. |
| Alat kawalan jauh tidak berfungsi | Battery isolation sheet not removed; Batteries depleted; Obstruction between remote and amplebih hidup. | Remove plastic sheet; Replace batteries; Ensure clear line of sight to amppenerima IR liifier. |
| Penerimaan FM yang lemah | FM antenna not connected or positioned incorrectly. | Connect FM antenna securely; Adjust antenna position for better signal. |
Jika masalah berterusan selepas mencuba penyelesaian ini, sila hubungi sokongan pelanggan.
9. Spesifikasi
| Ciri | Spesifikasi |
|---|---|
| Nombor Model | AK50 |
| Jenama | PEMERIKSA |
| Kuasa Keluaran | 400 Watt (Puncak) |
| Konfigurasi Saluran Bunyi Sekeliling | 2.0 Saluran |
| Teknologi Ketersambungan | Bluetooth 5.0, Auxiliary (RCA), USB, SD Card |
| Peranti Serasi | Speakers, Smartphones, Tablets, PCs, CD/DVD Players |
| Mod Keluaran Audio | Stereo |
| warna | Hitam |
| Berat Barang | 1.98 paun |
| Dimensi Pakej | 8.66 x 7.87 x 3.54 inci |
10. Waranti dan Sokongan
For warranty information or technical support, please refer to the documentation provided at the time of purchase or contact WOOPKER customer service through their official channels. Keep your purchase receipt as proof of purchase.