
1. Pengenalan
This manual provides detailed instructions for the installation, operation, and maintenance of your plplaaoo 100A MPPT Solar Charge Controller. This advanced controller is designed to optimize energy harvest from your solar panels and manage battery charging efficiently for 12V, 24V, 36V, and 48V solar power systems. Please read this manual thoroughly before installation and use to ensure proper function and safety.
2. Arahan Keselamatan
Sila patuhi langkah berjaga-jaga keselamatan berikut semasa pemasangan dan pengendalian:
- Ensure all wiring is correctly connected and securely fastened to prevent loose connections and overheating.
- Sentiasa putuskan sambungan panel solar dan kuasa bateri sebelum memasang atau melaraskan pengawal.
- Use appropriate tools and wear protective gear, including eye protection, during installation.
- Install the controller in a well-ventilated area, away from flammable gases and liquids.
- Jangan buka atau cuba membaiki alat kawalan sendiri. Hubungi kakitangan yang berkelayakan untuk servis.
- Ensure the battery bank is properly sized and compatible with the controller's voltage dan penilaian semasa.
- Avoid short-circuiting the solar panel, battery, or load terminals.
3. Ciri-ciri Produk
- Maximum Power Point Tracking (MPPT): Achieves up to 98% conversion efficiency by intelligently tracking the maximum power point of solar panels under varying conditions.
- Vol. Automatiktage Adaptation: Automatically detects and adapts to 12V, 24V, 36V, or 48V battery systems.
- Multifunctional Control: Supports various operating modes including PWM charging, constant current output, and voltage peraturan.
- Integrated USB and DC Outputs: Features dual 5V 1A USB ports and a 2A DC output for charging external devices.
- Perlindungan Komprehensif: Includes safeguards against overvoltage, overcurrent, overtemperature, overload, short circuits, and reverse polarity.
- Antara Muka Mesra Pengguna: Equipped with a backlit LCD display for real-time monitoring and intuitive buttons for configuration.
- Pembinaan Tahan Lama: Features an aluminum heatsink for efficient cooling and robust design for harsh environments (0°C to 60°C).
- Keserasian Bateri: Compatible with gel, sealed lead-acid, and lithium batteries.
4. Kandungan Pakej
- 1 x plplaaoo 100A MPPT Solar Charge Controller
- 1 x Manual Pengguna
5. Produk Lebihview dan Komponen
Familiarize yourself with the main components and interface of the solar charge controller.

Rajah 5.1: Depan view of the solar charge controller, highlighting the LCD screen and various connection terminals.
The controller features an intuitive LCD display and clearly labeled ports for easy connection. The display provides real-time information about the system's status.
Rajah 5.2: Terperinci view of the controller's connection ports.

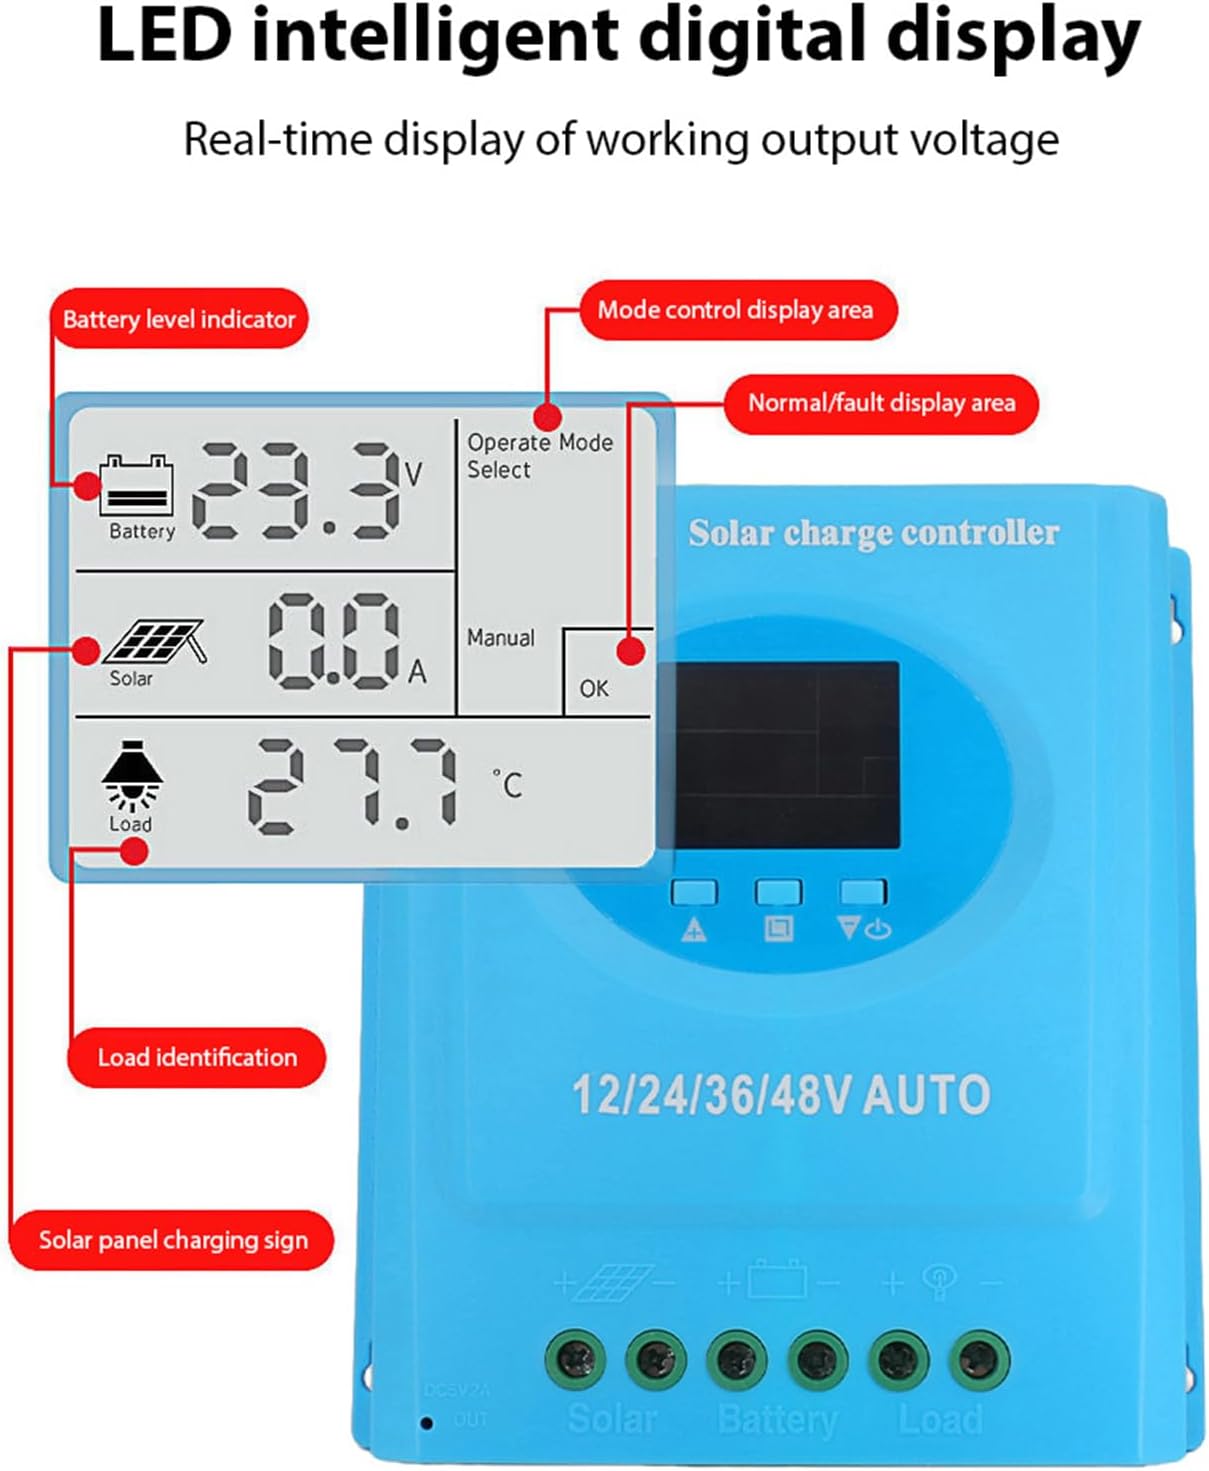
Rajah 5.3: Terperinci view of the LCD display, indicating battery level, solar panel charging sign, load identification, operating mode, and real-time voltage.
5.1. Pelabuhan Sambungan
- Antaramuka USB Dwi: Two 5V 1A USB ports for charging mobile devices.
- Solar Panel Port: Connects to your solar panels (positive and negative).
- Port Bateri: Connects to your battery bank (positive and negative).
- DC Load Port: Connects to your DC loads (positive and negative).
- Port Keluaran DC: Additional DC output.
6. Persediaan dan Pemasangan
Follow these steps for proper installation of the solar charge controller. Ensure all power sources are disconnected before beginning.
6.1. Kaedah Pendawaian
Connect the components in the following order to prevent damage:
- Sambungkan Bateri: Connect the battery to the controller's battery terminals (positive to positive, negative to negative). The controller will automatically detect the battery voltage.
- Sambungkan Panel Suria: Connect the solar panel to the controller's solar panel terminals (positive to positive, negative to negative).
- Sambungkan Beban DC: Connect the DC load to the controller's load terminals (positive to positive, negative to negative).
Penting: Sentiasa sambungkan bateri dahulu, kemudian panel solar, dan akhirnya beban. Putuskan sambungan dalam susunan terbalik.

Rajah 6.1: Solar energy system wiring diagram. Note the correct polarity for all connections.
6.2. Pemasangan
Mount the controller vertically on a flat surface in a well-ventilated area, ensuring adequate clearance for air circulation around the heatsink. Avoid direct sunlight, high temperatures, and humid environments.
7. Arahan Operasi
Once installed, the controller will automatically begin operating. The LCD display provides real-time system status.
7.1. Maklumat Paparan LCD
The LCD screen displays various parameters:
- Penunjuk Tahap Bateri: Shows the current charge status of the battery.
- Solar Panel Charging Sign: Indicates when the solar panels are actively charging the battery.
- Load Identification: Shows the status of the connected DC load.
- Operating Mode Display Area: Displays the current operating mode (e.g., manual, automatic).
- Normal/Fault Display Area: Indicates normal operation or displays error codes if a fault occurs.
- Real-time Working Output Voltage: Menunjukkan vol semasatage sistem.
7.2. Fungsi Butang
The controller typically features multiple buttons for navigation and setting adjustments:
- Butang Menu: Used to enter and exit the menu settings.
- Butang Naik / Turun: Used to navigate through menu options and adjust parameter values.
- Butang OK: Used to confirm selections and save settings.
Refer to the on-screen menu for specific parameter adjustments such as battery type, load control mode, and charging thresholds.
8. Penyelenggaraan
Penyelenggaraan berkala memastikan prestasi optimum dan jangka hayat pengawal cas solar anda.
- Pembersihan: Bersihkan bahagian luar pengawal secara berkala dengan kain kering untuk menghilangkan habuk dan serpihan. Pastikan bukaan pengudaraan bersih.
- Semakan Sambungan: Periksa semua sambungan pendawaian setiap tahun untuk memastikan ia ketat dan berkarat. Ketatkan semula jika perlu.
- Pemeriksaan Alam Sekitar: Ensure the installation environment remains within the specified operating temperature range and is free from excessive moisture or dust.
- Pemeriksaan Bateri: Regularly check the battery terminals for corrosion and ensure the battery is in good condition.
9. Penyelesaian masalah
Jika anda menghadapi masalah dengan pengawal cas solar anda, rujuk masalah dan penyelesaian biasa berikut:
| Masalah | Kemungkinan Punca | Penyelesaian |
|---|---|---|
| Controller not powering on / LCD blank |
|
|
| Bateri tidak dicas |
|
|
| Beban tidak berfungsi |
|
|
| Kod ralat dipaparkan | Kesalahan sistem tertentu. | Refer to the controller's display for the specific error code and consult the full product documentation or contact support for detailed interpretation and resolution. |
10. Spesifikasi
| Parameter | Nilai |
|---|---|
| Model | plplaaoozi6egog4wm-0A |
| Jenama | pllaaoo |
| Nilai Semasa | 100A |
| Sistem Voltage | 12V / 24V / 36V / 48V Automatic Adaptation |
| Jenis Pengecasan | MPPT (Maximum Power Point Tracking) |
| Kecekapan Penukaran | Sehingga 98% |
| Output USB | Dual 5V 1A ports |
| Keluaran DC | 2A |
| Suhu Operasi | 0°C hingga 60°C |
| Dimensi (Anggaran) | 19.5cm x 18.3cm x 6.8cm (7.7in x 7.2in x 2.7in) |

Rajah 10.1: Approximate dimensions of the solar charge controller.
11. Waranti dan Sokongan
Untuk maklumat waranti, sokongan teknikal atau pertanyaan perkhidmatan, sila hubungi peruncit anda atau pengilang secara terus. Simpan resit pembelian anda sebagai bukti pembelian.