1. Pengenalan dan Lebihview
The STRICH STL-D10 TL Style DIY Electric Guitar Kit provides all necessary components to build your own electric guitar. This kit is designed for ease of assembly, allowing you to construct a functional instrument with classic tones.
- TL-Style DIY Electric Guitar Kit: Build your own TL-style electric guitar equipped with classic SS pickups, ideal for bright, crisp tones.
- Professionally Pre-Assembled & Tested: Components are pre-assembled and tested for compatibility, with neck-to-body adjustment for straightforward setup and optimal string spacing.
- Polished & Clear-Coated Finish: The body and neck feature a polished finish with protective lacquer, minimizing additional finishing work while enhancing the wood grain and natural resonance.
- Premium Tonewoods & Hardware: Features a solid mahogany body and maple neck/headstock for warm, rich tones, an HPL fingerboard, and durable hardware for reliable performance.
- All-in-One Kit for Easy Assembly: Includes the body, headstock, six strings, bridge, pickups, tuning knobs, strap, cable, manual, and all required hardware for a complete DIY project.
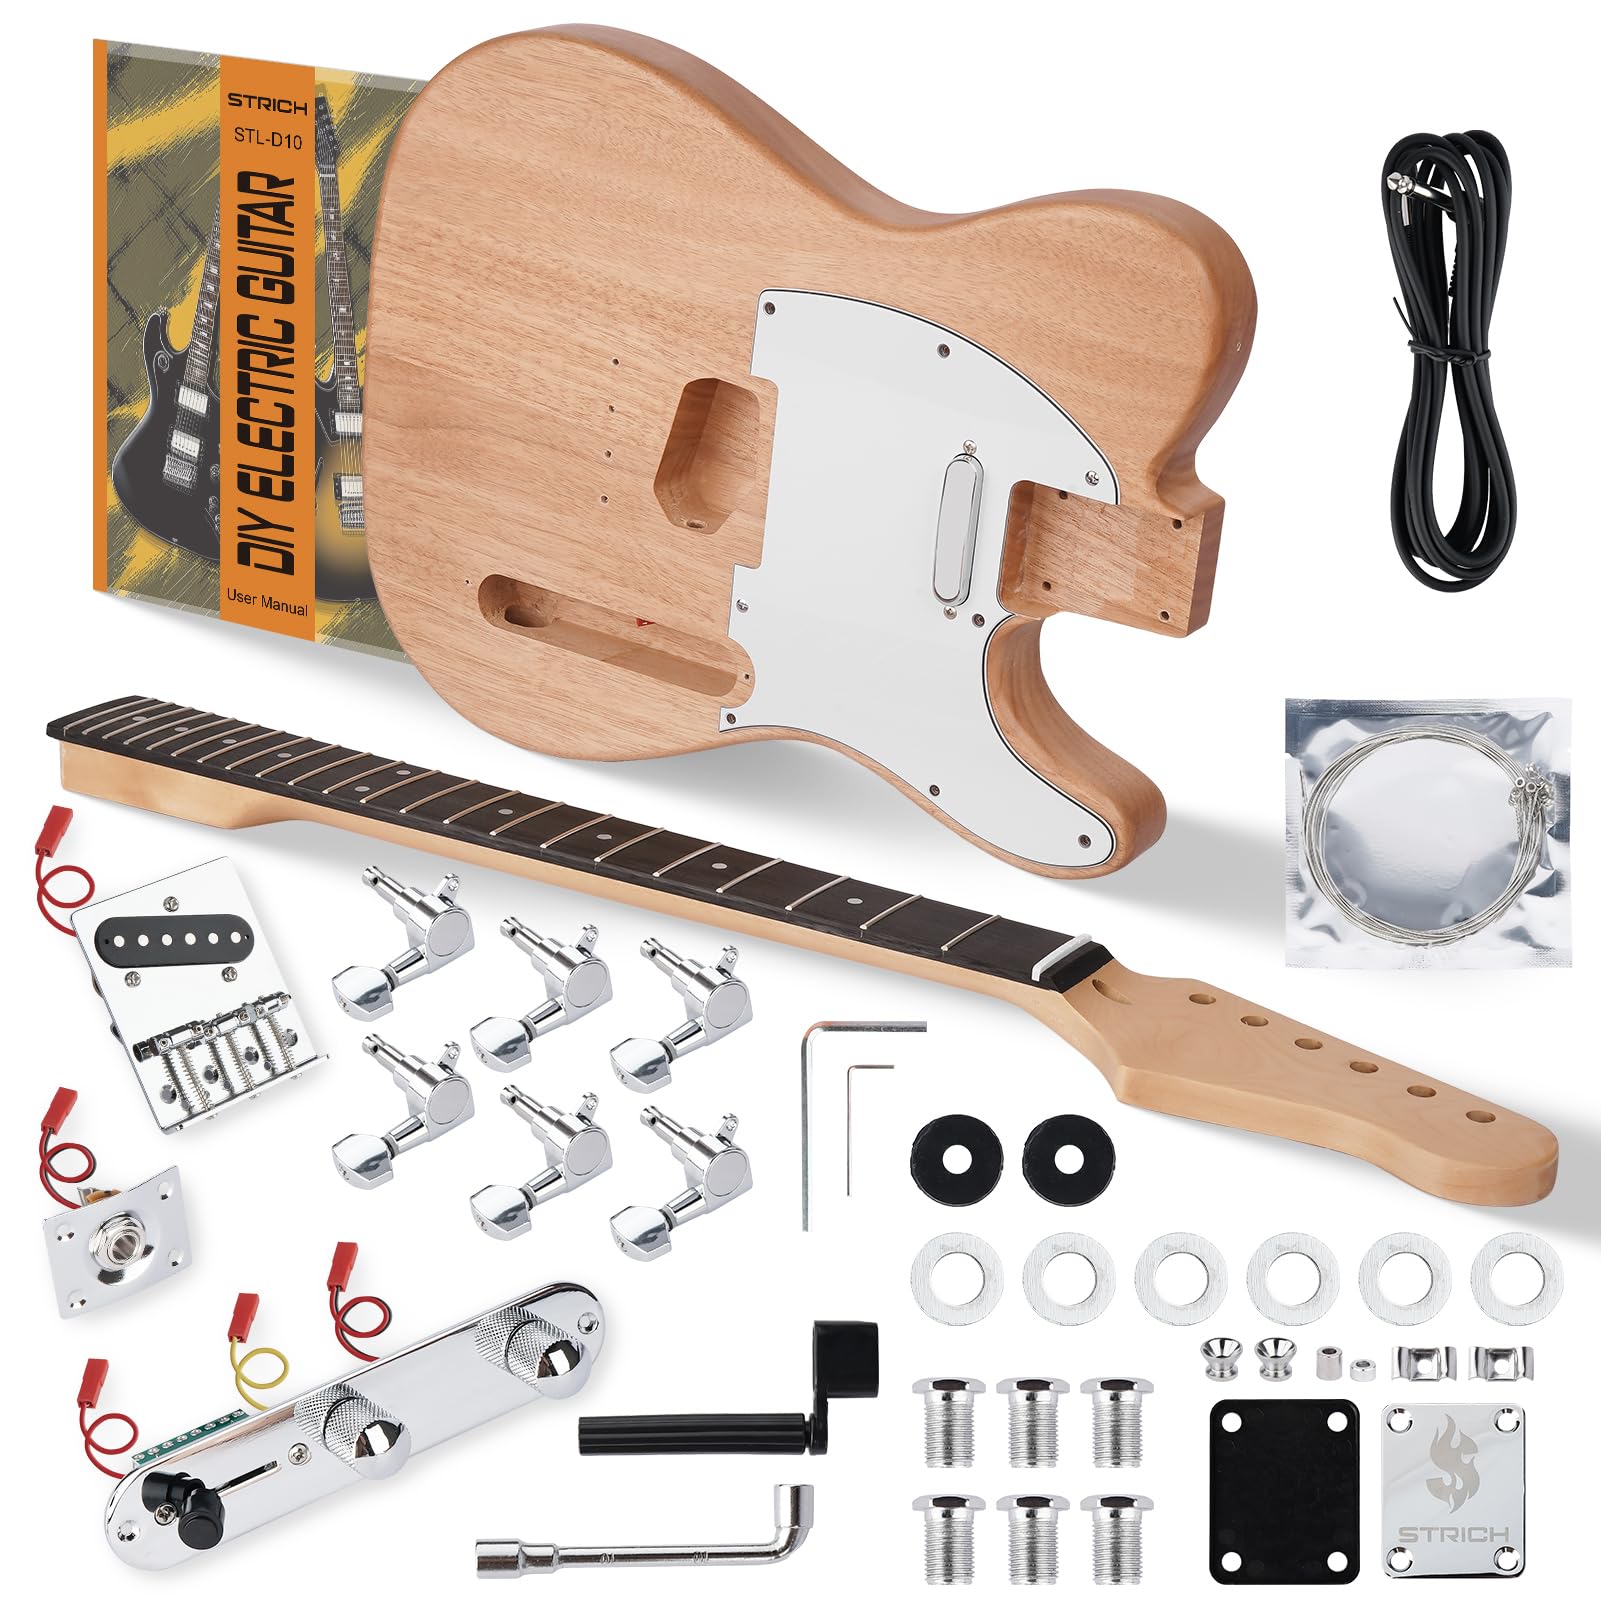
Figure 1.1: The fully assembled STRICH STL-D10 TL Style Electric Guitar.
2. Kandungan Pakej
Verify that all components listed below are present in your kit before beginning assembly. If any parts are missing or damaged, please contact customer support.
- Badan Gitar
- Guitar Headstock (Neck)
- Six Strings
- Perhimpunan Jambatan
- Pickups (SS configuration)
- Tuning Knobs (Machine Heads)
- Tali Gitar
- Guitar Cable
- Manual Arahan
- All necessary Hardware (screws, ferrules, neck plate, etc.)

Figure 2.1: All components included in the DIY guitar kit.
3. Arahan Perhimpunan
Follow these steps carefully to assemble your STRICH STL-D10 electric guitar. Refer to the provided videos for visual guidance.
3.1. Prepare the Body and Neck
The guitar body is made of mahogany, and the neck is maple. Both are pre-finished. You may choose to customize the finish before proceeding with assembly.

Figure 3.1: The mahogany guitar body, ready for assembly or finishing.

Figure 3.2: The maple neck, showing key dimensions.
3.2. Install Tuning Pegs on Headstock
- Insert each tuning peg into the pre-drilled holes on the headstock.
- Secure them with the provided washers and nuts from the front, and screws from the back.

Figure 3.3: The maple headstock with six alloy tuners installed.
3.3. Attach Neck to Body
- Carefully align the neck heel with the neck pocket on the guitar body. Ensure a snug fit.
- Place the neck plate over the four screw holes on the back of the body, aligning it with the neck.
- Insert the four neck screws through the neck plate and into the neck heel. Tighten them securely, but do not overtighten.
3.4. Install Bridge and Pickups
- Position the bridge assembly over the pre-drilled holes on the guitar body.
- Secure the bridge with the provided screws.
- The pickups are typically integrated into the bridge plate or pickguard. Ensure they are correctly seated.

Figure 3.4: The bridge and pickup assembly.
3.5. Wire Electronics
The kit features pre-wired electronics for simplified assembly, eliminating the need for soldering.
- Connect the pickup wires to the corresponding connectors on the control plate (volume/tone pots, switch).
- Connect the output jack wires to the main wiring harness.
- Pastikan semua sambungan selamat.
3.6. Install Remaining Hardware
- Install the strap buttons at the designated points on the body.
- Attach the pickguard (if separate) to the body using small screws.
3.7. Install Strings
- Thread each string through the appropriate hole in the bridge.
- Pull the string over the bridge saddles and through the corresponding tuning peg hole on the headstock.
- Wind the string around the tuning post, ensuring a few wraps, and tighten until taut.
- Repeat for all six strings.
3.8. Assembly Videos
For a visual guide to the assembly process, please refer to these official videos:
Video 3.1: Official build process video demonstrating the assembly of the STRICH TL-style electric guitar kit.
Video 3.2: Detailed assembly guide for the STRICH TL electric guitar kit, covering step-by-step installation of components.
Video 3.3: An additional assembly guide for the STRICH TL Style Electric Guitar Kit, providing visual instructions for construction.
4. Persediaan dan Pelarasan
After assembly, proper setup is crucial for optimal playability and tone.
4.1. Menala
Use an electronic tuner to tune your guitar to standard EADGBe (low to high) or your preferred tuning. Stretch new strings gently to help them settle and hold tune.
4.2. String Action (Height)
Adjust the height of the strings at the bridge saddles using the provided Allen key. Lowering the action makes the guitar easier to play, but too low can cause fret buzz. Raise the action if you experience excessive buzzing.
4.3. Neck Relief (Truss Rod)
The truss rod adjusts the curvature of the neck. If strings buzz in the middle of the neck, you may need to add more relief (loosen the truss rod). If the action is too high in the middle of the neck, you may need less relief (tighten the truss rod). Awas: Truss rod adjustments should be made incrementally and carefully. Overtightening can damage the neck. If unsure, consult a professional guitar technician.
4.4. Intonation
Intonation ensures that notes played higher up the neck are in tune. Compare the harmonic at the 12th fret with the fretted note at the 12th fret. Adjust the bridge saddle position for each string until both notes match. Move the saddle forward to sharpen the note, and backward to flatten it.
4.5. Pickup Height
Adjusting pickup height affects volume and tone. Generally, closer to the strings increases output and bass response, while further away reduces output and can brighten the tone. Experiment to find your preferred sound.
5. Arahan Operasi
Once assembled and set up, your electric guitar is ready to play.
5.1. Menyambung ke an Amplebih hidup
Insert one end of the guitar cable into the output jack on your guitar and the other end into the input of your guitar amppengikat. Memastikan amplifier is powered on and volume settings are appropriate.
5.2. Menggunakan Kawalan
- Tombol Kelantangan: Control the overall output volume of the guitar.
- Tombol Nada: Adjust the treble frequencies, making the sound brighter or darker.
- Suis Pemilih Pickup: Selects which pickup(s) are active (neck, bridge, or both), altering the guitar's tonal characteristics.
6. Penyelenggaraan
Regular maintenance will ensure your guitar remains in good playing condition.
6.1. Pembersihan
Wipe down the body, neck, and strings with a soft, clean cloth after each use to remove sweat and grime. Use guitar-specific cleaning products for deeper cleaning and polishing, avoiding harsh chemicals.
6.2. Changing Strings
Strings should be changed regularly, typically every 1-3 months depending on usage, or when they sound dull or show signs of corrosion. Change one string at a time to maintain neck tension.
6.3. Fretboard Conditioning
For non-maple fretboards (like HPL), periodically apply a small amount of lemon oil or a specialized fretboard conditioner to prevent drying and cracking. Do this during string changes.
7. Penyelesaian masalah
Berikut ialah penyelesaian kepada isu biasa yang mungkin anda hadapi:
- Tiada Bunyi:
- Ensure the guitar cable is fully inserted into both the guitar and amplebih hidup.
- Semak sama ada ampPengaktif dihidupkan dan kelantangannya dikuatkan.
- Verify that the guitar's volume knob is not at zero and the pickup selector switch is in an active position.
- Uji dengan kabel atau amplifier untuk mengasingkan masalah.
- Buzz Fret:
- Adjust the string action (height) at the bridge saddles. Raise the saddles slightly.
- Check the neck relief. If the neck is too straight or back-bowed, a slight truss rod adjustment may be needed (refer to Section 4.3).
- Inspect frets for unevenness. If a fret is significantly higher than others, professional attention may be required.
- Kestabilan Penalaan Lemah:
- Ensure the tuning pegs are securely tightened.
- Make sure strings are properly wound around the tuning posts, with sufficient wraps.
- Check the nut slots for binding. A small amount of graphite (from a pencil) in the slots can help lubrication.
- New strings require stretching to settle.
- Electronics Noise (Hum/Buzz):
- Ensure all wiring connections are secure and not loose.
- Verify proper grounding.
- Test in a different electrical outlet or room to rule out external interference.
8. Spesifikasi
| Jenama | KEKUATAN |
| Model | STL-D10 (TL DIY Guitar Set) |
| Bahan Badan | Poplar (Note: Product description states Mahogany, but specifications list Poplar. Please verify with manufacturer if specific wood type is critical.) |
| Bahan Leher | Maple |
| Bahan Fretboard | Technical Wood (HPL) |
| Konfigurasi Pengambilan | SS (Single-Single) |
| Bilangan Rentetan | 6 |
| Orientasi Tangan | Betul |
| Berat Barang | 4 Kilogram |
| Sistem Jambatan | tetap |
| Jenis Penyambung | 9V DC Barrel Jack |
9. Waranti dan Sokongan
For warranty information, technical support, or assistance with missing/damaged parts, please contact STRICH customer service directly through their official channels or the retailer where the kit was purchased.