1. Pengenalan
This manual provides essential instructions for setting up, operating, maintaining, and troubleshooting your MIRO A1 Unlocked 4G Cell Phone. Please read this guide thoroughly to ensure proper use and to maximize the device's performance.

Figure 1: MIRO A1 Smartphone
2. Kandungan Pakej
Sahkan bahawa semua item terdapat dalam pakej:
- MIRO A1 Smartphone (1 unit)
- Bateri (1 unit)
- Pengecas (1 unit)
- Kabel USB (1 unit)
- Manual Pengguna (1 unit)

Rajah 2: Aksesori yang Disertakan
3. Persediaan
3.1. Pemasangan Bateri
- Tanggalkan penutup belakang telefon dengan berhati-hati.
- Sejajarkan sentuhan bateri dengan terminal di dalam telefon.
- Tekan bateri dengan lembut ke tempatnya sehingga ia kukuh.
- Pasang semula penutup belakang, pastikan ia klik pada kedudukannya.

Rajah 3: Pemasangan Bateri
3.2. Pemasangan Kad SIM dan Kad MicroSD
The MIRO A1 supports Dual SIM cards and a MicroSD card for expandable storage.
- With the back cover removed, locate the SIM card slots and the MicroSD card slot.
- Insert your Nano SIM card(s) into the designated SIM slots with the gold contacts facing down.
- If using a MicroSD card for additional storage (up to 256GB), insert it into the MicroSD card slot.
- Ensure all cards are seated correctly.
Rajah 4: Pemasangan Kad SIM
3.3. Pengecasan Awal dan Hidupkan
- Connect the USB cable to the phone's USB Type C port and the charger.
- Plug the charger into a power outlet. Allow the phone to charge for at least 30 minutes before first use.
- Press and hold the Power button (usually on the side) until the MIRO logo appears.
- Follow the on-screen prompts to complete the initial setup of the Android 14 Go Edition operating system.
4. Arahan Operasi
4.1. Navigasi Asas
The MIRO A1 runs on Android 14 Go Edition, designed for efficient performance. Use touch gestures to navigate:
- Ketik: Pilih item atau buka apl.
- Leret: Tatal melalui skrin atau senarai.
- Cubit: Zum masuk atau keluar pada foto dan web muka surat.
- Tekan lama: Akses menu kontekstual atau alihkan ikon aplikasi.
4.2. Membuat Panggilan dan Menghantar Mesej
- Open the 'Phone' app to dial numbers or access contacts.
- Open the 'Messages' app to send and receive SMS/MMS.
- For Dual SIM users, you can select which SIM to use for calls or messages before initiating them.
4.3. Penggunaan Kamera
The MIRO A1 features a 5MP rear camera and a 2MP front camera.
- Open the 'Camera' app from the home screen or app drawer.
- Ketik butang pengatup untuk mengambil foto.
- Bertukar antara kamera hadapan dan belakang menggunakan ikon togol kamera.

Figure 5: Camera Module
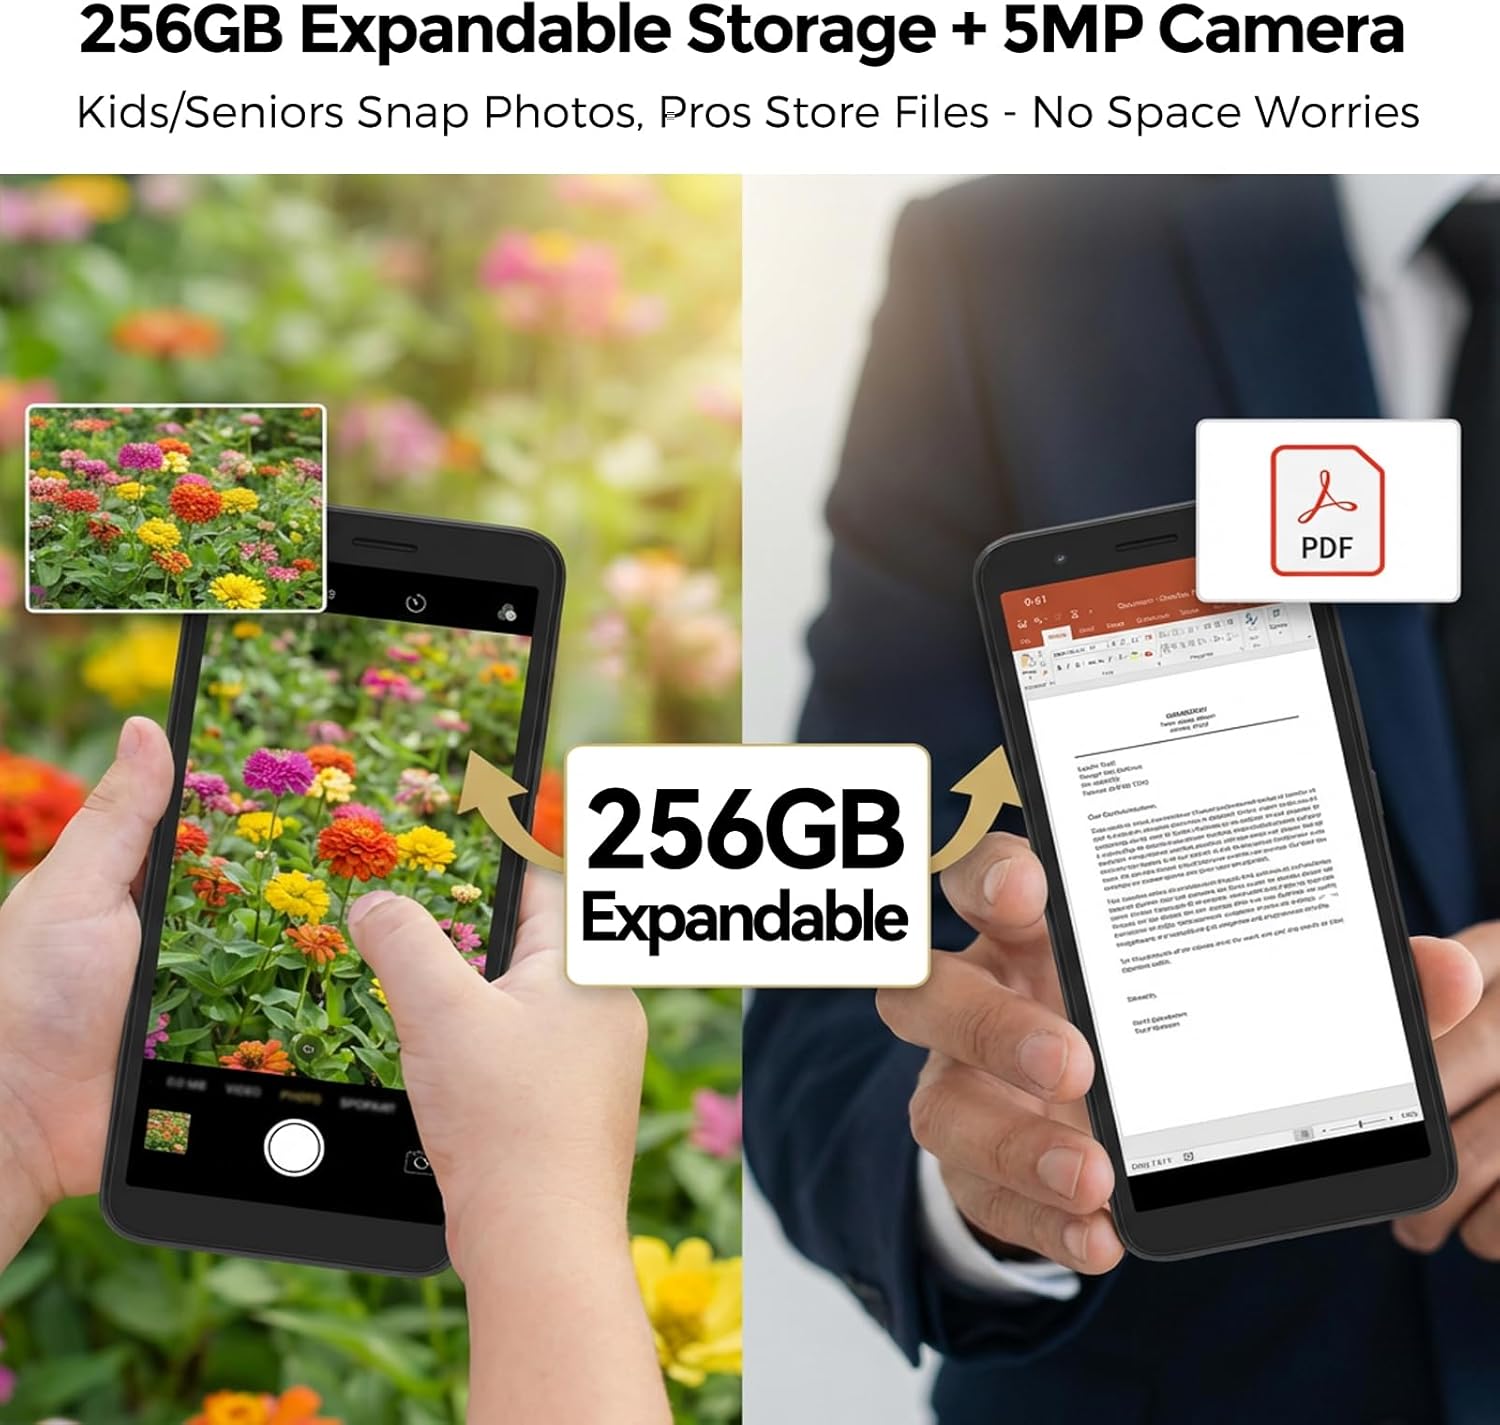
4.4. Pengurusan Storan
Your MIRO A1 comes with 32GB of internal storage, expandable up to 256GB via a MicroSD card.
- Untuk menyemak penggunaan storan, pergi ke Tetapan > Storan.
- Alihkan foto, video dan lain-lain files to the MicroSD card to free up internal space.

Rajah 6: Storan Boleh Diperluas
4.5. Kesambungan Wi-Fi
- Pergi ke Tetapan > Rangkaian & Internet > Wi-Fi.
- Togol Wi-Fi hidup.
- Pilih rangkaian yang anda inginkan daripada senarai dan masukkan kata laluan jika digesa.
5. Penyelenggaraan
5.1. Penjagaan Bateri
- Elakkan suhu yang melampau, yang boleh merendahkan hayat bateri.
- Jangan biarkan telefon dicas untuk tempoh yang lama selepas ia mencapai 100%.
- If the battery is removable, ensure it is properly seated.
5.2. Membersihkan Peranti
- Gunakan kain lembut dan tidak berbulu untuk membersihkan skrin dan badan telefon.
- Elakkan menggunakan bahan kimia yang keras atau bahan yang melelas.
- Pastikan port bebas daripada habuk dan serpihan.
5.3. Kemas Kini Perisian
Periodically check for system updates to ensure your phone has the latest features and security patches. Go to Tetapan > Sistem > Kemas kini sistem.
6. Penyelesaian masalah
6.1. Telefon Tidak Dihidupkan
- Pastikan bateri dipasang dan dicas dengan betul.
- Connect the phone to the charger and wait a few minutes before attempting to power on again.
- Jika bateri boleh ditanggalkan, cuba keluarkan dan masukkan semula.
6.2. Isu Rangkaian
- Periksa sama ada kad SIM dimasukkan dengan betul.
- Verify that your mobile data is enabled in Tetapan > Rangkaian & internet > Rangkaian mudah alih.
- Mulakan semula telefon.
- Confirm with your carrier that your plan is active and compatible with an unlocked 4G device.
6.3. Storage Full
- Padam aplikasi, foto dan video yang tidak diperlukan.
- Bergerak files to a MicroSD card if one is installed.
- Kosongkan data cache untuk aplikasi dalam Tetapan > Aplikasi & pemberitahuan > [Nama Aplikasi] > Storan & cache.
6.4. Tetapan Semula Kilang
If persistent issues occur, a factory reset may be necessary. This will erase all data on your phone. Back up important data before proceeding.
- Pergi ke Tetapan > Sistem > Tetapkan semula pilihan.
- Pilih Padam semua data (set semula kilang).
- Sahkan keputusan anda.
7. Spesifikasi
| Ciri | Spesifikasi |
|---|---|
| Jenama | MIRO |
| Nama Model | MIRO A1 |
| Sistem Operasi | Edisi Android 14 Go |
| Memori RAM | 2 GB |
| Storan Dalaman | 32 GB |
| Storan Boleh Dikembangkan | Sehingga 256 GB (MicroSD) |
| Saiz Skrin | 5.99 Inci |
| Resolusi | 576 x 1152 |
| Kamera Belakang | 5 MP |
| Kamera Depan | 2 MP |
| Kapasiti Bateri | 3000 mAh |
| Kiraan Slot Kad SIM | Dual SIM (Nano) |
| Ketersambungan | 4G, Wi-Fi, Bluetooth, 3.5mm Headphone Jack, USB Type C |
| Keselamatan Biometrik | Pengecaman Cap Jari |
| Berat badan | 182g (6.42oz) |
8. Waranti dan Sokongan
8.1. Maklumat Waranti
The MIRO A1 smartphone comes with a Waranti Terhad 1 Tahun from the date of purchase. This warranty covers manufacturing defects. It does not cover damage caused by misuse, accidents, unauthorized modifications, or normal wear and tear.
8.2. Sokongan Pelanggan
For technical assistance, warranty claims, or further inquiries, please contact MIRO customer support through the retailer where you purchased the device or refer to the official MIRO webtapak untuk maklumat hubungan.