
1. Pengenalan
This manual provides comprehensive instructions for the MAIMEIMI Motorcycle Speedometer Cluster. This all-in-one digital dashboard integrates essential motorcycle data, including speed, RPM, gear position, fuel level, indicator lights, alarms, and time display. Designed for 8-12V systems, it offers enhanced safety and convenience for riders.
2. Ciri-ciri Utama
- All-in-One Dashboard: Integrates speed, RPM, gear position, fuel level, indicator lights, alarms, and time display.
- Julat Paparan Lebar: Speed (up to 199 MPH/KMH), RPM (0-12K), odometer (99999 miles/KM), trip meter (999.9 miles/KM), 5-gear indicator, turn signals, high beam, neutral, engine fault indicators, low oil/voltage penggera.
- Waterproof & Auto-Brightness: Anti-glare LCD display with ambient light sensor for automatic brightness adjustment. Superior waterproof design for reliable use in various weather conditions.
- Pemasangan Mekanikal: Utilizes a mechanical speed gear, simplifying setup without external speed sensors.
- Pilihan Penentukuran: Adjustable for tire circumference, RPM, and fuel sensor settings (compatible with 2-wire or 3-wire systems).
3. Display Interface Overview
The speedometer cluster features a clear LCD display providing all necessary riding information at a glance. Refer to the diagram below for an explanation of each display element.
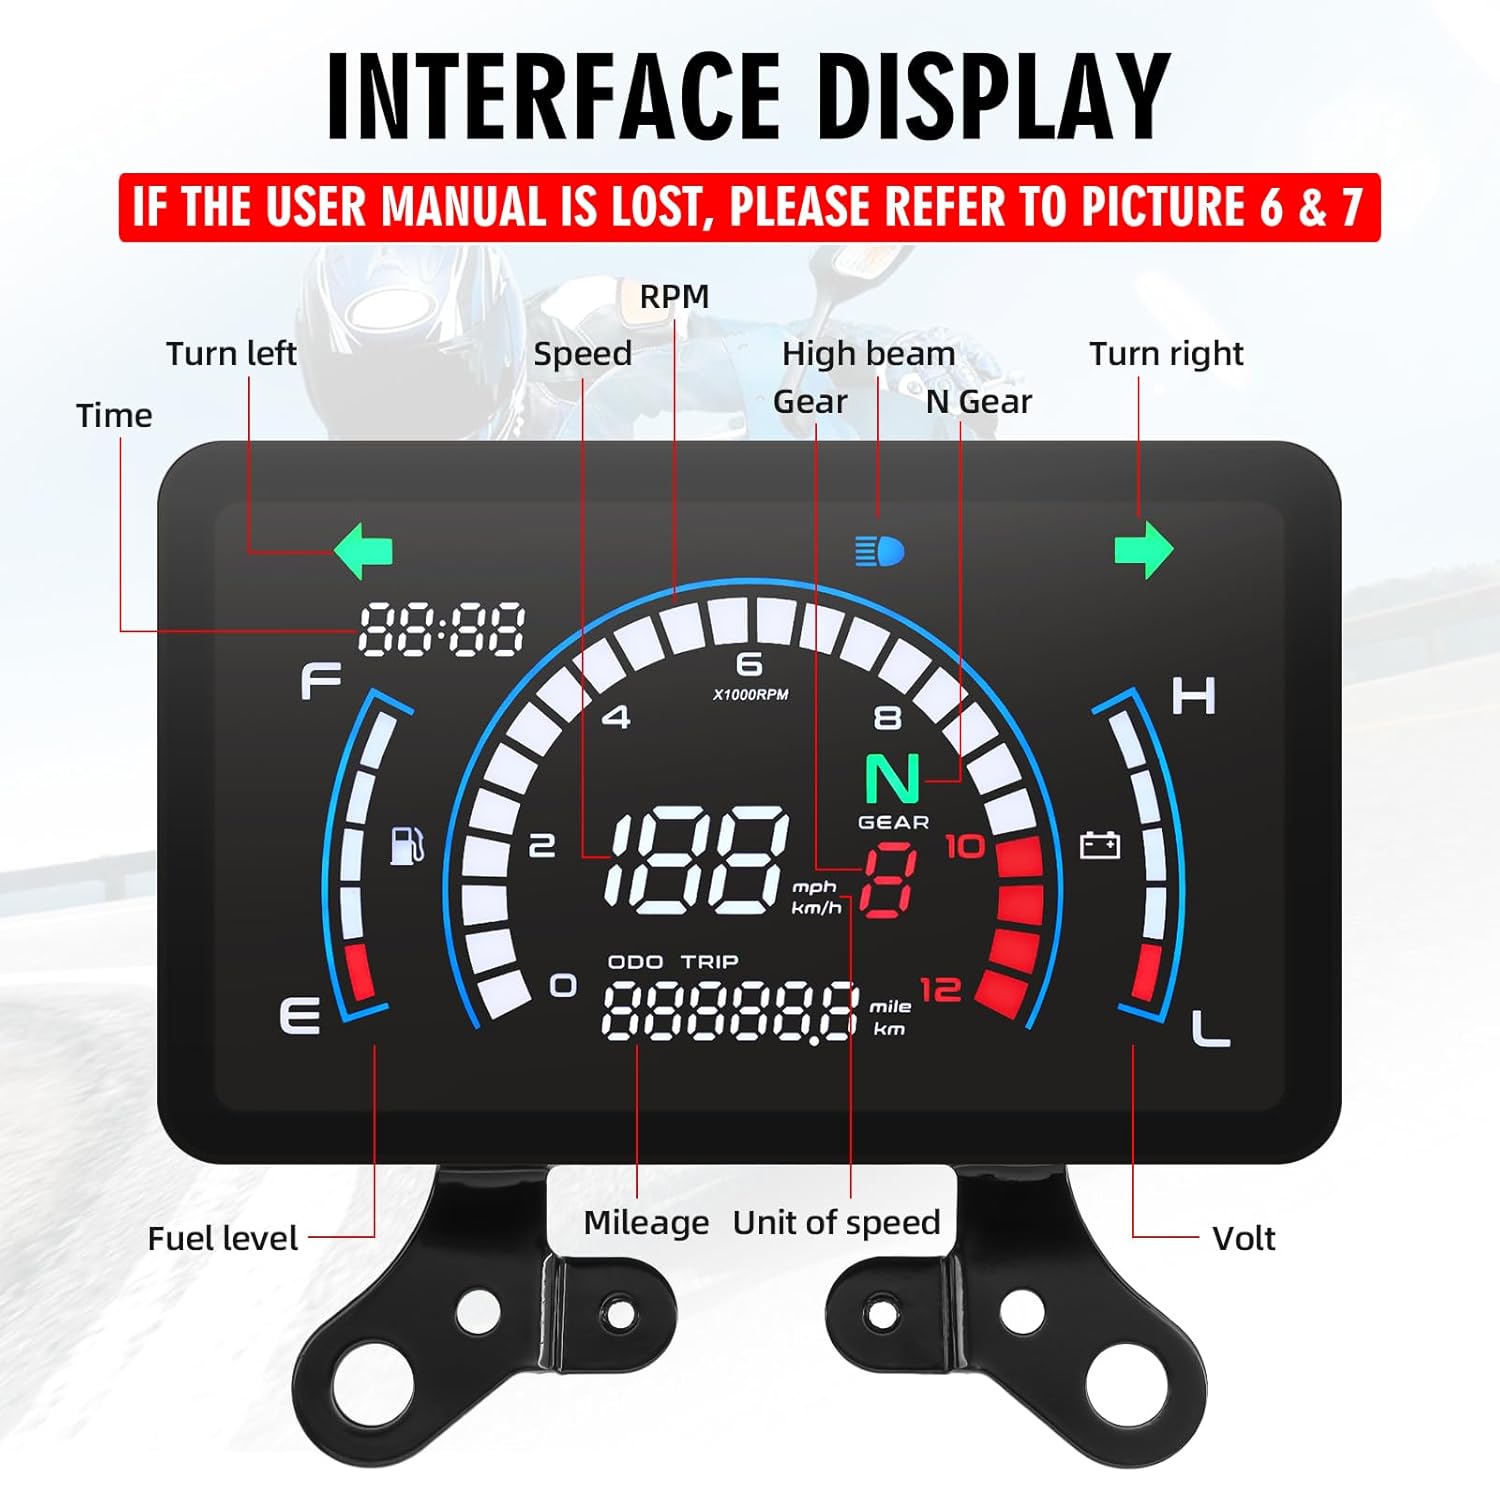
Rajah 3.1: Display Interface. This image illustrates the various indicators on the speedometer cluster, including time, turn signals, speed, RPM, gear, high beam, neutral, fuel level, odometer, trip meter, and voltage.
- Masa: Memaparkan masa semasa.
- Turn Left/Right Indicators: Illuminates when turn signals are active.
- Kelajuan: Shows current speed in MPH or KMH.
- RPM: Memaparkan putaran enjin seminit.
- Gear: Indicates current gear (N for Neutral, 1-5 for gears).
- Lampu tinggi: Illuminates when high beam is active.
- Tahap Bahan Api: Bar graph indicating fuel tank level.
- Odometer (ODO): Jumlah jarak yang dilalui.
- Trip Meter (TRIP): Resettable trip distance.
- Volt: Memaparkan vol bateri semasatage.
4. Panduan Pemasangan
4.1 Pemeriksaan Pra-Pemasangan
Before installation, ensure your motorcycle's electrical system is compatible with an 8-12V input. Incorrect voltage can damage the speedometer. If you are unsure about the installation process, consult a professional.
4.2 Gambarajah Pendawaian
Connect the speedometer to your motorcycle's electrical system according to the following wiring diagram. Ensure all connections are secure and properly insulated.
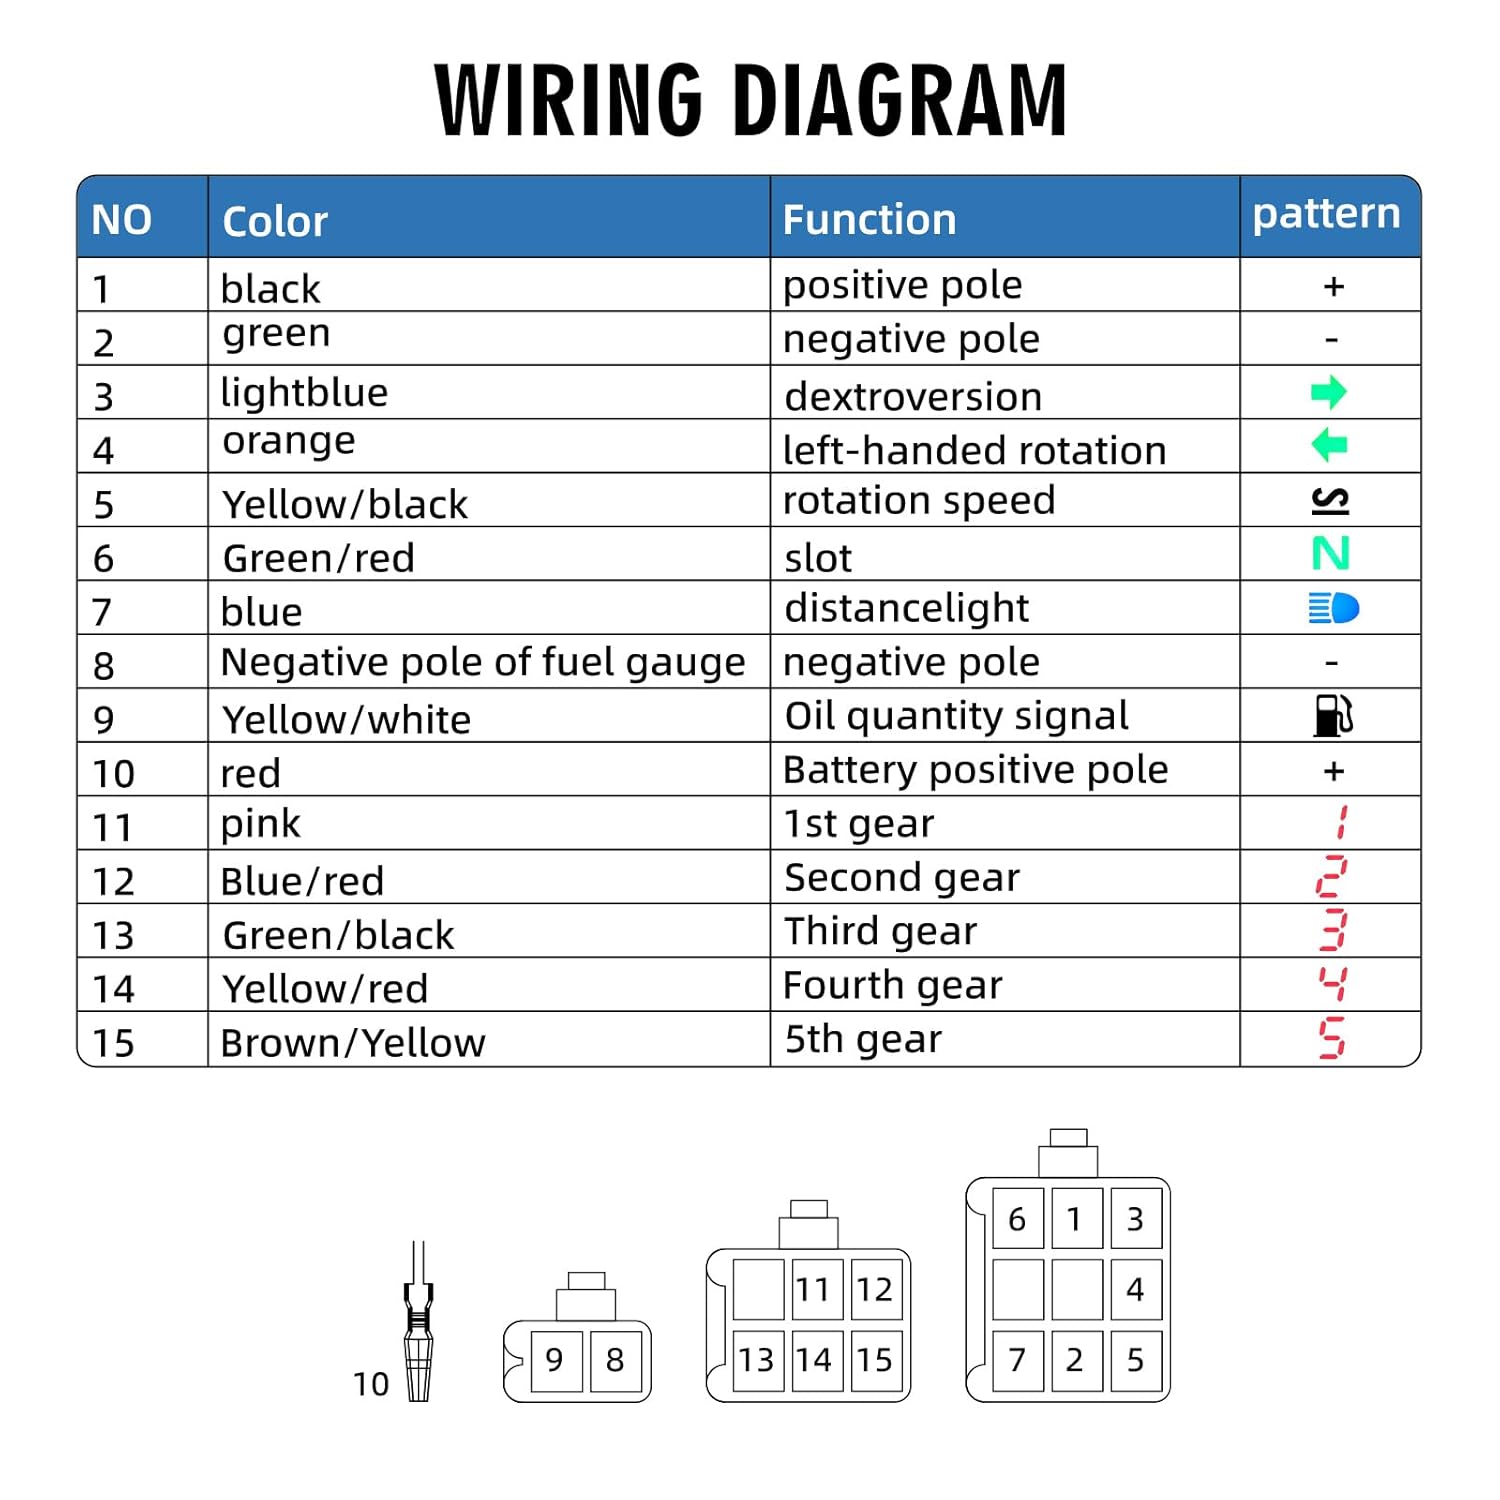
Rajah 4.1: Wiring Diagram. This diagram details the color-coded wires and their functions for connecting the speedometer cluster to the motorcycle's electrical system.
| TIDAK | warna | Fungsi | Corak |
|---|---|---|---|
| 1 | Hitam | Kutub Positif | + |
| 2 | hijau | Kutub Negatif | - |
| 3 | Biru Muda | Dextroversion (Right Turn Signal) | → |
| 4 | Jingga | Left-Handed Rotation (Left Turn Signal) | ← |
| 5 | Kuning/Hitam | Rotation Speed (RPM Signal) | S |
| 6 | Hijau/Merah | Slot (Neutral Gear Signal) | N |
| 7 | Biru | Distance Light (High Beam) | 🔦 |
| 8 | Negative Pole of Fuel Gauge | Kutub Negatif | - |
| 9 | Kuning/Putih | Oil Quantity Signal | ⛽ |
| 10 | merah | Kutub Positif Bateri | + |
| 11 | Merah jambu | Gear pertama | 1 |
| 12 | Biru/Merah | Gear Kedua | 2 |
| 13 | Hijau/Hitam | Gear Ketiga | 3 |
| 14 | Kuning / Merah | Fourth Gear | 4 |
| 15 | Coklat/Kuning | Gear ke-5 | 5 |
4.3 Mechanical Speed Connector
This speedometer connects directly to your motorcycle's original mechanical meter teeth, eliminating the need for a separate speed sensor. Ensure a secure connection for accurate speed readings.
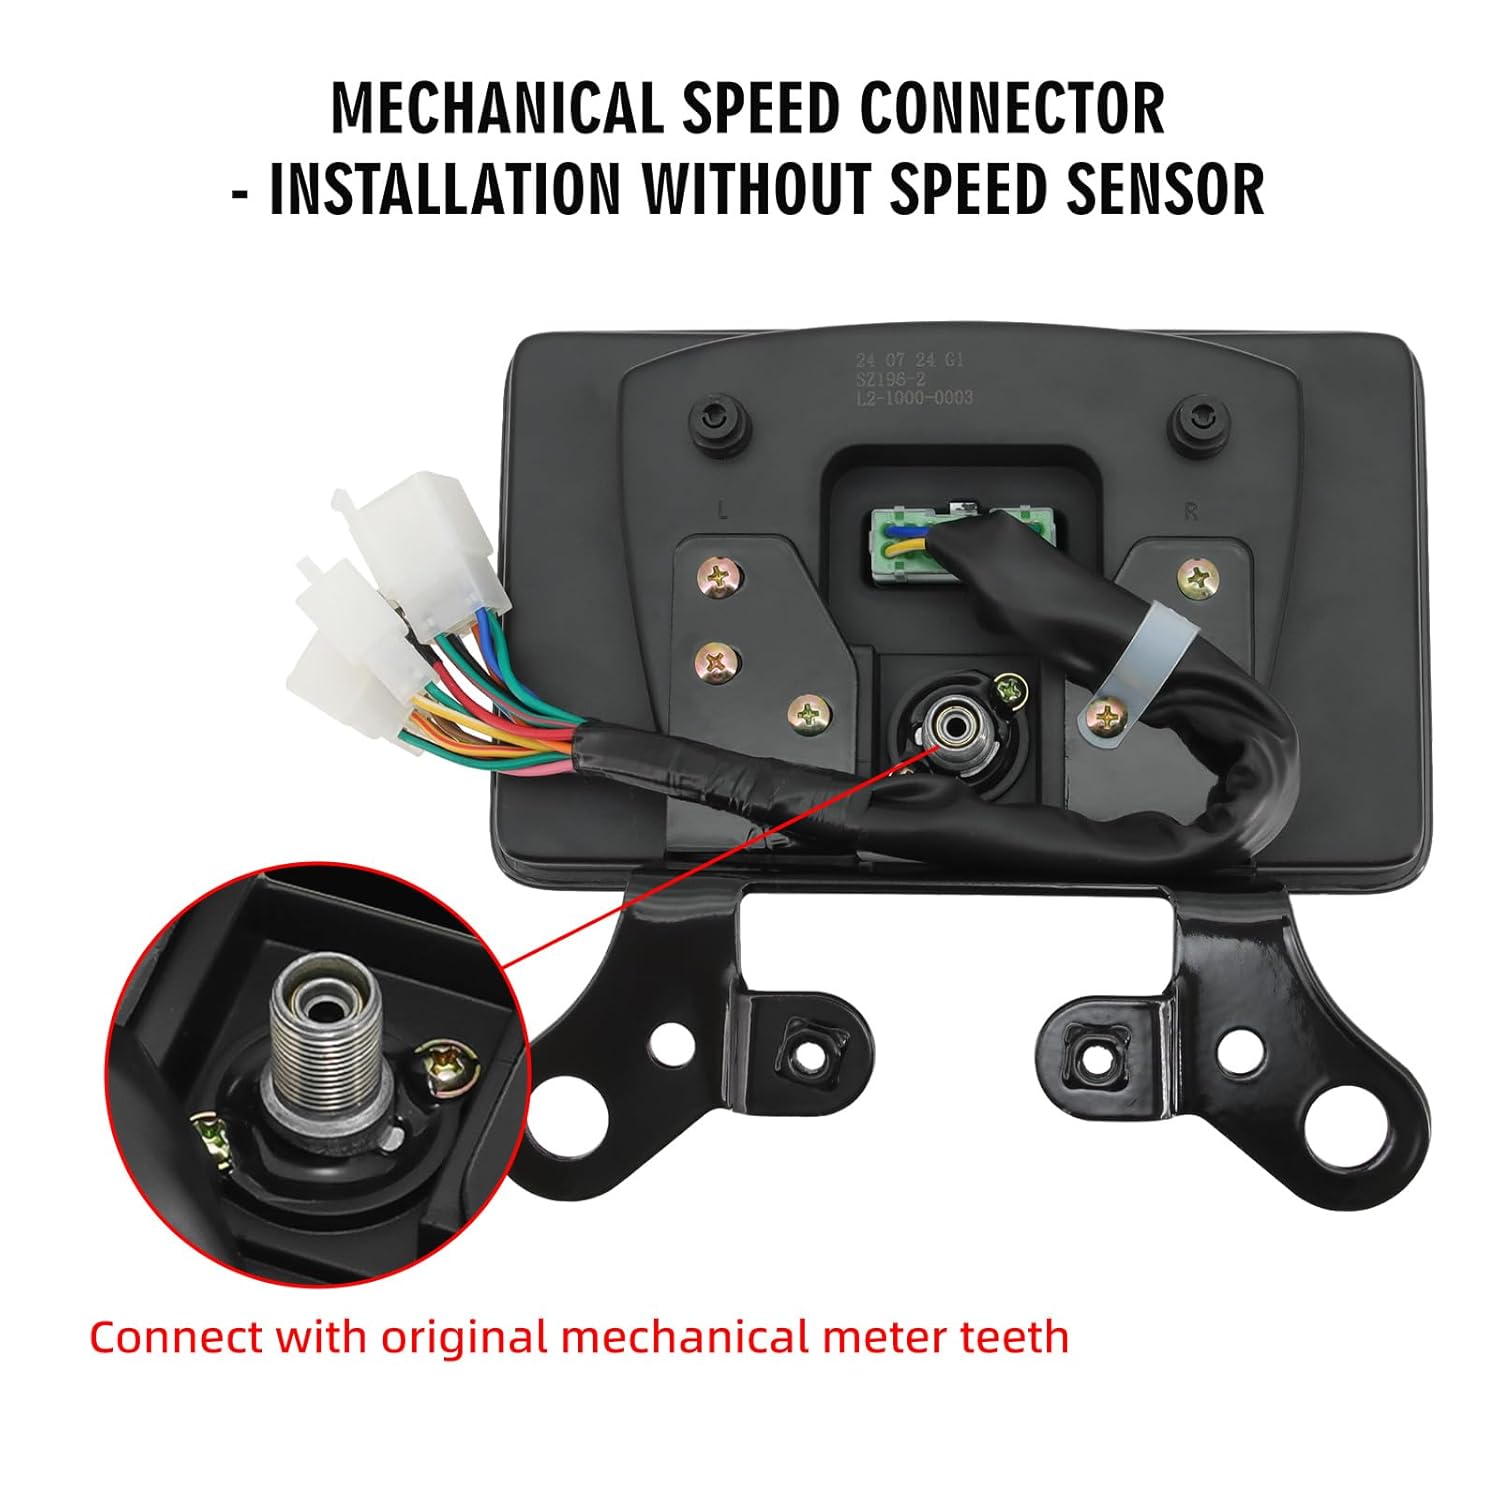
Rajah 4.2: Mechanical Speed Connector. This image shows the mechanical speed connector on the back of the speedometer, designed to interface with the motorcycle's existing mechanical speed gear.
5. Arahan Operasi
5.1 Touch-Sensitive Button
The speedometer features a touch-sensitive button (labeled "ADJ") located on the back, typically on the right small corner of the instrument panel. Apply normal pressure to interact with the device.

Rajah 5.1: Touch-Sensitive Button. This image highlights the location and function of the "ADJ" touch-sensitive button on the speedometer's rear panel.
5.2 Basic Operation and Settings
The "ADJ" button is used for various settings and adjustments. The functionality changes based on whether you perform a short press or a long press.

Rajah 5.2: One-Click Setting & Simple Operation. This image provides a table detailing the functions of long press and short press actions on the ADJ button for various settings.
| Mod | Tekan Panjang | Akhbar Ringkas |
|---|---|---|
| Buka kunci | Within one minute of starting up, in neutral or idle mode, press and hold the ADJ touch button for 5 seconds. Release it when the decorative strip flashes. Parameter adjustments can then be made. | |
| JUMLAH | Pelarasan jam | Switch to TRIP |
| PERJALANAN | Small mileage clearing | Switch to TOTAL |
| jam | Lock in hours or minutes, enter the selection of kilometers and miles | Adjust the hours and minutes |
| Kilometers, Miles | Lock in kilometer or mile mode; Enter the selection of the fuel gauge | Switching between kilometers and miles |
| Tolok Bahan Api | Lock the fuel gauge type and enter the speed ratio selection | Selection of Two Line or Three Line Fuel Gauge |
| Speed Ratio Adjustment Mode | Lock speed ratio; Enter the wheel outer diameter size adjustment | 1, /2, /4, /8, ; *1, *2, *4 Cyclic regulation |
| Adjustment of Wheel Outer Diameter Size | Lock the circumference of the wheels in units, tens, hundreds, and thousands; Enter the setting of pulse count | Adjust the circumference of the wheel in units, tens, hundreds, and thousands in sequence |
| Setting of Pulse Number | Lock the numerical value of several bits or ten bits of the pulse | Set the number of pulse bits or ten bits |
| In any state, do not operate for 5 seconds to save data and exit the adjustment mode. | ||
6. Calibration and Advanced Settings
Accurate readings depend on proper calibration. The speedometer allows for adjustments to match your motorcycle's specific characteristics.
- Tire Circumference Adjustment: Adjust the wheel outer diameter size (C0000-C9999) to ensure accurate speed readings. This setting is crucial for matching the speedometer to your specific tire size.
- RPM Calibration: Fine-tune the RPM signal for precise engine speed display.
- Fuel Sensor Settings: Configure the fuel gauge for compatibility with either 2-wire or 3-wire fuel sensor systems.
- Pulse Number Setting: Adjust the pulse count for accurate data interpretation.
Refer to the "ADJ Button Functions" table in Section 5.2 for detailed steps on how to access and modify these settings.
7. Waterproof Performance
The MAIMEIMI Motorcycle Speedometer Cluster is designed with superior waterproof capabilities, ensuring reliable operation in various weather conditions, including rain and damp environments. This protects the internal components from moisture damage and maintains display visibility.

Rajah 7.1: Waterproof Design. The image shows the speedometer installed on a motorcycle in rainy conditions, demonstrating its waterproof design.
8. Spesifikasi Produk
Detailed specifications for the MAIMEIMI Motorcycle Speedometer Cluster.

Rajah 8.1: Product Dimensions. This image provides a visual representation of the speedometer's dimensions in millimeters and inches.
| Spesifikasi | Nilai |
|---|---|
| Jenama | MAIMEIMI |
| Model | B0FJWXD5NF |
| bahan | Akrilonitril Butadiene Styrene (ABS), Logam |
| Dimensi Produk (L x W x H) | 7.68 x 4.72 x 3 inci (195 x 120 x 76 mm lebih kurang) |
| Berat Barang | 1.5 paun (0.68 kg) |
| Jenis Benang | mekanikal |
| Vol Operasitage | 8-12V |
| Speed Display Range | 0-199 MPH/KMH |
| RPM Display Range | 0-12,000 RPM |
| Odometer Display Range | 0-99,999 miles/KM |
| Trip Meter Display Range | 0-999.9 miles/KM |
9. Apa yang ada di dalam Kotak
Pakej termasuk item berikut:
- MAIMEIMI Motorcycle Speedometer Cluster
- Kurung Pemasangan
- User Manual (electronic copy available upon request)
10. Penyelesaian masalah
Bahagian ini membincangkan isu-isu lazim dan menyediakan penyelesaian.
- Isu: Display is not turning on or is intermittent.
Penyelesaian: Sahkan voltage compatibility (8-12V) and check all wiring connections as per the wiring diagram (Section 4.2). Ensure the positive and negative poles are correctly connected. - Isu: Speed or RPM readings are inaccurate.
Penyelesaian: Ensure the mechanical speed connector is properly engaged with the motorcycle's speed gear (Section 4.3). Calibrate the tire circumference and RPM settings as described in Section 6. - Isu: Fuel gauge is not displaying correctly.
Penyelesaian: Check the fuel sensor wiring. Adjust the fuel gauge settings for either 2-wire or 3-wire systems in the parameter settings (Section 5.2, Fuel Gauge). - Isu: Difficulty understanding parameter settings.
Penyelesaian: Refer to the "ADJ Button Functions" table in Section 5.2 for detailed instructions on long press and short press operations. Practice navigating the settings in a stationary, safe environment.
For persistent issues or complex installation challenges, it is recommended to seek support from the manufacturer or a qualified professional with experience in motorcycle electronics.
11. Sokongan dan Maklumat Hubungan
If you require further assistance, have questions, or need an electronic copy of this manual, please contact MAIMEIMI customer support. Always verify voltage compatibility (8-12V) to avoid damage during installation.
For installation issues, seek our support or a professional with experience. This motorcycle dashboard accessory demands careful handling.
Pengeluar: MAIMEIMI
For the latest support information, please visit the official MAIMEIMI store on Amazon: MAIMEIMI Store