1. Pengenalan
Thank you for choosing the Caupureye HDV900pro 4K 48MP Camcorder. This device is designed to capture high-quality video and images, offering a range of features for both beginners and enthusiasts. With 4K video resolution, 48.0MP image resolution, and 21x digital zoom, it's ideal for vlogging, travel, and capturing everyday moments. The 270° rotatable screen provides flexible shooting angles, and included accessories like an external microphone and 64GB SD card enhance your recording experience.
Video: Selesaiview of the Caupureye 4K 48MP Camcorder, showcasing reka bentuk dan ciri utamanya.
2. Apa yang ada di dalam Kotak
Your Caupureye HDV900pro package includes the following items:
- 1 x Camcorder Video Camera
- 2 x Bateri Li-ion
- Kad SD 1 x 64GB
- 1 x Mikrofon Luaran
- 1 x Kabel HDMI
- 1 x Kabel USB
- 1 x Alat Kawalan Jauh
- 1 x Camera Bag
- 1 x Manual Pengguna
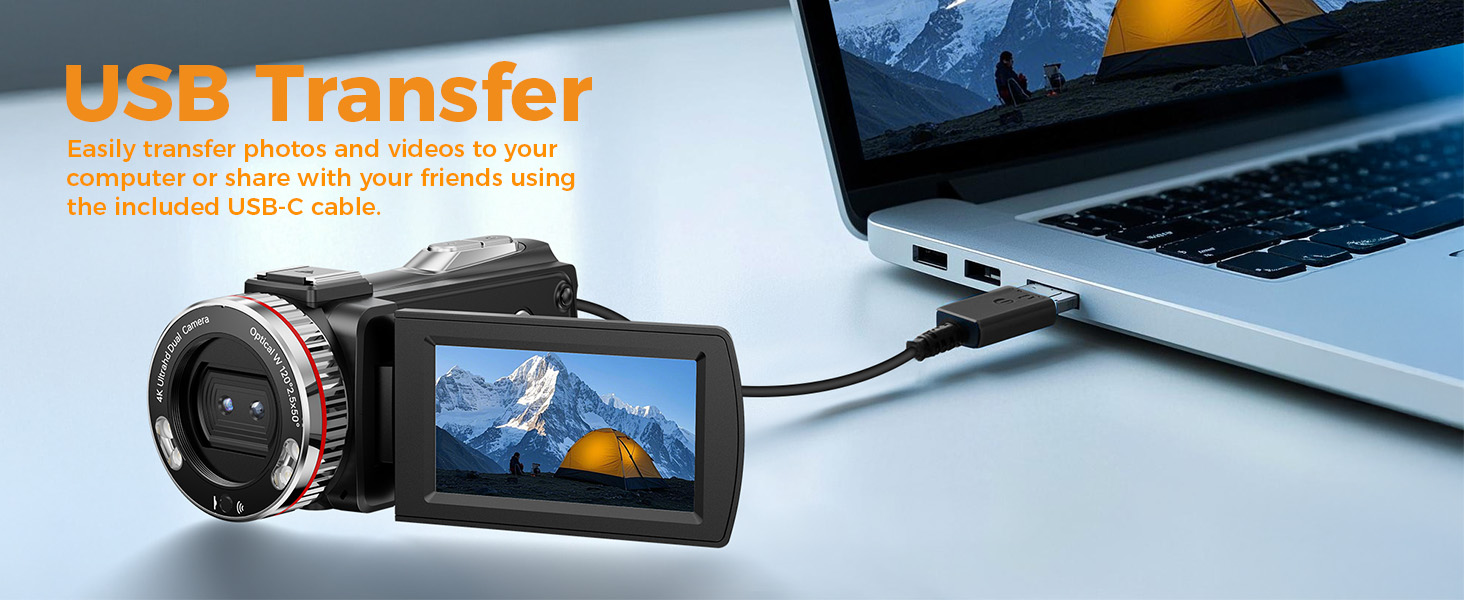
Image: A visual representation of all items included in the Caupureye HDV900pro Camcorder package.
3. Produk Lebihview
The Caupureye HDV900pro camcorder features a compact design with a 3.0-inch 270° rotatable screen for versatile shooting. It supports 4K video and 48MP photos, with 21x digital zoom. The camera includes a built-in fill light for low-light conditions and dual lenses (wide-angle and narrow) for various scenarios.

Image: The camcorder capturing a scene, highlighting its 4K 48MP capabilities and rotatable screen.
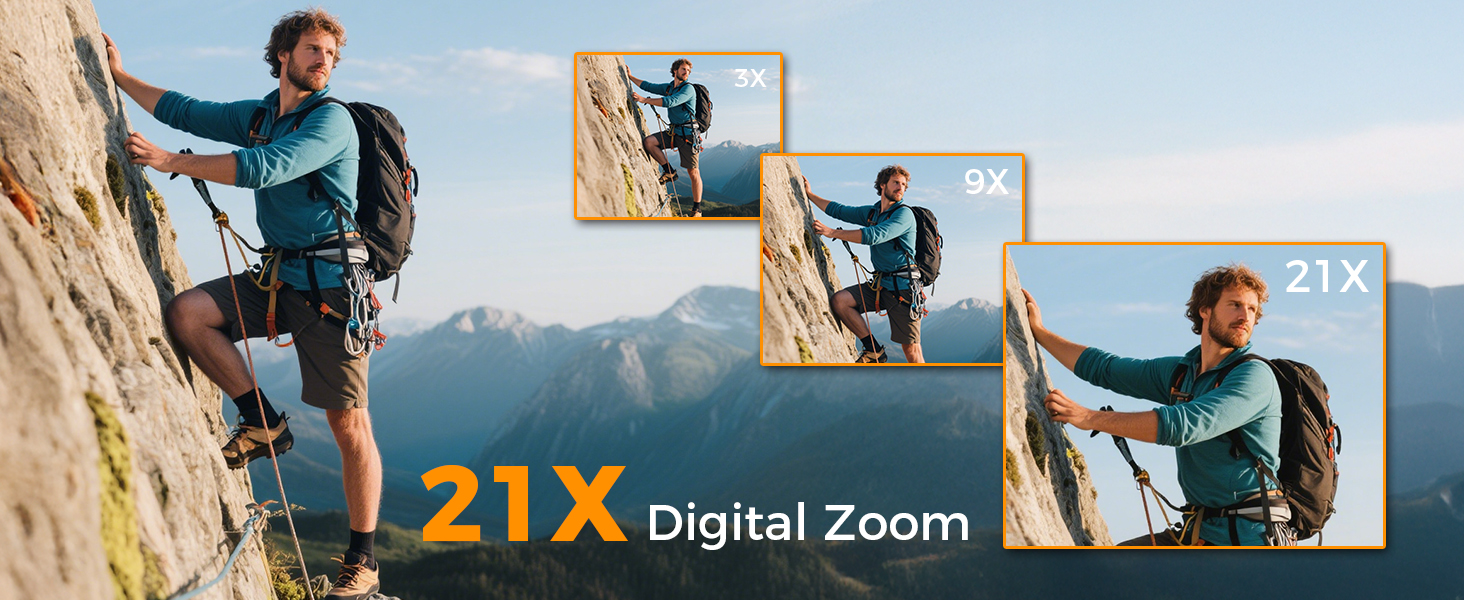
Image: Visual comparison of 3x, 9x, and 21x digital zoom, and the difference between normal and 120° wide-angle views.

Image: The LED Fill Light in action, demonstrating its ability to enhance image quality in low-light conditions.
4. Persediaan
4.1 Pemasangan dan Pengecasan Bateri
Insert one of the provided Li-ion batteries into the battery compartment. The camcorder supports recording while charging, ensuring you don't miss any moments. Use the included USB cable to charge the batteries.
4.2 Penyisipan Kad SD
Insert the 64GB SD card (or your own U3 class 10 memory card up to 512GB) into the designated slot. Ensure it clicks into place.
4.3 External Microphone Attachment
Attach the external microphone to the camcorder's hot shoe mount and plug it into the microphone input for enhanced audio recording.
5. Operasi Asas
5.1 Hidupkan/Mati Kuasa
Open the 270° rotatable screen to power on the camcorder. Close the screen to power it off.
5.2 Recording Video and Taking Photos
To record video or take photos, follow these steps:
- Tekan ke MODE button to select your desired mode (video or photo).
- Tekan ke PENAPI button to start/stop recording or take a photo.
- Gunakan W/T butang untuk zum masuk/keluar.
- Tekan ke ISI CAHAYA button to activate the LED light in dark areas.

Image: Step-by-step guide on using the camcorder's buttons for recording and photography.
6. Ciri Lanjutan
6.1 WebKamera dan Output HDMI
Connect the camcorder to your computer via USB and select "PC Camera" mode to use it as a webcam for live streaming. For an immersive viewing experience, connect the camcorder to a TV using the HDMI cable.

Image: The camcorder functioning as a webcam and connected to a TV via HDMI.
6.2 Special Recording Modes
The camcorder offers various modes to enhance your creativity:
- Fungsi Jeda: Pause and resume recording without creating multiple files.
- Slow-Motion Recording: Capture detailed slow-motion video.
- Rakaman Selang Masa: Ringkaskan acara yang panjang menjadi video pendek yang menarik.
- Selfie: Use the rotatable screen to frame yourself perfectly.
- Penggambaran berterusan: Capture a rapid sequence of photos.
- Night Vision (LED Fill Light): Improve visibility in dark environments.

Imej: Cthamples of different recording modes, including pause, slow-motion, and time-lapse.
7. Menyambung ke Komputer
Use the provided USB cable to connect your camcorder to a computer. This allows for easy transfer of photos and videos for editing or sharing.

Image: The camcorder connected to a laptop, illustrating the USB transfer function.
8. Main balik
Untuk kembaliview video dan foto yang dirakam:
- Tekan ke PLAY/RIGHT butang untuk memasuki mod main balik.
- Gunakan ATAS/BAWAH button to select the clip you wish to view.
- Tekan ke OK button to play or stop the video.
- Tekan ke MENU/LEFT button to delete a clip or return to the gallery.

Image: Step-by-step guide on how to access and control media playback on the camcorder.
9. Penyelesaian masalah
- Kamera tidak dihidupkan: Pastikan bateri dimasukkan dengan betul dan dicas sepenuhnya.
- Kualiti video/imej yang teruk: Check lighting conditions, adjust exposure settings, or ensure the lens is clean.
- Microphone not recording audio: Ensure the external microphone is securely plugged in and powered on (if applicable).
- Ralat kad SD: Ensure the SD card is correctly inserted and not full. Try formatting the card (this will erase all data).
- Alat kawalan jauh tidak berfungsi: Ensure the battery in the remote is functional and there are no obstructions between the remote and the camcorder.
For further assistance, please contact customer service.
10. Spesifikasi
| Ciri | Perincian |
|---|---|
| Jenama | Caupureye |
| Nombor Model | HDV900pro |
| Resolusi Tangkapan Video | 4K |
| Teknologi Penderia Foto | CMOS |
| Apertur Maksimum | 2 f |
| Saiz Skrin | 3 Inci |
| Teknologi Ketersambungan | USB |
| Berat Barang | 1.41 paun |
11. Waranti dan Sokongan
For warranty information or technical support, please refer to the contact details provided in your product packaging or visit the official Caupureye weblaman web. Pasukan khidmat pelanggan kami sedia membantu anda dengan sebarang pertanyaan atau kebimbangan.