
GMKtec JP Nucbox G10
Manual Pengguna PC Mini GMKtec G10
Model: JP Nucbox G10
1. Pengenalan
This manual provides detailed instructions for setting up, operating, maintaining, and troubleshooting your GMKtec G10 Mini PC. Please read this manual thoroughly before using your device to ensure optimal performance and longevity.
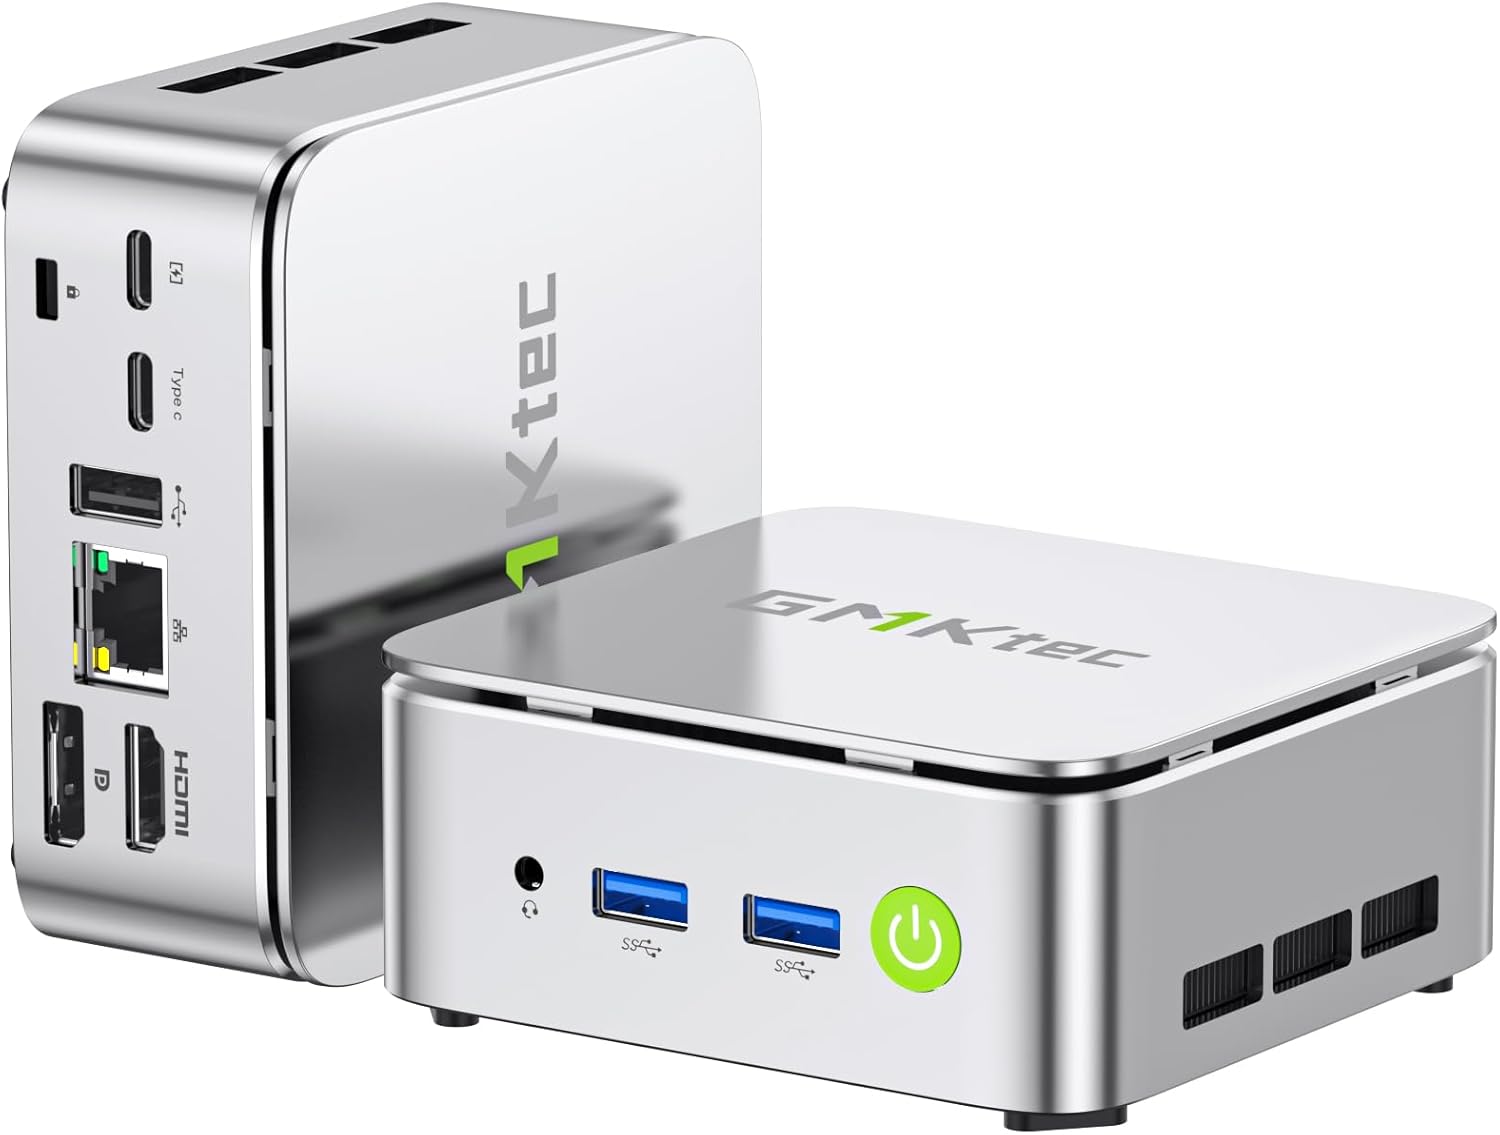
Imej: Depan dan belakang view of the GMKtec G10 Mini PC, highlighting its compact design and various ports.
2. Produk Lebihview
The GMKtec G10 Mini PC is a compact and powerful computing solution designed for various tasks, from everyday office work to multimedia entertainment. It features an AMD Ryzen 5 3500U processor, ample memory, and flexible storage options.
2.1 Ciri-ciri Utama
- High-Performance AMD Ryzen 5 3500U: Equipped with a 4-core, 8-thread processor with a max boost clock of 3.7GHz, offering robust performance for multitasking and light editing.
- Triple Display Output: Supports up to three simultaneous 4K displays via HDMI 2.1, DisplayPort 1.4, and USB-C (DP Alt Mode).
- Storan Boleh Dikembangkan: Includes a 256GB NVMe SSD and supports expansion up to 16TB (8TB x 2) via additional M.2 slots.
- Ample Memori: Comes with 16GB DDR4 RAM (8GB x 2) and is expandable up to 64GB across two SO-DIMM slots.
- Kesambungan Berkelajuan Tinggi: Features 2.5G wired LAN, Wi-Fi 5, and Bluetooth 5.0 for stable and fast network connections.
- Reka Bentuk Kompak & Senyap: Palm-sized form factor with an efficient, silent cooling fan, ideal for space-constrained or quiet environments.
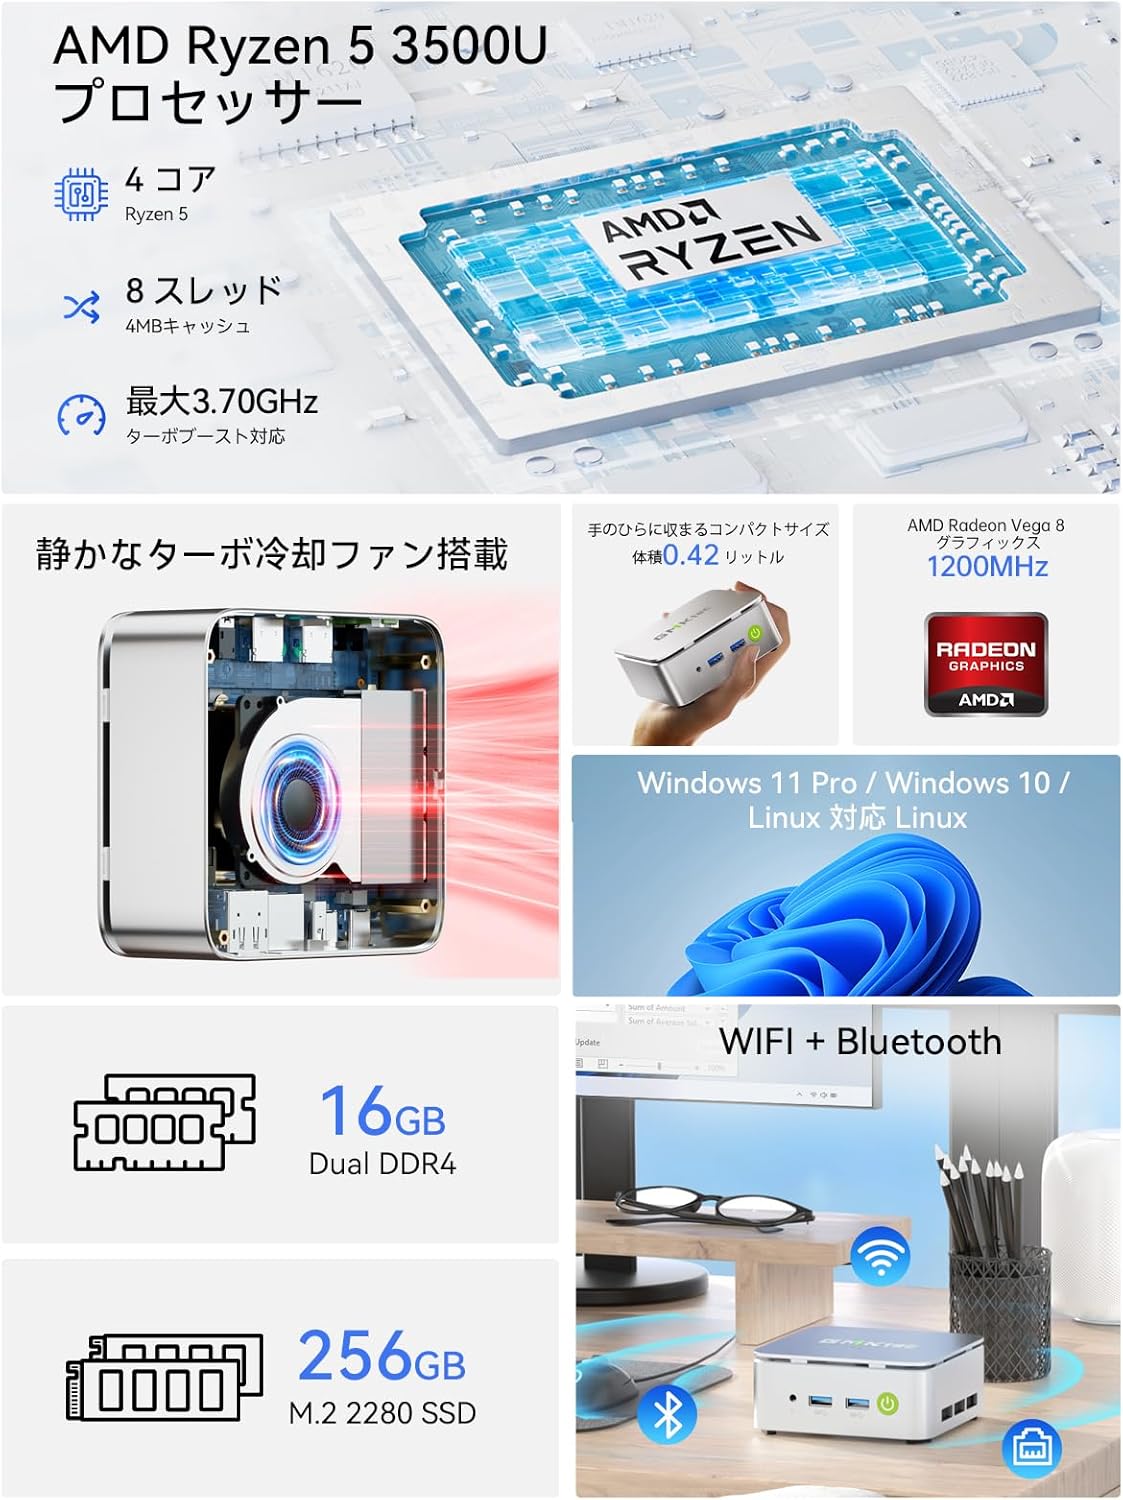
Imej: Tamatview of the GMKtec G10 Mini PC's main features, including its AMD Ryzen 5 3500U processor, 16GB DDR4 RAM, 256GB SSD, compact size, quiet turbo cooling fan, and support for Windows 11 Pro/Windows 10/Linux.
2.2 Processor and Graphics
The GMKtec G10 is powered by an AMD Ryzen 5 3500U processor, featuring 4 cores and 8 threads, with a maximum boost clock of 3.7GHz. It integrates Radeon Vega 8 Graphics, providing capable performance for daily tasks and multimedia.

Image: A close-up of the AMD Ryzen 5 3500U processor, detailing its core count, thread count, cache size, and maximum clock speed.
2.3 Pelabuhan dan Ketersambungan
The Mini PC offers a comprehensive set of ports for connecting various peripherals and displays:
- Pelabuhan hadapan: 3.5mm Audio Jack, USB 3.2 Gen1 x 2, Power Button.
- Port Belakang: Kensington Lock, Type-C (PD dedicated), USB 2.0 x 1, Type-C (DP / Data / PD compatible), 2.5G Gigabit LAN (RJ45) x 1, HDMI 2.1 (4K@60Hz), DisplayPort 1.4 (4K@60Hz).
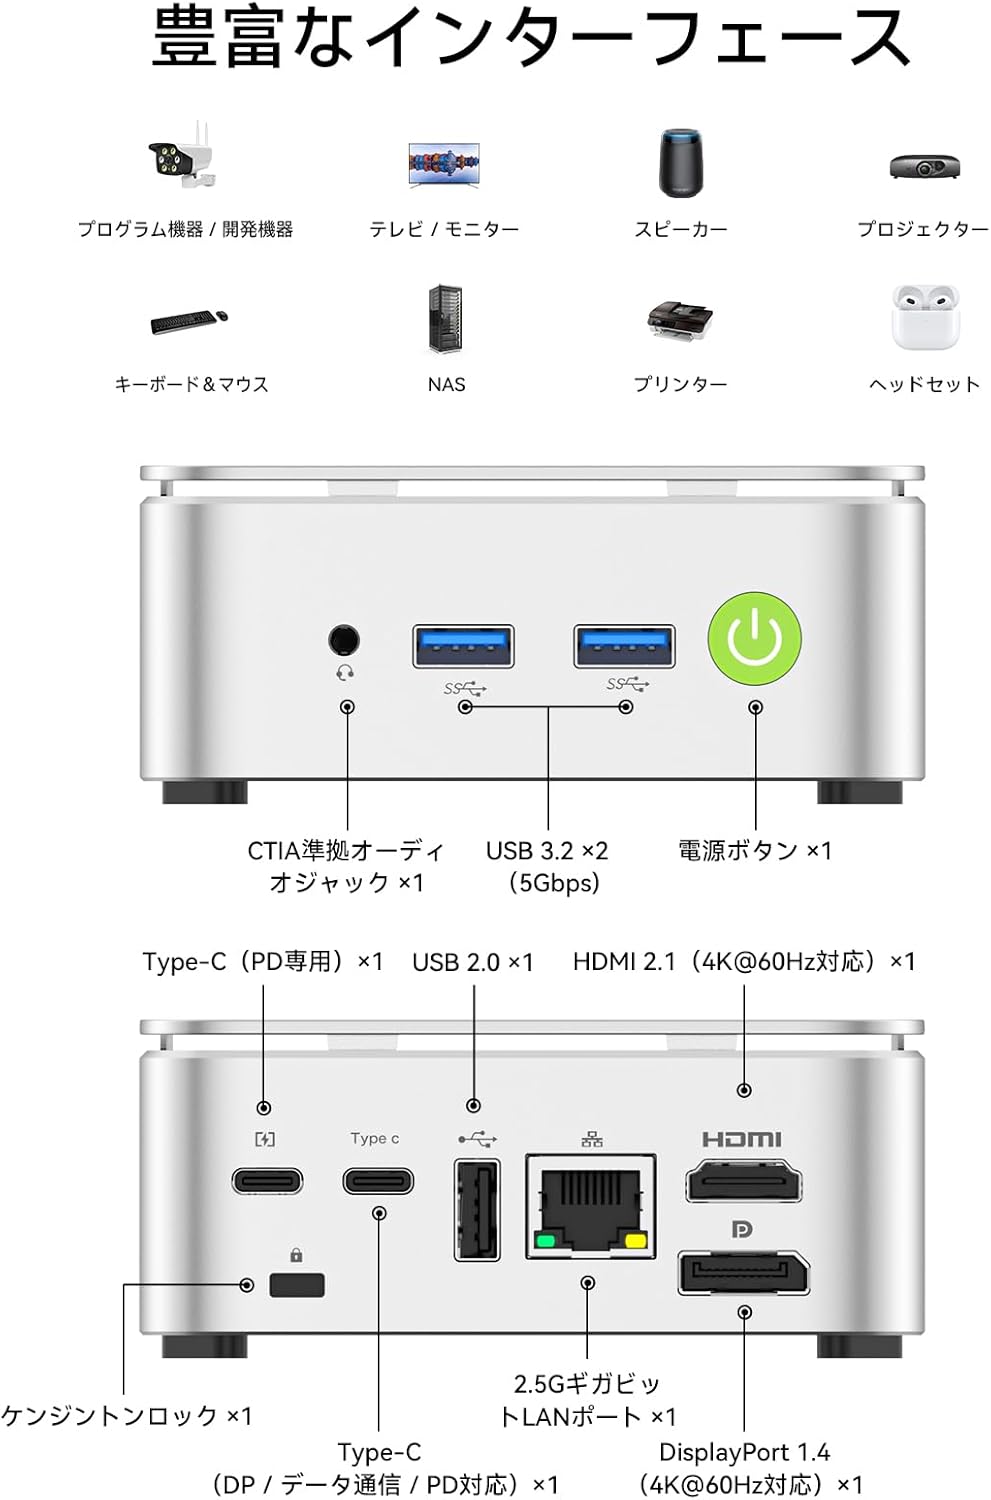
Image: A visual guide to the front and rear ports of the GMKtec G10 Mini PC, including USB, audio, power, HDMI, DisplayPort, Type-C, and LAN connections.
2.4 Memori dan Penyimpanan
The GMKtec G10 comes with 16GB of DDR4 RAM (8GB x 2) and a 256GB NVMe SSD. Both memory and storage are expandable to meet future needs.
- Ingatan: Two SO-DIMM slots support up to 64GB DDR4 RAM.
- Storan: Two M.2 2280 slots support up to 16TB (8TB x 2) of storage.

Imej: Meletup view illustrating the dual-channel DDR4 memory and M.2 2280 SSD slots, highlighting the upgrade potential for RAM up to 64GB and storage up to 16TB.
3. Panduan Persediaan
3.1 Membuka Kotak dan Kandungan Pakej
Carefully unbox your GMKtec G10 Mini PC. The package should contain the following items:
- Nucbox G10 Mini PC
- Penyesuai Kuasa & Kabel
- Kabel HDMI
- VESA Mount & Screws
- Manual Pengguna (dokumen ini)

Image: The complete package contents of the GMKtec G10 Mini PC, laid out for easy identification.
3.2 Initial Power-On and Connections
To set up your Mini PC for the first time:
- Sambungkan penyesuai kuasa ke port DC-in pada Mini PC dan pasangkannya ke soket kuasa.
- Connect your monitor(s) to the HDMI, DisplayPort, or Type-C video output ports.
- Sambungkan papan kekunci dan tetikus anda ke port USB yang tersedia.
- Tekan butang kuasa di bahagian hadapan Mini PC untuk menghidupkannya.
Watch this video for a visual guide on initial setup and connections:
Video: Tamatview of the GMKtec G10 Mini PC, demonstrating its compact size, various ports, and ease of connection to a display for initial use.
3.3 Pemasangan Pemasangan VESA
The GMKtec G10 supports VESA mounting, allowing you to attach it to the back of a compatible monitor for a clutter-free workspace.
- Attach the VESA mount bracket to the back of your monitor using the provided screws.
- Secure the Mini PC to the VESA mount.
For a visual demonstration of VESA mount installation, refer to this video (note: this video features a similar model, but the VESA mounting process is generally the same):
Video: Demonstration of VESA mount installation for a mini PC. The process shown is applicable to the GMKtec G10 for mounting behind a monitor.
4. Arahan Operasi
4.1 Hidupkan/Mati Kuasa
- Hidupkan kuasa: Tekan butang kuasa pada bahagian hadapan peranti.
- Matikan: Gunakan fungsi penutupan sistem pengendalian. Secara alternatif, tekan dan tahan butang kuasa selama 5 saat untuk memaksa penutupan (gunakan hanya apabila perlu).
4.2 Persediaan Berbilang Paparan
The GMKtec G10 supports connecting up to three displays simultaneously, enhancing productivity for work and entertainment.

Image: A workstation setup showcasing the GMKtec G10 Mini PC driving two large monitors and a tablet, illustrating its triple HD output capability for enhanced productivity.
4.3 Kesambungan Rangkaian
- LAN berwayar: Connect an Ethernet cable to the 2.5G Gigabit LAN port for high-speed internet access.
- Wi-Fi: The device supports Wi-Fi 5. Configure your wireless network settings through the operating system.
- Bluetooth: Bluetooth 5.0 is supported for connecting wireless peripherals like keyboards, mice, and headphones.
5. Penyelenggaraan
5.1 Pembersihan
Regularly clean the exterior of the Mini PC with a soft, dry cloth. Ensure ventilation grilles are free from dust to maintain optimal cooling performance.
5.2 Component Upgrades (RAM & SSD)
The GMKtec G10 allows for upgrades to its RAM and M.2 SSD. Always ensure the device is powered off and unplugged before performing any internal modifications.
For a visual guide on upgrading RAM and SSD, please refer to this video (note: this video features a similar model, but the general procedure for installing RAM and M.2 SSDs is comparable):
Video: A tutorial demonstrating the process of expanding DDR memory and replacing an SSD in a mini PC. This guide can be used as a reference for upgrading the GMKtec G10.
5.3 Sistem Penyejukan
The Mini PC features a silent cooling fan designed to maintain optimal operating temperatures while minimizing noise.

Image: A graph comparing the noise level of the G10 Mini PC (35dB) to other environments, highlighting its quiet operation, alongside a user working in a quiet room.

Image: An internal diagram of the GMKtec G10's high-efficiency cooling system, showing the airflow and heat sink design.
6. Penyelesaian masalah
6.1 Tiada Output Paparan
- Ensure all display cables (HDMI, DP, Type-C) are securely connected to both the Mini PC and the monitor.
- Pastikan monitor dihidupkan dan ditetapkan kepada sumber input yang betul.
- Try connecting to a different display port or using a different cable.
6.2 Isu Ketersambungan Wi-Fi
- Check if Wi-Fi is enabled in the operating system settings.
- Ensure the Mini PC is within range of your wireless router.
- Restart your wireless router and the Mini PC.
- Update Wi-Fi drivers if available.
6.3 System Unresponsive
- If the system becomes unresponsive, press and hold the power button for 5 seconds to force a shutdown. Wait a few moments, then power it back on.
- Pastikan pengudaraan yang mencukupi untuk mengelakkan terlalu panas.
6.4 External Graphics Card Connection
If you are connecting an external graphics card via Oculink, ensure the Mini PC is powered off before connecting or disconnecting the external GPU. Hot-plugging Oculink is not supported and may damage the motherboard.
For a demonstration of connecting an external graphics card, refer to this video (note: this video features a similar model, but the connection method is relevant):
Video: A guide on how to connect an AD-GP1 external graphics board to a GMKtec M7 Mini PC. This demonstrates the Oculink connection process, which is similar for the G10.
7. Spesifikasi
| Ciri | Spesifikasi |
|---|---|
| Jenama | GMKtec |
| Siri Model | JP Nucbox G10 |
| Dimensi Produk | 9.8 x 10.3 x 4.2cm; 284g |
| warna | putih |
| Jenama CPU | AMD |
| Jenis CPU | Ryzen 5 3500U |
| Kelajuan CPU | 3.7 GHz |
| Kiraan Pemproses | 4 |
| Jenis Memori RAM | DDR4, SO-DIMM x 2 |
| Kapasiti Memori Maks | 64 GB |
| Kelajuan Jam Memori | 2400 MHz |
| Kapasiti Cakera Keras | 256 GB |
| Jenis Pemacu Keras | SSD |
| Antara Muka Pemacu Keras | PCIe x 4 |
| Pemecut Grafik | Radeon Vega 8 Graphic |
| GPU Brand | AMD |
| Jenis Kad Grafik | Bersepadu |
| VRAM Type | SODIMM |
| VRAM Capacity | 16 GB |
| Ketersambungan | Bluetooth, Wi-Fi 5, 2.5G LAN |
| Port USB 2.0 | 1 |
| Port USB 3.0 | 2 |
| Port HDMI | 1 |
| Jenis Pemacu Optik | tiada |
| Sistem Operasi | Windows 11 Pro / Linux |
| Disertakan Bateri | ya |
| Kandungan Tenaga Bateri Lithium | Jam 5 Watt |
| Pembungkusan Bateri Litium | Battery contained in equipment |
| Berat Bateri Litium | 0.7 Gram |
| Lithium Ion Battery Count | 1 |
| Penggunaan Produk | Gaming, Business, Multimedia |
| Jenis Reka Bentuk Komputer Peribadi | PC mini |
| Saiz Memori RAM yang Dipasang | 16 GB |
8. Waranti dan Sokongan
Untuk maklumat jaminan dan sokongan teknikal, sila rujuk kepada GMKtec rasmi webtapak atau hubungi perkhidmatan pelanggan mereka secara langsung. Simpan resit pembelian anda sebagai bukti pembelian untuk tuntutan waranti.
Ask a question about this manual
Ask about setup, troubleshooting, compatibility, parts, safety, or missing instructions. Manuals+ will review the question and use this page’s manual context to help answer it.