Olvy A10
Olvy A10 Cordless Stick Vacuum Cleaner with Mop Function User Manual
Model: A10
1. Pengenalan
Thank you for choosing the Olvy A10 Cordless Stick Vacuum Cleaner with Mop Function. This appliance is designed for efficient cleaning of various floor types, offering both vacuuming and mopping capabilities. Please read this manual thoroughly before use to ensure proper operation, maintenance, and safety.

Image: The Olvy A10 Cordless Stick Vacuum Cleaner in its full assembly, alongside various attachments and the wall mount.
2. Arahan Keselamatan
To reduce the risk of fire, electric shock, or injury, always follow basic safety precautions when using an electrical appliance.
- Baca semua arahan sebelum menggunakan perkakas.
- Jangan gunakan di luar atau di permukaan basah.
- Jangan biarkan digunakan sebagai mainan. Perhatian yang rapi diperlukan apabila digunakan oleh atau berhampiran kanak-kanak.
- Gunakan hanya seperti yang diterangkan dalam manual ini. Gunakan hanya lampiran yang disyorkan pengilang.
- Jangan gunakan dengan kord atau palam yang rosak. Jika perkakas tidak berfungsi sebagaimana mestinya, telah terjatuh, rosak, ditinggalkan di luar rumah, atau terjatuh ke dalam air, kembalikannya ke pusat servis.
- Jangan tarik atau bawa dengan kord, gunakan kord sebagai pemegang, tutup pintu pada kord, atau tarik kord di sekeliling tepi atau sudut yang tajam. Jangan jalankan perkakas di atas kord. Jauhkan kord dari permukaan yang dipanaskan.
- Jangan cabut plag dengan menarik kord. Untuk mencabut palam, pegang palam, bukan kordnya.
- Jangan pegang palam atau perkakas dengan tangan yang basah.
- Jangan letakkan sebarang objek ke dalam bukaan. Jangan gunakan dengan mana-mana bukaan yang disekat; jauhkan daripada habuk, serabut, rambut dan apa sahaja yang boleh mengurangkan aliran udara.
- Jauhkan rambut, pakaian longgar, jari dan semua bahagian badan daripada bukaan dan bahagian yang bergerak.
- Matikan semua kawalan sebelum mencabut plag.
- Gunakan lebih berhati-hati semasa membersihkan di tangga.
- Jangan gunakan untuk mengambil cecair mudah terbakar atau mudah terbakar, seperti petrol, atau gunakan di kawasan yang mungkin terdapat.
- Jangan ambil apa-apa yang terbakar atau berasap, seperti rokok, mancis, atau abu panas.
- Jangan gunakan tanpa cawan habuk dan/atau penapis di tempatnya.
- Elakkan permulaan yang tidak disengajakan. Pastikan suis dalam kedudukan mati sebelum menyambung ke pek bateri, mengambil atau membawa perkakas.
- Isi semula hanya dengan pengecas yang ditentukan oleh pengilang. Pengecas yang sesuai untuk satu jenis pek bateri mungkin menimbulkan risiko kebakaran apabila digunakan dengan pek bateri yang lain.
- Dalam keadaan kesat, cecair mungkin dikeluarkan daripada bateri; elakkan bersentuhan. Jika terkena secara tidak sengaja, siram dengan air. Jika cecair terkena mata, dapatkan bantuan perubatan tambahan. Cecair yang dikeluarkan daripada bateri boleh menyebabkan kerengsaan atau melecur.
3. Kandungan Pakej
Sahkan bahawa semua komponen terdapat dalam pakej:
- Unit Utama (Vakum Pegang Tangan)
- Tiub Sambungan Boleh Laras
- Kepala Berus Lantai
- Bateri boleh tanggal
- Tangki Air (untuk mengemop)
- Pad Mop
- Alat Berus 2-dalam-1
- Alat Celah
- Pendakap Pelekap Dinding
- Penyesuai Kuasa
- Replacement HEPA Filter (2x)
- Manual Pengguna

Image: A visual representation of all components included with the Olvy A10 Cordless Stick Vacuum Cleaner.
4. Produk Lebihview
The Olvy A10 features a powerful 350W motor providing up to 35,000 Pa suction, an integrated mop function, and a multi-stage HEPA filtration system. It includes an intelligent LED display for monitoring status and an auto-mode for adaptive cleaning.
Ciri-ciri Utama:
- Penyedutan Kuat: 350W motor with 35,000 Pa for deep cleaning on various surfaces.
- Fungsi 2-dalam-1: Seamlessly switch between vacuuming and mopping.
- Paparan LED Pintar: Provides real-time information on battery level, suction mode, and dust concentration.
- Mod Auto: Melaraskan kuasa sedutan secara automatik berdasarkan tahap kotoran yang dikesan.
- HEPA 13 Filtration: Captures 99.99% of fine particles, suitable for allergy sufferers.
- Masa Jangka Panjang: Up to 60 minutes on a single charge with a 2200 mAh removable battery.
- Ringan dan Serbaguna: Easy to maneuver and convert into a handheld vacuum for various cleaning tasks.

Image: Close-up of the intelligent LED display showing battery indicator, low power warning, auto mode, dust concentration, and control panel.

Image: The LED display indicating 'Auto-mode' and the current power level during operation.
5. Persediaan dan Pemasangan
5.1 Pengecasan Awal
Before first use, fully charge the battery. The battery takes approximately 4-5 hours to fully charge.
- Tanggalkan bateri dari unit utama dengan menekan butang pelepas.
- Connect the power adapter to the charging port on the battery.
- Plug the adapter into a power outlet. The battery indicator on the LED display will show charging status.
- Once fully charged, disconnect the adapter.

Image: The removable battery unit, highlighting its 2200 mAh capacity, 4-5 hour charging time, and up to 60 minutes run time.
5.2 Memasang Pembersih Vakum
- Pasang Bateri: Slide the charged battery into the main unit until it clicks into place.
- Pasangkan Tiub Sambungan: Connect the adjustable extension tube to the main unit. Ensure it clicks securely.
- Pasang Berus Lantai: Connect the floor brush head to the other end of the extension tube.
- Pasang Pelekap Dinding (Pilihan): Pilih lokasi yang sesuai untuk pelekap dinding. Pasangkannya pada dinding menggunakan skru dan sauh yang disediakan. Ini membolehkan penyimpanan dan pengecasan yang mudah.
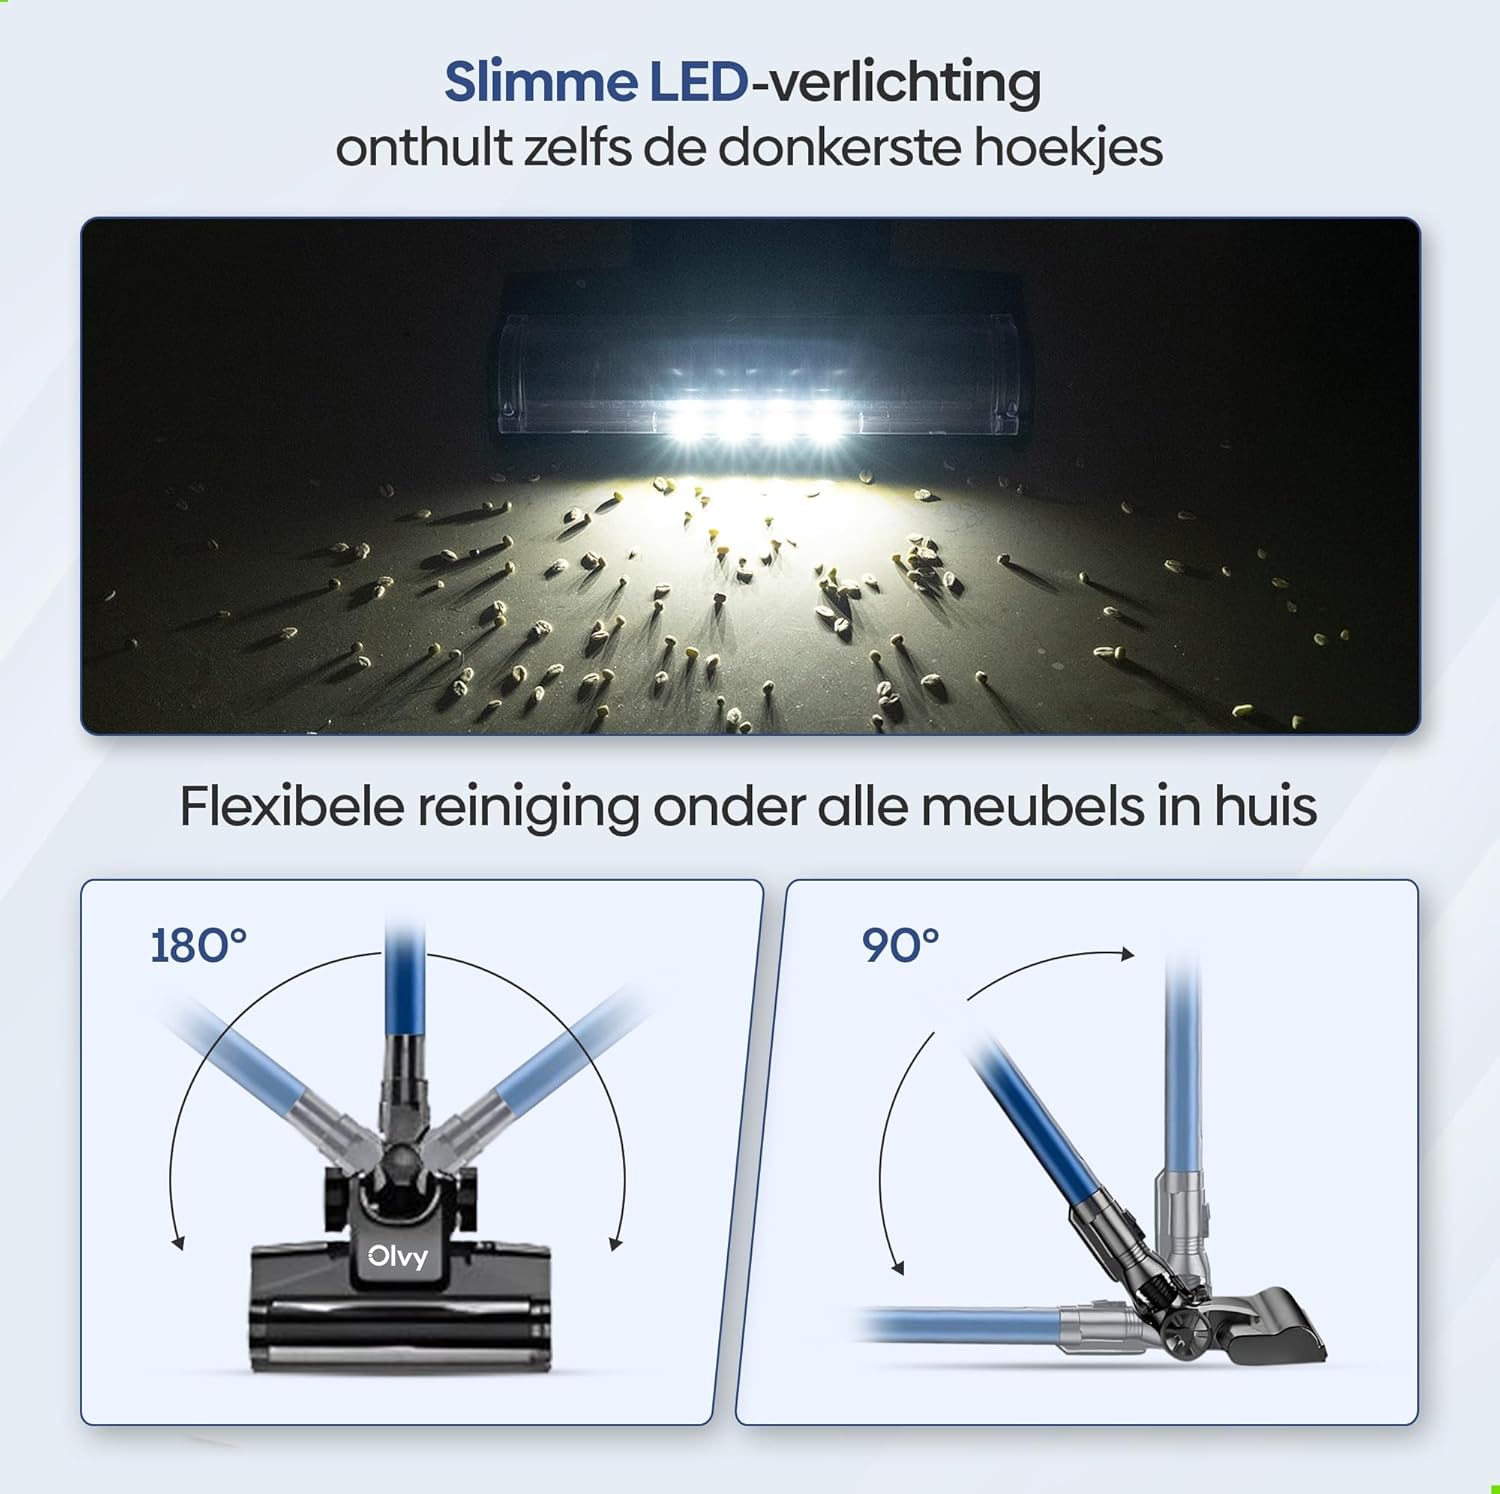
Image: The vacuum cleaner demonstrating both wall-mounted storage and self-standing capability.
6. Arahan Operasi
6.1 Operasi Asas
- Hidupkan/Mati Kuasa: Tekan butang kuasa pada unit utama untuk menghidupkan atau mematikan pembersih vakum.
- Laraskan Kuasa Sedutan: The vacuum offers 5 suction levels. Use the control panel on the LED display to cycle through the power modes (Low, Normal, High, Turbo).
- Mod Auto: Activate the intelligent auto mode for automatic suction adjustment based on dirt detection. The LED display will show 'Auto' when this mode is active.
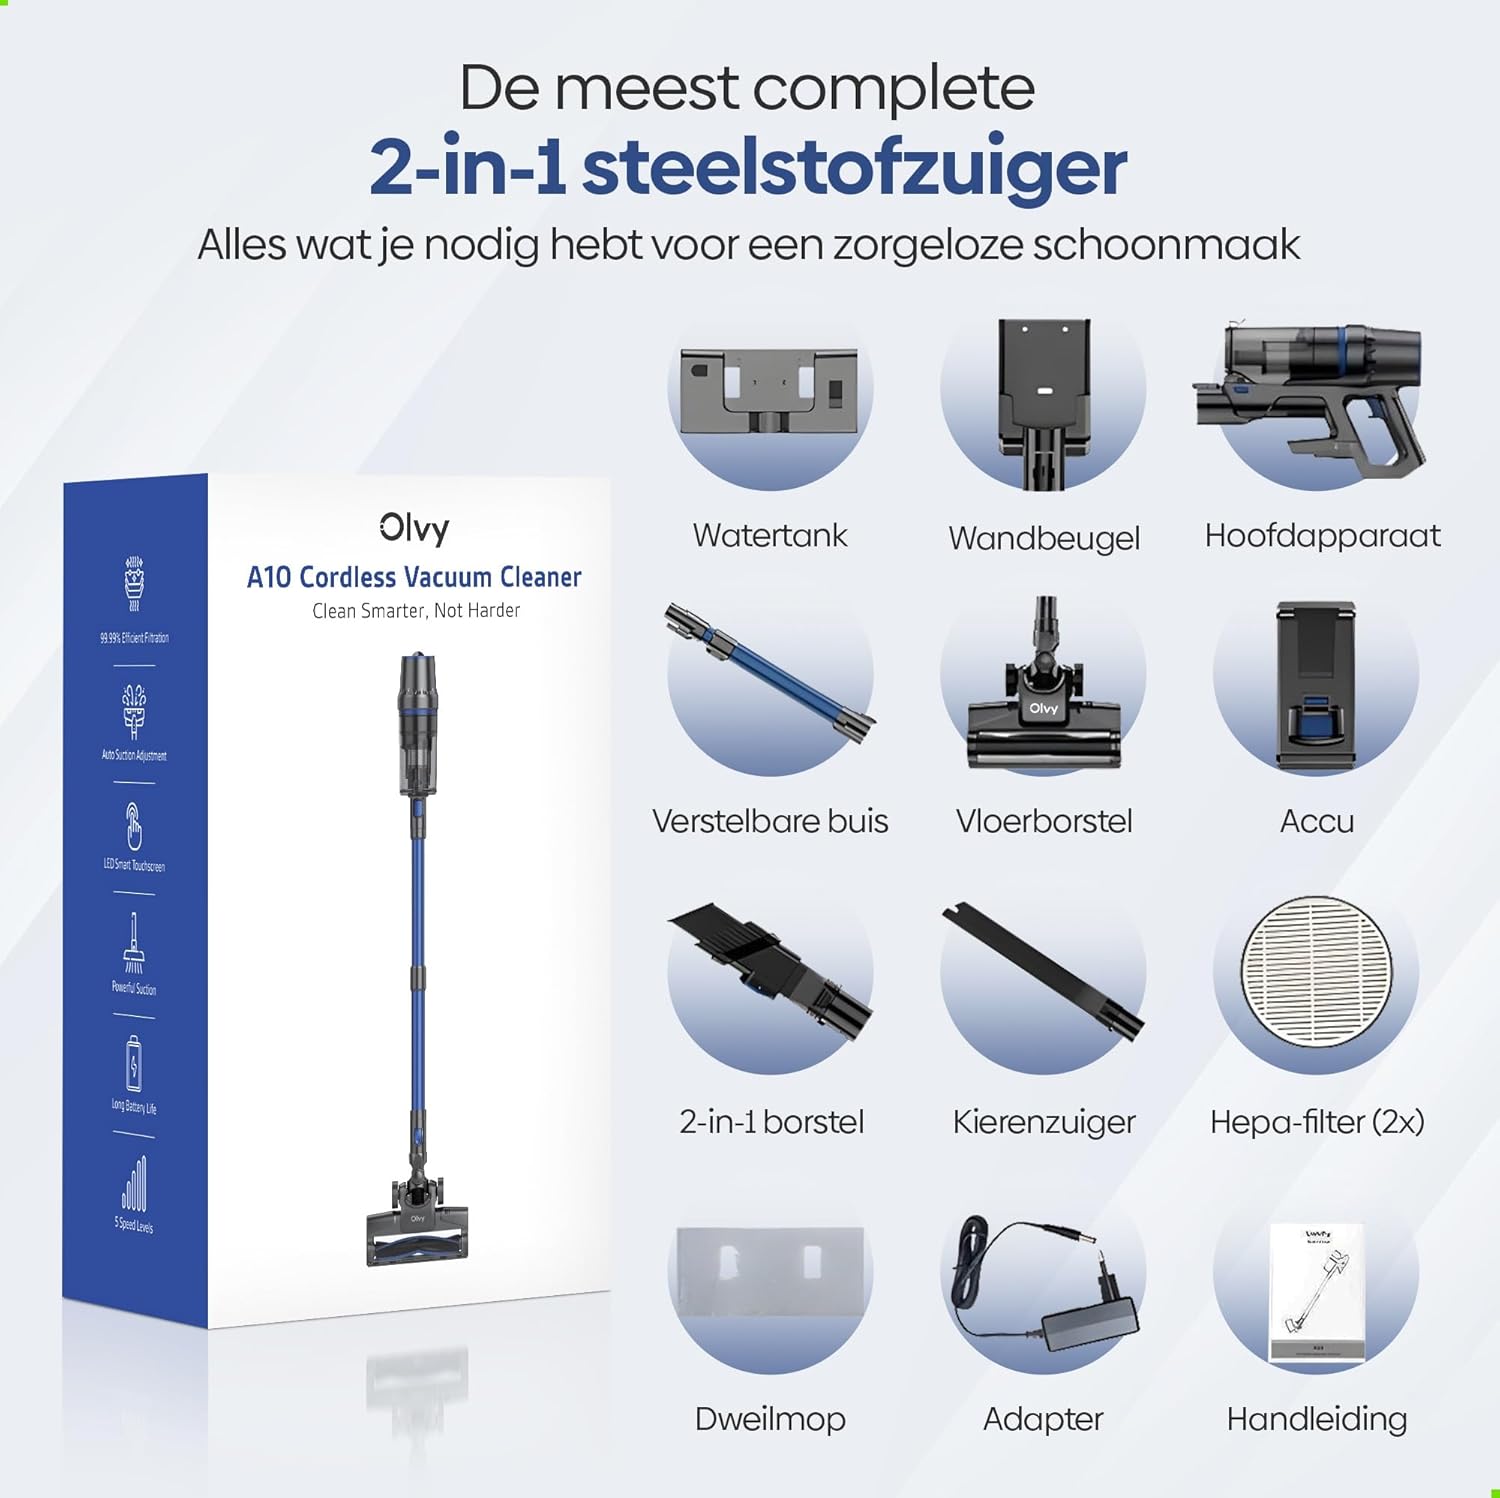
Image: The vacuum cleaner demonstrating its 4 suction levels (Low, Normal, High, Turbo) and intelligent auto mode, which adapts to dirt levels.
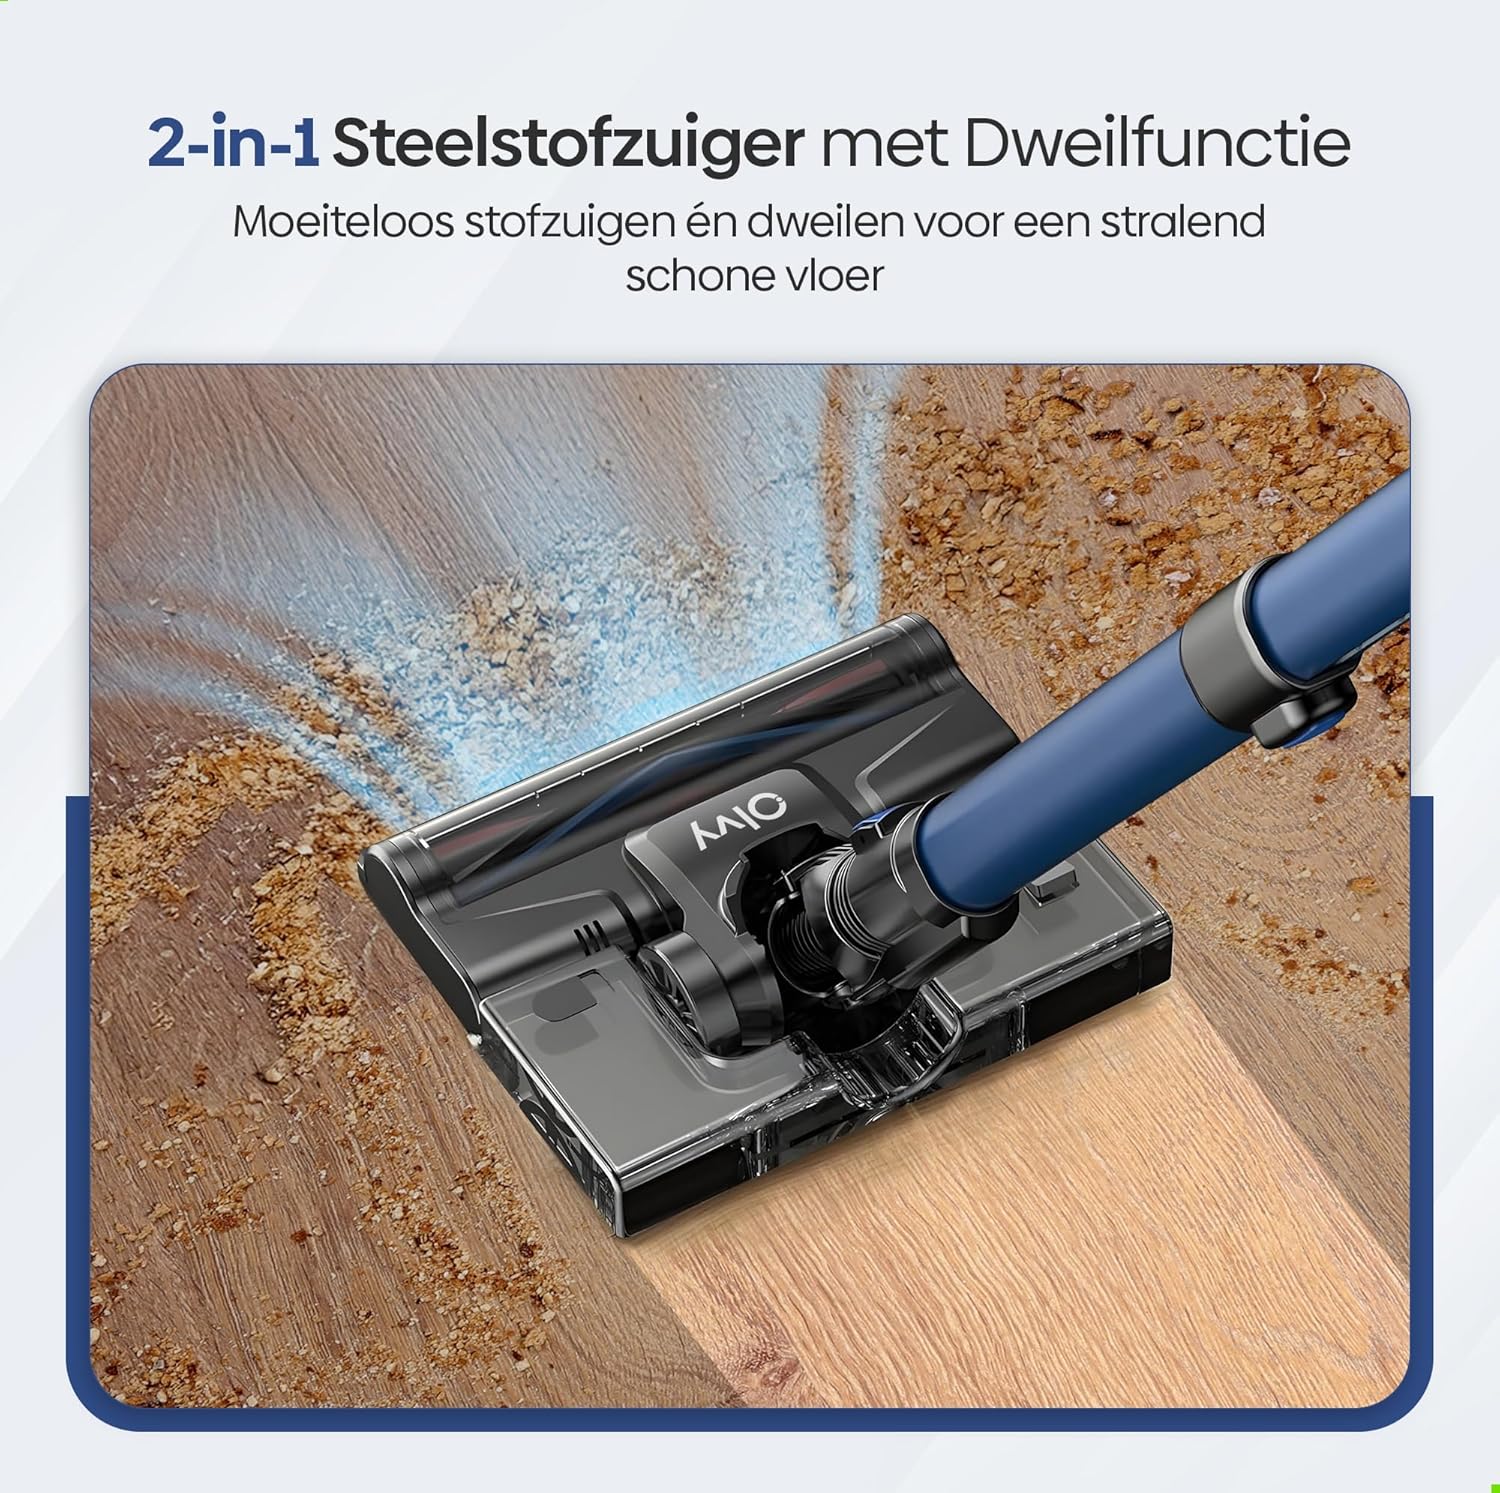
Image: A user operating the Olvy A10, showcasing its powerful 350W motor and 35,000 Pa suction for effective cleaning of various debris like hair, dust, crumbs, and sand.
6.2 Using the Mop Function
The integrated mop function allows for simultaneous vacuuming and wet cleaning of hard floors.
- Isi Tangki Air: Detach the water tank from the floor brush head. Fill it with clean water. Do not use corrosive liquids or detergents that may damage the tank or floor.
- Pasang Pad Mop: Securely attach the mop pad to the bottom of the water tank.
- Reattach Water Tank: Reinstall the filled water tank onto the floor brush head.
- Begin Mopping: Operate the vacuum cleaner as usual. The mop pad will dampen the floor as you vacuum, providing a streak-free clean.

Imej: A terperinci view of the 2-in-1 stick vacuum with mop function, showing water being dispensed for simultaneous vacuuming and mopping on a hard floor.

Image: The mop function of the Olvy A10 actively cleaning a hard floor, demonstrating its effectiveness in removing dirt and leaving a clean surface.
6.3 Menggunakan Lampiran
- Alat Berus 2-dalam-1: Ideal for cleaning upholstery, curtains, and delicate surfaces.
- Alat Celah: Sesuai untuk mencapai ruang, sudut dan tepi yang sempit.
- To use, detach the extension tube and connect the desired attachment directly to the main unit.

Image: The Olvy A10 being used in different configurations, including as a stick vacuum for floors, a handheld for high areas, and for cleaning under furniture.

Image: The vacuum's LED lighting revealing hidden dust particles on the floor, and diagrams illustrating its 180° and 90° flexible head rotation for cleaning under furniture.
7. Penyelenggaraan
Regular maintenance ensures optimal performance and extends the lifespan of your Olvy A10 vacuum cleaner.
7.1 Mengosongkan Tong Sampah
Empty the dustbin regularly, especially when the 'Dust Concn' indicator on the LED display shows high concentration.
- Pastikan vakum dimatikan.
- Tekan butang pelepas tong habuk untuk menanggalkannya daripada unit utama.
- Hold the dustbin over a trash can and press the bottom release latch to open the lid and empty the contents.
- Close the lid and reattach the dustbin to the main unit.

Image: The dustbin being emptied with a single click, demonstrating its large 0.8L capacity.

Image: A user washing the dustbin under running water, illustrating the washable components for easy cleaning.
7.2 Membersihkan Penapis
The Olvy A10 uses a multi-stage filtration system, including an HEPA filter, which should be cleaned regularly.
- Keluarkan tong sampah.
- Twist and pull out the filter assembly (HEPA filter, dust filter, stainless steel filter).
- Tap off loose dirt from each filter component.
- Bilas penapis di bawah air sejuk yang mengalir. Jangan gunakan air panas atau detergen.
- Biarkan semua komponen penapis kering sepenuhnya di udara selama sekurang-kurangnya 24 jam sebelum memasang semula. Jangan gunakan vakum dengan penapis basah.
- Pasang semula penapis dan letakkannya semula ke dalam tong sampah, kemudian pasangkan semula tong sampah pada unit utama.

Image: A cutaway diagram illustrating the multi-stage HEPA filtration system, including the dustbin filter, stainless steel filter, dust filter, HEPA air filter, and air outlet filter.
7.3 Membersihkan Gulungan Berus
Periksa gulungan berus secara berkala untuk mengesan rambut kusut atau serpihan.
- Matikan pembersih vakum.
- Press the release tab on the side of the floor brush head to remove the brush roll cover.
- Angkat gulung berus.
- Gunakan gunting atau alat pembersih untuk memotong dan membuang sebarang rambut atau gentian yang kusut.
- Masukkan semula gulungan berus dan pasangkan penutupnya.
7.4 Membersihkan Pad Mop
After each use of the mop function, remove and clean the mop pad.
- Detach the mop pad from the water tank.
- Rinse the mop pad under running water or machine wash it with mild detergent.
- Allow the mop pad to air dry completely before storing or reusing.
8. Penyelesaian masalah
If you encounter any issues with your Olvy A10, refer to the following common problems and solutions:
| Masalah | Kemungkinan Punca | Penyelesaian |
|---|---|---|
| Vakum tidak dihidupkan | Bateri tidak dicas atau tidak dipasang dengan betul. | Charge the battery fully. Ensure the battery is securely clicked into the main unit. |
| Kuasa sedutan rendah | Dustbin is full. Filters are clogged. Brush roll is tangled. Obstruction in the nozzle or tube. | Empty the dustbin. Clean all filters thoroughly and ensure they are dry. Remove any hair or debris from the brush roll. Check for and remove any blockages. |
| Gulung berus tidak berputar | Brush roll is tangled or jammed. | Turn off the vacuum. Remove the brush roll and clear any obstructions. |
| Fungsi mop tidak berfungsi | Water tank is empty or not properly installed. Mop pad is dry. | Fill the water tank. Ensure the water tank is securely attached to the floor brush. Dampen the mop pad slightly before use if needed. |
| Masa larian pendek | Battery not fully charged. Using high suction mode continuously. Battery degradation. | Ensure battery is fully charged. Use lower suction modes for longer run time. If battery life significantly decreases, consider replacing the battery. |
9. Spesifikasi
| Ciri | Spesifikasi |
|---|---|
| Jenama | Olvy |
| Nombor Model | A10 |
| warna | Hitam |
| Dimensi Produk | 32 x 19 x 32 cm |
| Berat badan | 5 kg |
| Kuasa Motor | 350W |
| Kuasa Sedutan | Sehingga 35,000 Pa |
| Bilangan Kelajuan | 5 (including Auto Mode) |
| Tahap Kebisingan | 55 Desibel |
| Masa Larian | Up to 1 hour (60 minutes) |
| Kapasiti Bateri | 2200 mAh |
| Masa Mengecas | 4-5 jam |
| Jenis Penapis | HEPA 13 (Washable) |
| Kapasiti tong sampah | 0.8L |
| Sumber Kuasa | Bateri |
| Permukaan Disyorkan | All floors (carpets, hard floors) |
| Ciri Khas | 2-in-1 Vacuum & Mop, LED Display, Auto Mode, Pet-friendly, Lightweight |
10. Waranti dan Sokongan
Olvy products are manufactured to high-quality standards. For warranty information, technical support, or service inquiries, please refer to the contact information provided with your purchase documentation or visit the official Olvy webtapak. Sila simpan bukti pembelian anda untuk tuntutan waranti.
Ask a question about this manual
Ask about setup, troubleshooting, compatibility, parts, safety, or missing instructions. Manuals+ will review the question and use this page’s manual context to help answer it.