
GMKtec G3 PLUS
Manual Pengguna GMKtec Nucbox G3 Plus Mini PC
Model: G3 PLUS | Jenama: GMKtec
1. Pengenalan
This user manual provides comprehensive instructions for the setup, operation, and maintenance of your GMKtec Nucbox G3 Plus Mini PC. Please read this manual carefully before using the device to ensure optimal performance and longevity.
2. Apa yang ada di dalam Kotak
Sahkan bahawa semua item terdapat dalam pakej:
- 1 x GMKtec Nucbox G3 Plus Mini PC
- 1 x Penyesuai Kuasa
- 1 x Manual Pengguna
- 1 x VESA Mount dengan Skru
- 1 x Kabel HDMI

Image: Retail Boxed Packaging showing the mini PC, power adapter, user manual, HDMI cable, and VESA mount with screws.
3. Produk Lebihview
3.1. External Features and Ports
The GMKtec Nucbox G3 Plus is designed with a compact form factor and a variety of ports for versatile connectivity.
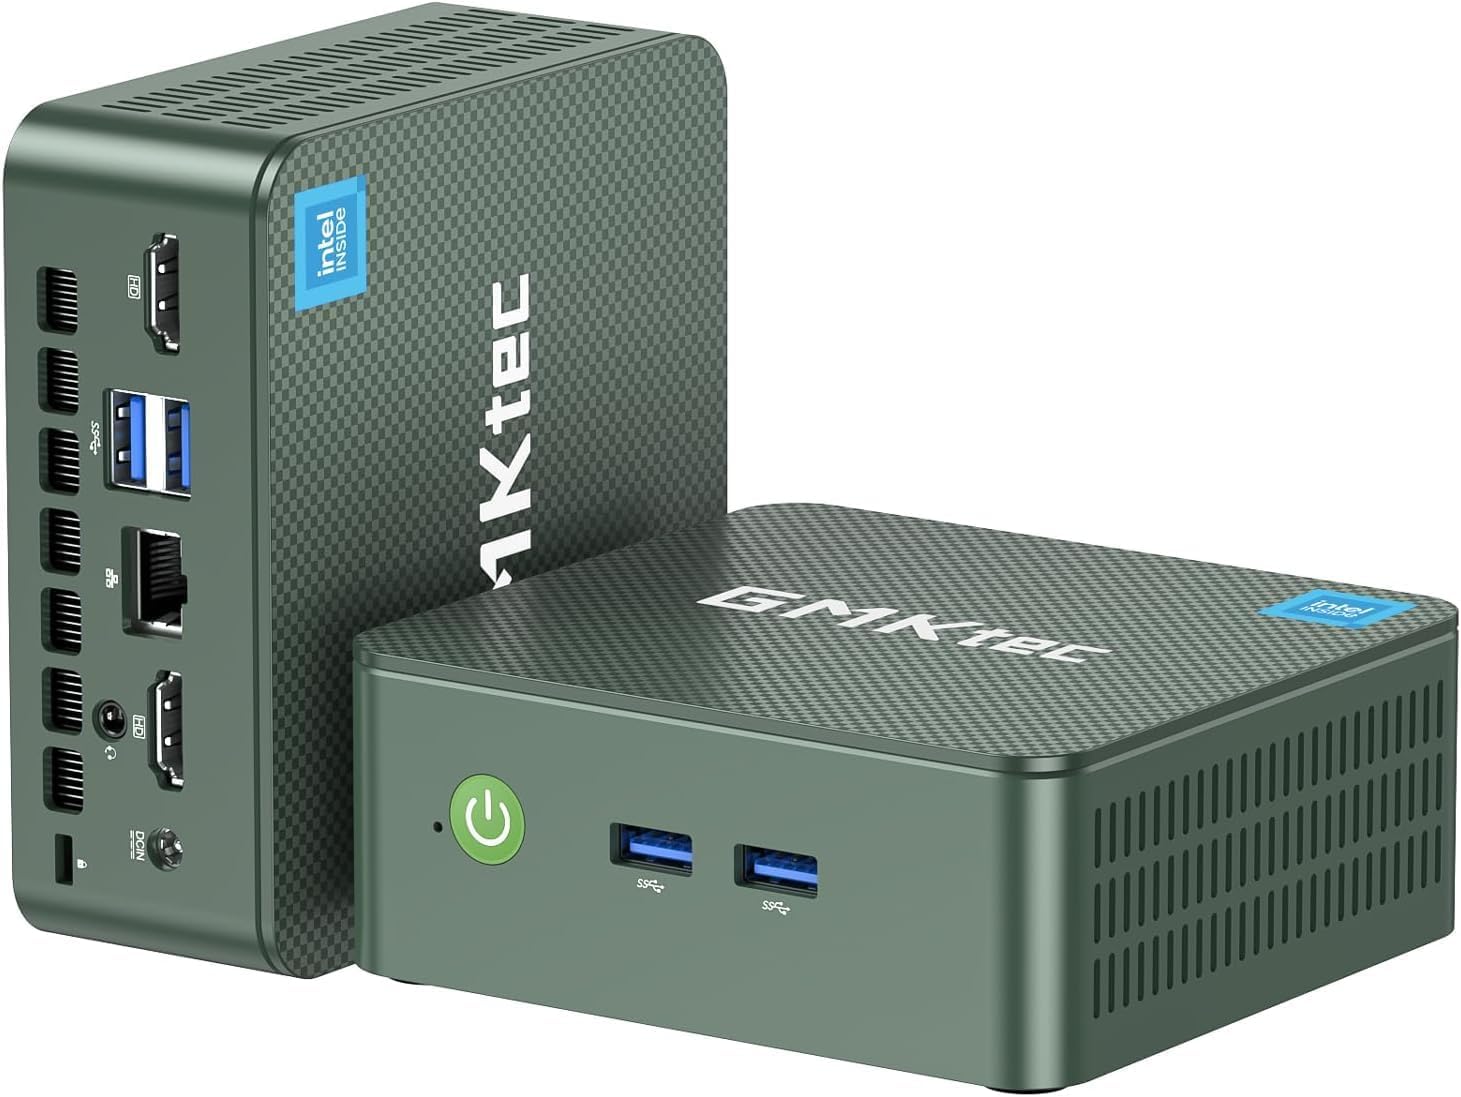
Imej: Depan dan belakang views of the GMKtec Nucbox G3 Plus Mini PC, highlighting its compact size and various ports.

Image: Detailed diagram showing the front and rear ports of the Nucbox G3 Plus, including Power Button, USB 3.2 ports, HDMI (4K@60Hz) ports, Giga LAN (RJ45 2.5G), 3.5mm Audio Jack, and Security Lock.
3.2. Komponen Dalaman
The internal design focuses on performance and efficient cooling.

Imej: Meletup view illustrating the internal components of the Nucbox G3 Plus, including DDR4 RAM, M.2 2280 NVMe SSD, M.2 2242 SATA slot (not included), cooling fan, and cooling vents.
Video: Animasi mengenaiview of the GMKtec Mini PC with Intel N150, showcasing its internal components, ports, and features like Wi-Fi 6, Bluetooth 5.2, and 2.5G LAN. The video highlights the Intel Twin Lake N150 Processor, Intel Graphics, DDR4 SO-DIMM, M.2 2280 NVMe SSD, M.2 2242 SATA, quiet cooling fan, and dual screen display capabilities.
4. Spesifikasi
Key technical specifications of the GMKtec Nucbox G3 Plus Mini PC:
| Ciri | Spesifikasi |
|---|---|
| Pemproses | Intel Twin Lake N150 (4 Core 4 Threads, up to 3.6GHz) |
| Grafik | Intel UHD Graphics (max 1000MHz) |
| RAM | 16GB DDR4 SO-DIMM (3200MHz) |
| Penyimpanan | 256GB PCIe 3.0 M.2 2280 NVMe SSD (Max 2TB), M.2 2242 SATA slot (Max 2TB) |
| Output Video | 2 x HDMI 2.0 (4K@60Hz) |
| Port USB | 4 x USB 3.2 (sehingga 5Gbps/S) |
| Rangkaian | Intel i226-V 2.5Gbps RJ45 Ethernet, WiFi 6 (802.11ax) |
| Bluetooth | Bluetooth 5.2 |
| Audio | 3.5mm Audio Jack |
| Sistem Operasi | Windows 11 Pro (prapasang) |
| Dimensi | 4.17 x 1.67 x 4.49 inci |
| Berat badan | 1.8 paun |
5. Panduan Persediaan
Follow these steps to set up your GMKtec Nucbox G3 Plus Mini PC:
Sambung ke Kuasa: Plug the power adapter into the DC 12V 3A port on the back of the mini PC, then connect it to a power outlet.
Sambung ke Paparan: Use the provided HDMI cable to connect one of the HDMI ports on the mini PC to your monitor or TV. The device supports dual 4K@60Hz displays.

Image: The mini PC connected to two monitors, demonstrating its dual 4K display capability.
Sambung Peranti: Connect your USB keyboard, mouse, and other peripherals to the available USB 3.2 ports.
Sambungan Rangkaian: For wired internet, connect an Ethernet cable to the 2.5Gbps RJ45 LAN port. For wireless internet, the device supports WiFi 6.

Image: The mini PC with an Ethernet cable connected to its 2.5G LAN port, illustrating high-speed wired connectivity.
Hidupkan kuasa: Press the power button located on the front of the mini PC. The power indicator light will illuminate.
But Permulaan: The system will boot into Windows 11 Pro. Follow the on-screen instructions for initial Windows setup, including language, region, and network settings.
VESA Mount Installation (Optional): If desired, use the included VESA mount and screws to attach the mini PC to the back of a compatible monitor.

Image: The mini PC shown mounted on the back of a monitor using the VESA mount, demonstrating space-saving installation.
6. Arahan Operasi
6.1. Pengurusan Kuasa
- Hidupkan kuasa: Tekan butang kuasa pada panel hadapan.
- Tutup: Klik butang Mula dalam Windows, kemudian pilih Kuasa > Matikan.
- Mulakan semula: Klik butang Mula dalam Windows, kemudian pilih Kuasa > Mulakan semula.
- Mod tidur: Klik butang Mula dalam Windows, kemudian pilih Kuasa > Tidur.
- Wake On LAN (WoL): This feature allows you to power on the mini PC remotely over a network. Ensure WoL is enabled in the BIOS settings and your network adapter supports it.
- But PXE: Supports network boot for system deployment.
- RTC Wake: Allows the PC to power on at a scheduled time. Configure this in the BIOS.
- Hidupkan Auto: The PC can automatically power on after a power outage. This setting is typically found in the BIOS.
6.2. Menyambung ke Rangkaian
- Sambungan Berwayar: Connect an Ethernet cable to the RJ45 port. The 2.5Gbps LAN provides high-speed internet.
- Sambungan Wayarles (WiFi 6):
- Klik ikon Wi-Fi dalam dulang sistem.
- Pilih rangkaian yang anda inginkan daripada senarai.
- Masukkan kunci keselamatan rangkaian jika digesa.

Image: Diagram illustrating the high-speed WiFi 6 and Bluetooth 5.2 connectivity of the mini PC, showing faster speeds, lower latency, and wider coverage compared to older standards.
- Bluetooth 5.2:
- Pergi ke Tetapan Windows > Peranti > Bluetooth & peranti lain.
- Pastikan Bluetooth dihidupkan.
- Click "Add Bluetooth or other device" and follow the instructions to pair your Bluetooth devices.
6.3. Peluasan Storan
The Nucbox G3 Plus supports storage expansion:
- M.2 2280 NVMe SSD: The device comes with a 256GB PCIe 3.0 M.2 2280 NVMe SSD. This can be upgraded to a maximum of 2TB.
- M.2 2242 SATA: An additional M.2 2242 SATA slot is available for further storage expansion, supporting up to 2TB.
Nota: Upgrading internal components should be performed by users with technical expertise. Refer to online guides or professional assistance if unsure.
7. Penyelenggaraan
Penyelenggaraan tetap membantu memastikan jangka hayat dan prestasi optimum PC mini anda:
- Pastikan ia bersih: Bersihkan bahagian luar PC mini dengan kerap dengan kain lembut dan kering. Elakkan menggunakan pembersih cecair terus pada peranti.
- Pengudaraan: Ensure the cooling vents are not obstructed to allow for proper airflow. The upgraded cooling fan and copper turbine pipes are designed for efficient heat dissipation.
- Kemas Kini Perisian: Pastikan sistem pengendalian dan pemacu anda dikemas kini kepada versi terkini untuk keselamatan dan peningkatan prestasi.
- Penyingkiran habuk: Periodically, and with caution, use compressed air to clear dust from the cooling vents. Do not open the casing unless you are familiar with computer hardware.
- Suhu: Operate the mini PC in a well-ventilated area, away from direct sunlight or heat sources, to prevent overheating.

Imej: Satu dalaman view of the mini PC highlighting the quiet cooling fan and the airflow paths for heat dissipation, emphasizing the improved thermal design.
8. Penyelesaian masalah
This section addresses common issues you might encounter with your GMKtec Nucbox G3 Plus Mini PC.
| Masalah | Kemungkinan Punca / Penyelesaian |
|---|---|
| No Power / Does not turn on |
|
| Tiada Paparan pada Monitor |
|
| No Internet Connection (Wired) |
|
| No Internet Connection (Wireless) |
|
| Prestasi Perlahan |
|
9. Waranti dan Sokongan
GMKtec offers comprehensive support for your Nucbox G3 Plus Mini PC:
- Waranti: GMKtec provides a 1-year limited warranty for each mini PC, effective from the date of purchase. This warranty covers defects due to design and workmanship.
- Sokongan Teknikal: For any technical issues or inquiries, you can contact the GMKtec after-sales team.
- Maklumat Hubungan:
- Sokongan Amazon: Log in to your Amazon account, navigate to "Your Orders," and select "Ask Product Question" for assistance.
- Sokongan E-mel: Hantar e-mel ke support@gmktec.com untuk sokongan pelanggan 24/7.
- Sokongan Teknikal Seumur Hidup: GMKtec is committed to providing lifetime technical support for its products.

Image: Graphic detailing GMKtec's warranty and support options, including Amazon support and direct email support.
Ask a question about this manual
Ask about setup, troubleshooting, compatibility, parts, safety, or missing instructions. Manuals+ will review the question and use this page’s manual context to help answer it.