pengenalan
This manual provides detailed instructions for the installation, operation, and maintenance of your JOYING Single Din Touchscreen Car Stereo, model JY-UTS08N8-R. Please read this manual thoroughly before using the product to ensure proper functionality and to prevent damage.

Figure 1: JOYING Single Din Touchscreen Car Stereo (JY-UTS08N8-R)
Persediaan
1. Membongkar dan Semakan Komponen
Carefully unpack the unit and verify that all components are present. The package should include:
- 10.1" radio unit
- Sangkar Din Tunggal
- Lengan Pemasangan
- Left & Right Brackets
- Plastic Trim Out
- Extraction Keys
- Manual Pemasangan
- Antena WiFi (x1)
- Antena GPS (x1)
- Antena 4G (x2)
- Mikrofon Luaran (x1)
- Kabel USB (x2)
- Kabel AR (x1)
- Kabel Reben Skrin (x1)
- ISO Cable (x1)
- Manual Pengguna (dokumen ini)

Rajah 2: Komponen Termasuk
2. Pemasangan Fizikal
Installation may require an installation frame kit, special ISO harness, amplifier adapter, or CANbus decoder depending on your vehicle's specific requirements. Refer to the included Manual Pemasangan for detailed steps. The unit features an upgraded installation structure allowing adjustment of left and right bracket positions for optimal fit in various car center consoles.

Figure 3: Installation Structure Adjustment
3. Pendawaian dan Sambungan
Connect the provided cables to the corresponding ports on the rear of the head unit and to your vehicle's wiring harness. Ensure all connections are secure. The unit features various input/output ports including USB, HDMI, Optical, Coaxial, and RCA for audio and video.
- ISO Cable: Connects to the vehicle's main power and speaker harness.
- Antena GPS: Connect for satellite navigation functionality.
- Antena WiFi: Connect for stable wireless internet access.
- Antena 4G: Connect for mobile data access via SIM card.
- Mikrofon Luaran: Connect for improved call quality and voice commands.
- Kabel USB: For connecting external devices or media.
- Output HDMI: For connecting external displays (e.g., headrest monitors).
- Optical Fiber and Coaxial Digital Output: For direct connection to external amplifiers with digital inputs for enhanced sound quality.

Figure 4: Rear Port Layout
4. 4G Module Setup
Insert a compatible SIM card into the designated slot for internet access. The unit supports FDD-LTE: B2/B4/B5/B7/B12/B13/B14/B17/B25/B26/B38/B66/B71 and TDD-LTE: B41. Note that the 4G module is for internet access only and does not support phone calls or SMS directly from the unit.
Arahan Operasi
1. Initial Boot and Fast Boot
The first boot-up may take approximately 30-40 seconds. Subsequent power-ons will utilize the fast boot feature, allowing the unit to start and enter the user interface within 2 seconds after the car key is turned.
2. Navigasi (GPS)
The unit includes precise GPS engines and an antenna for accurate positioning and real-time navigation. You can download offline maps for use in areas without internet connectivity. Mobile phone map data can also be synchronized to the head unit via Apple CarPlay or Android Auto.
3. Apple CarPlay & Android Auto
Connect your mobile phone via USB cable or Bluetooth to access Apple CarPlay or Android Auto. This allows you to use phone applications for navigation, make calls, and stream music directly on the car stereo's display.

Figure 5: Apple CarPlay and Android Auto Interface
4. Split-Screen Multitasking
The unit supports split-screen functionality, allowing you to run two applications simultaneously. For example, awak boleh view navigation on one side and media playback on the other. To activate, tap the recent apps icon, find the app you want to split, click its icon, and select the split-screen option. Then choose a second app from recent apps.

Figure 6: Split-Screen Multitasking
5. Ciri Audio
The unit features a TDA7851 DSP chip and a 48-band graphic equalizer for high-quality sound. It provides 4 audio outputs and 1 subwoofer output. Support for aftermarket amplifiers is available via Fiber Optical or SPDIF Coaxial outputs.

Figure 7: High-Quality Sound Features
6. Output HDMI
The HDMI output allows for a full digital image and sound signal to external displays. This supports projection screen displays for passengers or on-screen displays with 1080P clarity without stuttering. Note that the HDMI cable is not included.

Figure 8: HDMI Output Functionality
7. Kawalan Roda Stereng (SWC)
The unit supports steering wheel controls for easy switching of songs, radio channels, and volume adjustment. If your car has a CAN system, an extra CANbus cable may be required to retain this feature.

Rajah 9: Kawalan Stereng
8. Ciri-ciri Lain
The unit includes AM/FM radio, hands-free calling, Picture-in-Picture (PiP) mode, 3 USB ports, a Micro SD card slot, and a 4G SIM card slot.

Figure 10: Additional Features Overview
9. Personalized Settings
Customize your user experience with options for changing the car boot logo, setting custom wallpapers, adjusting button light colors, and controlling screen brightness.
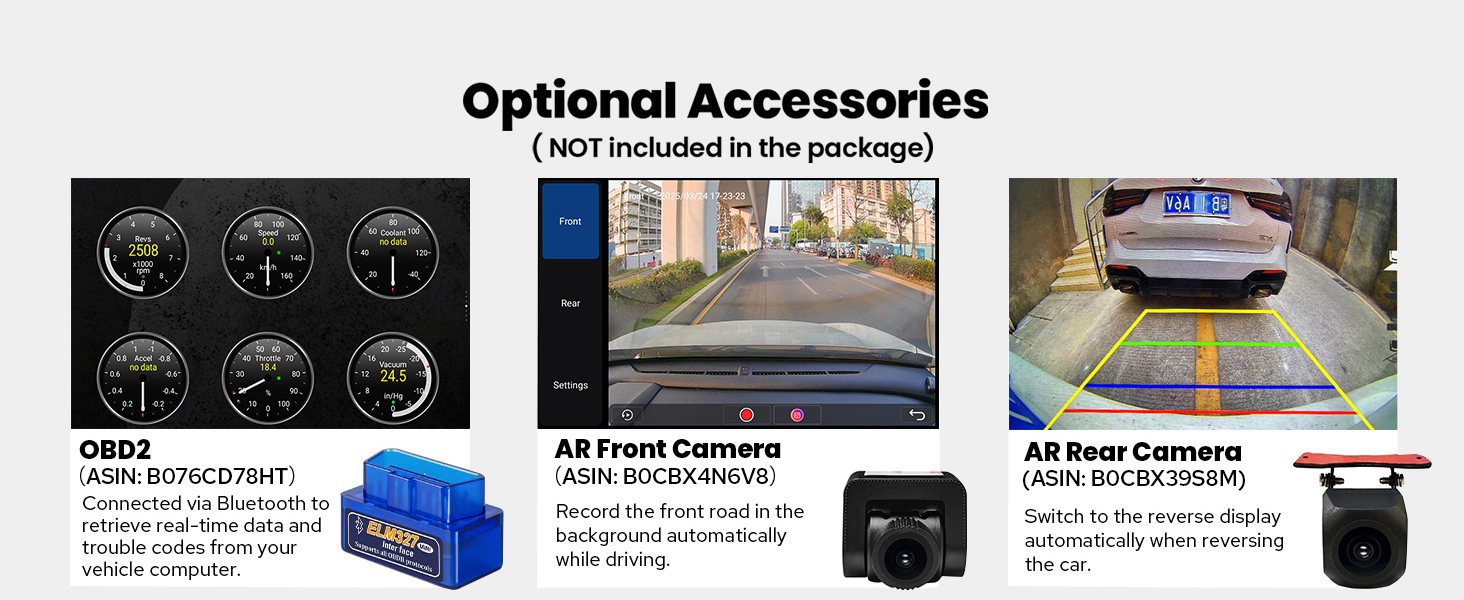
Figure 11: Personalized Settings
Penyelenggaraan
Untuk memastikan ketahanan dan prestasi optimum stereo kereta JOYING anda, ikuti garis panduan penyelenggaraan ini:
- Membersihkan Skrin: Gunakan kain lembut dan tidak berbulu sedikit dampdilengkapi dengan air atau pembersih skrin yang direka khusus untuk elektronik. Elakkan bahan kimia yang keras atau bahan yang melelas.
- Membersihkan Unit: Wipe the exterior of the unit with a dry, soft cloth. Ensure no liquids enter the unit.
- Kemas Kini Perisian: Periksa pengeluar secara berkala website for available software updates to improve performance and add new features. Follow the provided instructions carefully when performing updates.
- Kawalan Suhu: The unit features a dual heat sink design and a cooling fan. Ensure proper ventilation around the unit to prevent overheating. The system can be configured to automatically activate the fan if the CPU temperature or radio volume exceeds a set warning value.

Figure 12: Upgraded Cooling System

Figure 13: Independent WiFi Antenna
Menyelesaikan masalah
If you encounter issues with your JOYING car stereo, refer to the following common problems and solutions:
- Tiada Kuasa: Ensure all power cables are correctly connected and the vehicle's fuse is intact.
- Tiada Bunyi: Check speaker connections, amplifier connections (if applicable), and volume settings. Verify that the audio output mode is correctly configured.
- Kehilangan Isyarat GPS: Pastikan antena GPS dipasang dengan betul dan mempunyai jelas view dari langit. Elakkan meletakkannya di bawah objek logam.
- Bluetooth/Wi-Fi Connectivity Issues: Ensure Bluetooth/Wi-Fi is enabled on both the head unit and the connected device. Try restarting both devices.
- Skrin sentuh Tidak Responsif: Perform a soft reset of the unit (refer to the Installation Manual for specific instructions). If the issue persists, contact support.
- CarPlay/Android Auto Tidak Bersambung: Ensure your phone's operating system is up to date and try a different USB cable. Verify that the feature is enabled on the head unit.
For persistent issues, consult the detailed troubleshooting section in the Installation Manual or contact JOYING customer support.
Spesifikasi
| Ciri | Spesifikasi |
|---|---|
| Jenama | MERIAHKAN |
| Nama Model | UTS08N8 |
| Nombor Model | JY-UTS08N8-R |
| Saiz Skrin | 10.1 Inci |
| Sistem Operasi | Android |
| Kapasiti Penyimpanan Memori | 128 GB |
| Jenis Skrin Sentuh | Kapasitif |
| Jenis Paparan | LED |
| Teknologi Ketersambungan | Bluetooth, Ethernet, HDMI, USB, Wi-Fi |
| Protokol Ketersambungan | Bluetooth, WiFi |
| Ciri Khas | Android Auto, Apple CarPlay, DSP, RCA, RDS |
| Mod Keluaran Audio | Stereo |
| Sistem Navigasi Satelit yang Disokong | BeiDou, GLONASS, GPS |
| Jenis Peta | Amerika Utara |
| Peranti Serasi | Amplifier, Camera, Speaker |
| Kaedah Kawalan | Apl, Sentuh, Suara |
| Berat Barang | 1200 Gram |
Aksesori Pilihan
The following accessories are not included in the standard package but can be ordered separately to enhance your car stereo experience:
- OBD2 Scanner: Connects via Bluetooth to retrieve real-time data and trouble codes from your vehicle computer.
- AR Front Camera: Records the front road automatically while driving.
- AR Rear Camera: Switches to reverse display automatically when reversing the car.
- DAB+ Digital Radio Adapter
- DVR (Perakam Video Digital)
- TPMS (Sistem Pemantauan Tekanan Tayar)
Rajah 14: Aksesori Pilihan
Waranti dan Sokongan
Your JOYING Single Din Touchscreen Radio (JY-UTS08N8-R) comes with a Waranti 2 tahun dari tarikh pembelian. Waranti ini meliputi kecacatan pembuatan dan kerosakan dalam penggunaan biasa.
For warranty claims, technical assistance, or any questions regarding your product, please contact JOYING customer support through the retailer where the product was purchased or visit the official JOYING webtapak untuk maklumat hubungan sokongan.
Sila simpan bukti pembelian anda untuk pengesahan waranti.