
1. Pengenalan
This manual provides essential information for the safe and effective use of your Thsinde TRMS 6000 Auto Ranging Digital Multimeter. Please read it thoroughly before operation and retain it for future reference. This device is designed for measuring AC/DC voltage, AC/DC current, resistance, capacitance, frequency, diode, and continuity, and features Non-Contact Voltagpengesanan e (NCV).

Figure 1: Thsinde TRMS 6000 Digital Multimeter. This image displays the front view of the multimeter, highlighting its large LCD screen and rotary function switch.
2. Maklumat Keselamatan
AMARAN: Untuk mengelakkan kemungkinan renjatan elektrik, kebakaran atau kecederaan diri, sila baca semua maklumat keselamatan sebelum menggunakan produk ini.
- Always ensure the multimeter is in good working condition and that the test leads are not damaged.
- Jangan gunakan lebih daripada vol yang dinilaitage, seperti yang ditandakan pada meter, antara terminal atau antara mana-mana terminal dan tanah bumi.
- Berhati-hati apabila bekerja dengan voltagadalah melebihi 30V AC RMS, puncak 42V atau 60V DC. Ini voltagia menimbulkan bahaya kejutan.
- Sentiasa putuskan sambungan petunjuk ujian daripada litar sebelum menukar fungsi.
- Jangan gunakan meter jika penutup bateri tidak ditutup dengan betul.
- Gantikan bateri sebaik sahaja penunjuk bateri lemah muncul untuk memastikan bacaan yang tepat.
- Patuhi kod keselamatan tempatan dan kebangsaan.
3. Kandungan Pakej
Sahkan bahawa semua item yang disenaraikan di bawah disertakan dalam pakej anda:
- Thsinde TRMS 6000 Digital Multimeter
- Bateri 9V
- English User's Manual (this document)
- 2 x Test Leads (one red, one black)
- 2 x Alligator Clips (one red, one black)

Figure 2: Multimeter with included test leads and alligator clips. This image shows the multimeter connected to its red and black test leads, which are further connected to red and black alligator clips, illustrating the complete set of accessories.
4. Produk Lebihview
Familiarize yourself with the components of your digital multimeter:
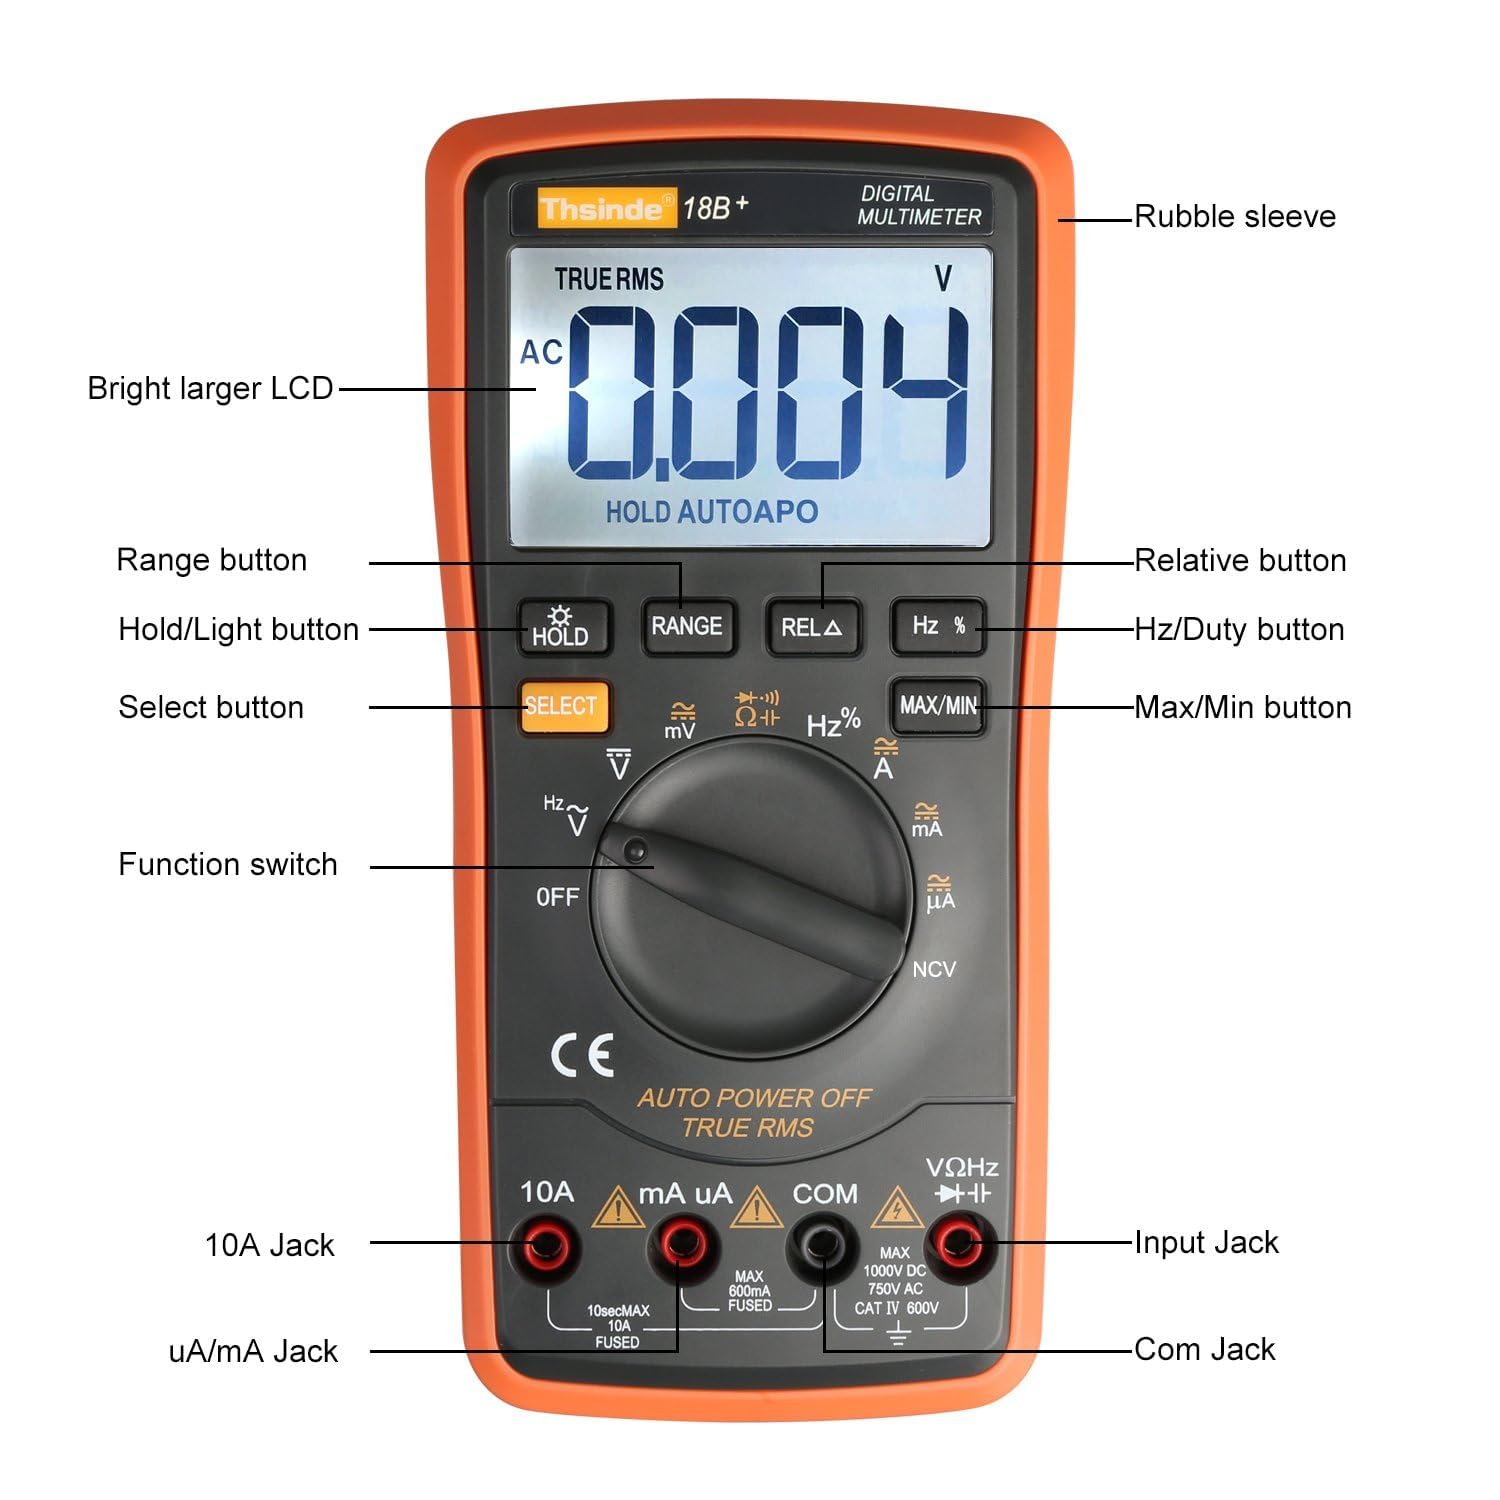
Figure 3: Labeled diagram of the Thsinde TRMS 6000 Multimeter. This image provides a detailed view of the multimeter with labels pointing to its key components, including the LCD, buttons, function switch, and input jacks.
- Rubble sleeve: Luar pelindung casing.
- Bright larger LCD: Digital display for readings.
- Butang julat: Memilih julat pengukuran secara manual (jika bukan dalam mod julat automatik).
- Hold/Light button: Freezes the current reading on the display; long press activates/deactivates backlight.
- butang pilih: Toggles between different functions within a single rotary switch position (e.g., AC/DC, Diode/Continuity).
- Suis fungsi: Suis putar untuk memilih fungsi pengukuran yang dikehendaki.
- Bicu 10A: Terminal input untuk pengukuran arus tinggi (sehingga 10A).
- uA/mA Jack: Input terminal for microampere dan miliampsebelum pengukuran semasa.
- COM Jack: Terminal input biasa (negatif) untuk semua ukuran.
- Input Jack (VΩHz): Terminal input positif untuk voltage, rintangan, kekerapan, kemuatan, diod, dan ukuran kesinambungan.
- Max/Min button: Displays maximum or minimum recorded values during a measurement session.
- Hz/Duty button: Toggles between frequency and duty cycle measurements.
- Relative button: Stores the current reading as a reference value and displays subsequent readings as a deviation from this reference.
5. Persediaan
5.1 Pemasangan Bateri
The multimeter requires one 9V battery for operation. To install or replace the battery:
- Pastikan multimeter dimatikan.
- Cari petak bateri di belakang multimeter.
- Gunakan pemutar skru untuk menanggalkan skru yang mengikat penutup bateri.
- Tanggalkan penutup bateri dengan berhati-hati.
- Connect the 9V battery to the battery clips, observing correct polarity (+ to + and - to -). The positive terminal is typically on the left when viewing dari belakang.
- Place the battery into the compartment, ensuring it fits snugly.
- Gantikan penutup bateri dan kencangkannya dengan skru.
5.2 Menghubungkan Petunjuk Ujian
Sentiasa sambungkan petunjuk ujian hitam ke COM jack. Connect the red test lead to the appropriate input jack based on the measurement type:
- Untuk Voltage, Resistance, Frequency, Capacitance, Diode, and Continuity measurements: Connect the red lead to the VΩHz jek.
- Untuk mikroampere (µA) or milliampere (mA) current measurements: Connect the red lead to the uA / mA jek.
- For high current (up to 10A) measurements: Connect the red lead to the 10A jek.
6. Arahan Operasi
6.1 Operasi Asas
- Turn the function switch to the desired measurement function.
- Sambungkan wayar ujian ke litar atau komponen yang diuji.
- Baca nilai ukuran pada LCD.
- To turn off the multimeter, rotate the function switch to the DIMATIKAN kedudukan.
6.2 Pengimbasan Automatik
The TRMS 6000 features auto-ranging, which automatically selects the appropriate measurement range for the input signal. This simplifies operation as you do not need to manually select a range. If manual ranging is desired for specific functions, press the JULAT butang.
6.3 Pegangan Data
Tekan ke TAHAN button to freeze the current reading on the display. Press it again to release the hold function and resume live readings.
6.4 Lampu Latar
Tekan lama HOLD/Light button to activate or deactivate the LCD backlight. This feature is useful for working in dimly lit environments.

Figure 4: Multimeter display with backlight activated in a dark setting. This image demonstrates the clear visibility of the LCD readings even in low-light conditions, thanks to the integrated backlight.
6.5 Kuasa Auto Mati (APO)
The multimeter will automatically power off after approximately 15 minutes of inactivity to conserve battery life. To disable or re-enable APO, refer to the detailed user manual for specific button combinations during power-on.
7. Fungsi Pengukuran
The Thsinde TRMS 6000 offers a variety of measurement functions:

Figure 5: Icons representing various multimeter functions. This image displays a visual guide to the different measurement capabilities of the multimeter, such as Diode test, Frequency, Backlight, True RMS, Electric resistance, Max/Min value, Data hold, LCD display, Range, Auto Power Off, and Select.
7.1 DC Jldtage Pengukuran (V DC)
- Putar suis fungsi ke V position. If necessary, press PILIH to choose DC voltage.
- Sambungkan plumbum ujian hitam ke COM dan ujian merah membawa kepada VΩHz.
- Connect the test leads in parallel to the circuit or component.
- Range and Accuracy: 600mV, 6V, 60V, 600V ±(0.5%+3); 1000V ±(0.8%+10).
7.2 AC Jldtage Pengukuran (V AC)
- Putar suis fungsi ke V position. If necessary, press PILIH to choose AC voltage.
- Sambungkan plumbum ujian hitam ke COM dan ujian merah membawa kepada VΩHz.
- Connect the test leads in parallel to the circuit or component.
- Range and Accuracy: 6V, 60V, 600V ±(0.8%+5); 750V ±(1.2%+10).
7.3 DC Current Measurement (A DC)
- Putar suis fungsi ke A or mA/µA position. If necessary, press PILIH to choose DC current.
- For µA/mA: Connect the black test lead to COM dan ujian merah membawa kepada uA / mA.
- For 10A: Connect the black test lead to COM dan ujian merah membawa kepada 10A.
- Sambungkan petunjuk ujian secara bersiri dengan litar.
- Range and Accuracy: 600µA, 6000µA ±(0.8%+3); 60mA, 600mA, 10A ±(2%+30).
7.4 AC Current Measurement (A AC)
- Putar suis fungsi ke A or mA/µA position. If necessary, press PILIH to choose AC current.
- For µA/mA: Connect the black test lead to COM dan ujian merah membawa kepada uA / mA.
- For 10A: Connect the black test lead to COM dan ujian merah membawa kepada 10A.
- Sambungkan petunjuk ujian secara bersiri dengan litar.
- Range and Accuracy: 600µA, 6000µA ±(0.8%+10); 60mA, 600mA, 10A ±(2%+30).
7.5 Pengukuran Rintangan (Ω)
- Putar suis fungsi ke Ω kedudukan.
- Sambungkan plumbum ujian hitam ke COM dan ujian merah membawa kepada VΩHz.
- Connect the test leads across the component. Ensure the circuit is de-energized.
- Range and Accuracy: 600Ω ±(0.8%+5); 6KΩ, 60KΩ, 600KΩ, 6MΩ ±(0.8%+3); 60MΩ ±(1%+25).
7.6 Pengukuran Kapasitans (F)
- Putar suis fungsi ke Kapasitansi position (often shared with Diode/Continuity, use PILIH).
- Sambungkan plumbum ujian hitam ke COM dan ujian merah membawa kepada VΩHz.
- Sambungkan wayar ujian merentasi kapasitor. Pastikan kapasitor dinyahcas sebelum ujian.
- Range and Accuracy: 60nF, 600nF, 6µF, 60µF ±(3.5%+20); 600µF, 6000µF ±(5.0%+10).
7.7 Pengukuran Kekerapan (Hz)
- Putar suis fungsi ke Hz position (often shared with voltage, use PILIH).
- Sambungkan plumbum ujian hitam ke COM dan ujian merah membawa kepada VΩHz.
- Sambungkan wayar ujian ke sumber isyarat.
- Range and Accuracy: 10Hz to 20MHz ±(0.1%+3).
7.8 Ujian Diod
- Putar suis fungsi ke Diod position (often shared with Continuity, use PILIH).
- Sambungkan plumbum ujian hitam ke COM dan ujian merah membawa kepada VΩHz.
- Sambungkan wayar merah ke anod dan wayar hitam ke katod diod. Voltan hadapantage drop will be displayed. Reverse the leads; the display should show OL (Open Loop).
7.9 Ujian Kesinambungan
- Putar suis fungsi ke Kesinambungan position (often shared with Diode, use PILIH).
- Sambungkan plumbum ujian hitam ke COM dan ujian merah membawa kepada VΩHz.
- Connect the test leads across the circuit or component. If resistance is below approximately 50Ω, the buzzer will sound, indicating continuity.
7.10 Bukan Kenalan Voltage (NCV) Pengesanan
- Putar suis fungsi ke NCV kedudukan.
- Move the top end of the multimeter near a conductor.
- Sekiranya AC voltage is detected (typically above 700V RMS), the instrument sensor will light up and an audible buzz will be emitted.

Figure 6: Multimeter demonstrating Non-Contact Voltage (NCV) detection. This image shows the multimeter held near a power strip, indicating its ability to detect AC voltage without direct contact, accompanied by an alarm sound icon.
8. Penyelenggaraan
8.1 Pembersihan
Lap kes dengan iklanamp cloth and a mild detergent. Do not use abrasives or solvents. Ensure the multimeter is completely dry before use.
8.2 Penggantian Bateri
When the low battery indicator appears on the display, replace the 9V battery as described in Section 5.1. Prompt battery replacement ensures continued accuracy and proper operation.
9. Penyelesaian masalah
- Tiada paparan atau paparan samar: Periksa pemasangan bateri dan gantikan bateri 9V jika perlu.
- Bacaan yang salah: Ensure test leads are correctly connected to the appropriate jacks for the selected function. Verify the function switch is set to the correct measurement type. Check battery level.
- "OL" dipaparkan: This indicates an overload (measurement exceeds the selected range) or an open circuit (no continuity). Adjust the range or check the circuit connection.
- Tiada bip kesinambungan: Ensure the function switch is set to continuity mode and the circuit resistance is below the threshold (approx. 50Ω).
10. Spesifikasi
| Ciri | Spesifikasi |
|---|---|
| Paparan | 6000 counts, Digital LCD with Backlight |
| DC Voltage Julat | 600mV, 6V, 60V, 600V, 1000V |
| Vol. ACtage Julat | 6V, 60V, 600V, 750V |
| Julat Semasa DC | 600µA, 6000µA, 60mA, 600mA, 10A |
| Julat Semasa AC | 600µA, 6000µA, 60mA, 600mA, 10A |
| Julat Rintangan | 600Ω, 6KΩ, 60KΩ, 600KΩ, 6MΩ, 60MΩ |
| Julat Kapasiti | 60nF, 600nF, 6µF, 60µF, 600µF, 6000µF |
| Julat Kekerapan | 10Hz hingga 20MHz |
| Ciri Khas | True RMS, Auto Ranging, Data Hold, Auto Power Off, NCV Test, Diode Test, Continuity Test |
| Sumber Kuasa | Bateri 1 x 9V |
| Dimensi (L x W x H) | 18.5 cm x 9 cm x 4.5 cm (7.28 in x 3.54 in x 1.77 in) |
| Berat Barang | 1.34 paun (lebih kurang 608g) |
| Perlindungan | Overload Protection, Short-circuit Protection |

Figure 7: Multimeter with its physical dimensions indicated. This image provides a visual representation of the device's size, showing its length, width, and thickness in both centimeters and inches.
11. Waranti dan Sokongan
The Thsinde TRMS 6000 Digital Multimeter comes with a Waranti 1 tahun from the date of purchase. If you encounter any issues or have questions regarding the product during this period, please contact Thsinde customer support for assistance. Please retain your proof of purchase for warranty claims.