
Jonsbo NV10
Jonsbo NV10 ITX Mini Desktop PC Case User Manual
Model: NV10 | Brand: Jonsbo
pengenalan
The Jonsbo NV10 is a compact Mini-ITX desktop PC case designed with premium materials and a modern aesthetic. It features a 3.3mm aluminum alloy shell with a sandblasted finish and North American walnut trim, offering a minimalist yet sophisticated appearance. Despite its ultra-compact 4.5L form factor, the NV10 supports Mini-ITX motherboards, 1U FLEX power supplies, and half-height GPUs up to 190mm. An included PCIe 4.0 extension cable facilitates powerful yet small builds. The case can be positioned vertically or horizontally for flexible placement in any workspace.

Figure 1: Jonsbo NV10 ITX Mini Desktop PC Case, showcasing its compact design and premium materials.
Ciri-ciri Utama
- Mini-ITX Support: Designed for compact ITX builds without compromising style or functionality.
- Bahan Premium: Features a 3.3mm aluminum alloy shell with North American walnut trim and a sandblasted finish.
- PCIe 4.0 Riser Included: Supports GPUs up to 190mm (half-height) with high-speed PCIe 4.0 extension.
- Padat dan Ringan: Small 4.5L capacity and only 1.5kg weight, ideal for minimalist or portable builds.
- Orientasi Berganda: Can be used upright or laid flat for flexible placement.
- Ketersambungan Moden: Front I/O includes a convenient USB Type-C port.
Spesifikasi
| Ciri | Perincian |
|---|---|
| Jenama | Jonsbo |
| Nama Model | NV10 |
| warna | Hitam |
| bahan | aluminium |
| Ciri Khas | PCIe 4.0 Support, Dual Orientation |
| Peranti Serasi | Mini ITX Motherboards, GPUs up to 190mm, 1U FLEX Power Supplies |
| Keserasian Papan Induk | ITX mini |
| Jenis Kes | Menara Mini |
| Penggunaan yang Disyorkan | Permainan |
| Jenis Pemasangan Bekalan Kuasa | Pelekap Bawah |
| Kaedah Penyejukan | Udara |
| Bilangan USB 3 Port | 1 (USB 3.2 Gen 2 Type-C) |

Figure 2: Dimensions of the Jonsbo NV10 case, showing its compact size of 205mm x 205mm x 108mm.
Panduan Persediaan
This section provides instructions for setting up your Jonsbo NV10 ITX Mini Desktop PC Case and installing essential components.
1. Pemasangan Komponen
The Jonsbo NV10 is designed for easy assembly. The upper cover is equipped with an easy-to-pull handle, making disassembly and maintenance convenient.

Figure 3: Tool-free access to the interior by lifting the top panel, simplifying component installation and maintenance.
1.1 Motherboard and CPU Installation
Install your Mini-ITX motherboard into the designated area. Ensure all standoffs are correctly aligned and secure the motherboard with screws. Install your CPU and CPU cooler (up to 38mm radiator height for air cooling) before proceeding.

Figure 4: Illustration of air cooling support (up to 38mm radiator) and the front USB 3.2 Gen 2 Type-C interface.
1.2 Pemasangan Kad Grafik
The NV10 supports half-height graphics cards up to 190mm in length. Utilize the included standard PCIe 4.0 extension cable to connect your graphics card to the motherboard.

Figure 5: Diagram showing the installation of a half-height graphics card using the included PCIe 4.0 extension cable.
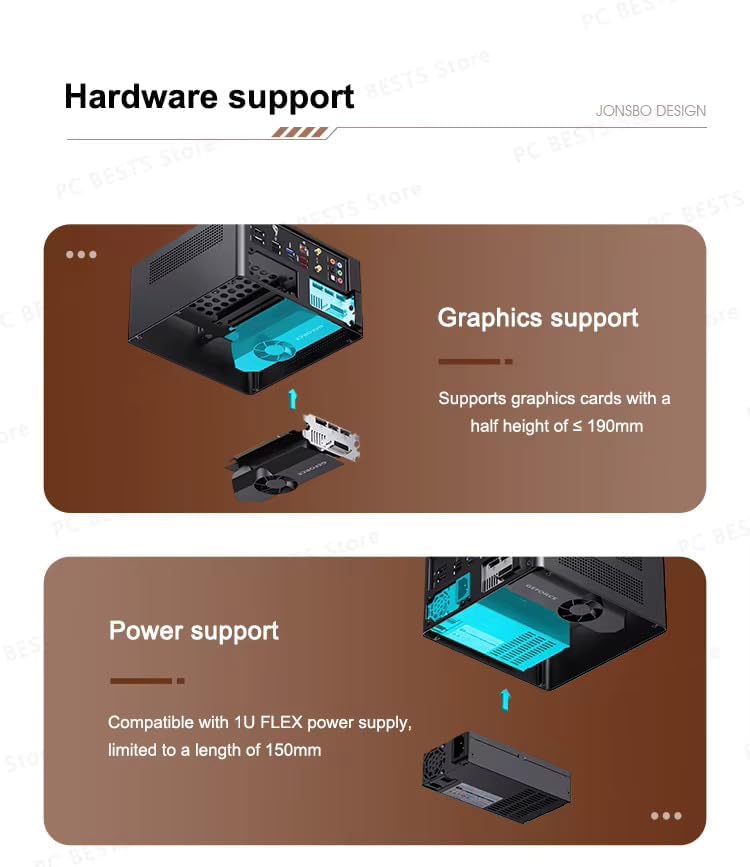
Gambar 6: Lebihview of hardware support, detailing graphics card compatibility (half-height, ≤190mm) and power supply compatibility (1U FLEX, ≤150mm).
1.3 Pemasangan Bekalan Kuasa
Install a 1U FLEX power supply, limited to a length of 150mm, into its designated mounting area. Ensure all power cables are routed neatly and connected to the respective components.
Arahan Operasi
Once all components are installed and connected, close the case cover. Connect your peripherals (monitor, keyboard, mouse) to your system. Power on your system using the power button located on the front panel. The front panel also features a USB Type-C port for convenient connectivity.

Figure 7: The Jonsbo NV10 case integrated into a typical desk setup, demonstrating its compact footprint.
Penyelenggaraan
Regular maintenance helps ensure optimal performance and longevity of your Jonsbo NV10 case and the components within.
1. Pembersihan
Periodically clean the exterior of the case with a soft, dry cloth. For interior cleaning, gently remove dust from components using compressed air. Ensure the system is powered off and unplugged before cleaning.
2. Airflow and Ventilation
The Jonsbo NV10 features a multi-component perforated design to enhance heat dissipation and improve airflow circulation. Ensure that the ventilation holes are not obstructed to maintain proper cooling.

Rajah 8: Pelbagai views of the Jonsbo NV10, highlighting the perforated panels designed for enhanced heat dissipation and airflow.
Menyelesaikan masalah
Bahagian ini menangani isu biasa yang mungkin anda hadapi dan menyediakan langkah penyelesaian masalah asas.
1. Sistem Tidak Menghidupkan
- Semak Sambungan Kuasa: Ensure the power supply is securely connected to the wall outlet and to all internal components (motherboard, GPU, drives).
- Verify Front Panel Connectors: Confirm that the power button and other front panel connectors are correctly attached to the motherboard.
- Ujian Bekalan Kuasa: If possible, test the power supply with another system or a PSU tester to ensure it is functional.
2. Tiada Output Paparan
- Check Monitor Connection: Ensure the display cable (HDMI, DisplayPort) is securely connected to both the graphics card (or motherboard if using integrated graphics) and the monitor.
- Reseat Graphics Card: Power off the system, unplug it, and carefully reseat the graphics card in its PCIe slot and ensure the PCIe riser cable is properly connected.
- Verify Monitor Input: Make sure your monitor is set to the correct input source.
3. Isu Terlalu Panas
- Semak Aliran Udara: Ensure all ventilation holes are clear of obstructions.
- Habuk Bersih: Remove any accumulated dust from inside the case and on component heatsinks.
- Sahkan Operasi Kipas: Ensure all installed fans (CPU cooler, case fans if any) are spinning correctly.
Waranti dan Sokongan
For warranty information and technical support, please refer to the documentation provided with your purchase or visit the official Jonsbo webtapak. Simpan bukti pembelian anda untuk tuntutan waranti.
This manual is intended to provide general guidance. Specific issues may require professional assistance.
Ask a question about this manual
Ask about setup, troubleshooting, compatibility, parts, safety, or missing instructions. Manuals+ will review the question and use this page’s manual context to help answer it.