1. Maklumat Keselamatan
Please read and understand all safety information before operating this multimeter. Failure to follow these instructions may result in electric shock, fire, or personal injury.
- Sentiasa pastikan multimeter berada dalam keadaan baik dan bebas daripada kerosakan sebelum digunakan.
- Jangan gunakan voltage or current that exceeds the maximum specified limits for the multimeter. This model supports up to 600V and 10A.
- Berhati-hati apabila bekerja dengan voltagadalah melebihi 30V AC RMS, puncak 42V atau 60V DC. Ini voltagia menimbulkan bahaya kejutan.
- Always connect the common (COM) test lead first, then the live test lead. Disconnect the live test lead first, then the common test lead.
- Ensure the test leads are properly seated in the correct input jacks for the measurement being performed.
- Do not use the multimeter if the test leads are damaged or if the meter casing is open.
- Replace fuses with specified types and ratings only. This device features double safety protection with 500mA/600V and 10A/600V fuses.
- Elakkan menggunakan multimeter dalam persekitaran basah atau semasa ribut elektrik.
- Simpan jari di belakang pelindung jari pada probe ujian semasa pengukuran.
Overvoltage Category III 600V Safety Standards:
This multimeter is designed to meet CAT III 600V safety standards, providing enhanced protection against transient overvoltages in fixed installations.

Image: Internal circuit board of the DEASOMIYE T21D multimeter, highlighting the dual fuses (500mA/600V and 10A/600V) that provide anti-burn and overload protection across all ranges.
2. Produk Lebihview
The DEASOMIYE T21D is an auto-ranging digital multimeter designed for accurate and reliable electrical measurements. It features a 6000-count True RMS display and a wide range of functions suitable for DIYers, homeowners, handymen, and electricians.

Image: The DEASOMIYE T21D Digital Multimeter, shown with its orange and black casing, large LCD display, function knob, input jacks, and included accessories such as test leads, AAA batteries, and spare safety tubes.
2.1 Ciri-ciri Utama
- Auto-Julat: Secara automatik memilih julat pengukuran yang betul.
- RMS Benar: Provides accurate readings for non-sinusoidal AC waveforms.
- Paparan 6000 Kiraan: High-resolution digital display for precise measurements.
- Vol. Bukan Kenalantage (NCV) Pengesanan: Mengesan vol AC dengan selamattage tanpa sentuhan langsung.
- Pelbagai fungsi: Mengukur Vol. AC/DCtage, AC/DC Current, Resistance, Continuity, Frequency, Capacitance, Diode, Temperature, and Duty Cycle.
- Perlindungan Keselamatan: Overvoltage Category III 600V, anti-burn with double ceramic fuses.
- Reka Bentuk Mesra Pengguna: Large LCD screen with backlight, data hold, support stand, test leads holder, and flashlight.
- Pembinaan Tahan Lama: Wrapped with a sturdy, non-slip silicone protective cover.

Image: A visual representation of the DEASOMIYE T21D's multi-function capabilities, including AC/DC voltage, AC/DC current, automatic shutdown, frequency, flashlight, diode, continuity buzzer, resistance, NCV detection, duty cycle, temperature measurement, and capacitance.
2.2 Komponen dan Paparan

Image: A detailed diagram labeling the key components of the DEASOMIYE T21D multimeter, including the NCV sensing area, LED display, FUNC/HZ function selection button, NCV indicator, Hold button, Function knob, COM input socket, VΩmA input socket, and 10A input socket.
- Paparan led: Menunjukkan bacaan ukuran, unit dan penunjuk fungsi.
- Tombol Fungsi: Used to select the desired measurement mode.
- FUNC/HZ Button: Toggles between functions within a mode (e.g., AC/DC, Frequency/Duty Cycle).
- Butang TAHAN: Membekukan bacaan semasa pada paparan.
- Butang Lampu Belakang: Activates the display backlight for improved visibility in low light.
- Butang lampu suluh: Turns on the built-in flashlight.
- NCV Sensing Area: Detects non-contact voltage.
- Bicu Input:
- COM: Input biasa untuk semua ukuran (plumbum ujian hitam).
- VΩmA: Input untuk voltage, resistance, capacitance, frequency, diode, continuity, and milliampere current (red test lead).
- 10A: Input for high current measurements up to 10A (red test lead).
2.3 Senarai Pembungkusan

Image: The complete packing list for the DEASOMIYE T21D Digital Multimeter, including the multimeter unit, test leads, 3 AAA batteries, thermocouple, safety tubes, and user manual.
Pakej termasuk:
- 1x DEASOMIYE T21D Electrical Multimeter
- 1x Probe Test Leads (Red and Black)
- 1x Thermocouple (for temperature measurement)
- 2x Safety Tubes (spare fuses)
- 3x Bateri AAA
- 1x Manual Pengguna
3. Persediaan
3.1 Pemasangan Bateri
- Pastikan multimeter dimatikan.
- Cari petak bateri di belakang multimeter.
- Gunakan pemutar skru untuk membuka penutup petak bateri.
- Insert three (3) AAA batteries, observing the correct polarity (+/-) as indicated inside the compartment.
- Gantikan penutup petak bateri dan kencangkannya dengan skru.

Image: The back of the DEASOMIYE T21D multimeter, illustrating the durable case, integrated support stand, test leads holder, and the battery compartment for AAA batteries.
3.2 Menghubungkan Petunjuk Ujian
- Masukkan petunjuk ujian hitam ke dalam COM bicu input (biasa).
- Untuk kebanyakan ukuran (voltage, resistance, capacitance, frequency, diode, continuity, and milliampere current), insert the red test lead into the VΩmA bicu input.
- Untuk pengukuran arus tinggi (sehingga 10A), masukkan wayar ujian merah ke dalam 10A bicu input.
Penting:
- Always ensure test leads are securely connected before taking measurements.
- Never connect test leads to the wrong input jacks, especially when measuring current, as this can damage the multimeter or blow a fuse.
4. Arahan Operasi
The DEASOMIYE T21D features an auto-ranging function, simplifying operation by automatically selecting the appropriate measurement range for most functions.

Image: The DEASOMIYE T21D multimeter with a close-up of its automatic range turntable design, indicating that it's easy to use for AC/DC readings without manual range switching.
4.1 Langkah Pengukuran Asas
- Turn the function knob to the desired measurement mode.
- Connect the test leads to the appropriate input jacks (COM and VΩmA or 10A).
- Sambungkan probe ujian ke litar atau komponen yang sedang diuji.
- Baca nilai pengukuran pada paparan LCD.
- Disconnect the test probes from the circuit, then remove the test leads from the multimeter.
- Turn the function knob to the OFF position when finished.
4.2 Fungsi Pengukuran Khusus
4.2.1 AC/DC Jldtage Pengukuran
- Putar tombol fungsi ke V~ (Jilid ACtage) atau V- (DC Voltage) position. The multimeter will auto-range.
- Connect the black test lead to the COM jack and the red test lead to the VΩmA jack.
- Connect the test probes in parallel across the circuit or component to measure voltage.

Image: The DEASOMIYE T21D multimeter demonstrating AC voltage measurement on a power strip (displaying 223.5V AC) and DC voltage measurement on a 9V battery (displaying 9.253V DC).
4.2.2 Pengukuran Arus AC/DC
- Putar tombol fungsi ke mA~ (Arus AC) atau mA- (DC Current) position. For higher currents, use the 10A position.
- Connect the black test lead to the COM jack. Connect the red test lead to the VΩmA jack for mA measurements or the 10A jack for A measurements.
- Penting: Connect the multimeter in series with the circuit to measure current. Never connect it in parallel across a voltagsumber e apabila dalam mod semasa.
4.2.3 Pengukuran Rintangan (Ω)
- Putar tombol fungsi ke Ω kedudukan.
- Connect the black test lead to COM and the red test lead to VΩmA.
- Ensure the circuit is de-energized before measuring resistance. Connect the probes across the component.
4.2.4 Ujian Kesinambungan ())))
- Putar tombol fungsi ke Ω position and press the FUNC/HZ button until the continuity symbol ()))) muncul.
- Connect the black test lead to COM and the red test lead to VΩmA.
- Connect the probes across the circuit or component. A continuous beep indicates a low-resistance path (continuity).
4.2.5 Ujian Diod (→|)
- Putar tombol fungsi ke Ω position and press the FUNC/HZ button until the diode symbol (→|) muncul.
- Connect the black test lead to COM and the red test lead to VΩmA.
- Sambungkan prob merentasi diod. Paparan akan menunjukkan volum hadapantage drop. Balikkan kuar; bacaan litar terbuka menunjukkan diod yang baik.
4.2.6 Pengukuran Kapasitans (C)
- Putar tombol fungsi ke C kedudukan.
- Connect the black test lead to COM and the red test lead to VΩmA.
- Ensure the capacitor is fully discharged before testing. Connect the probes across the capacitor.
4.2.7 Frequency (Hz) and Duty Cycle (%)
- Putar tombol fungsi ke Hz% kedudukan.
- Connect the black test lead to COM and the red test lead to VΩmA.
- Connect the probes to the signal source. Press FUNC/HZ to toggle between Frequency (Hz) and Duty Cycle (%).
4.2.8 Pengukuran Suhu (°C/°F)
- Putar tombol fungsi ke ° C / ° F kedudukan.
- Insert the thermocouple into the VΩmA and COM jacks, observing polarity.
- Place the thermocouple tip on or near the object whose temperature is to be measured. Press FUNC/HZ to switch between Celsius and Fahrenheit.

Image: The DEASOMIYE T21D multimeter displaying a temperature reading (26.08°C) while a thermocouple, connected to the meter, is immersed in a glass of water.
4.2.9 Bukan Kenalan Voltage (NCV) Pengesanan
- Putar tombol fungsi ke NCV kedudukan.
- Move the NCV sensing area (top of the multimeter) close to a live AC voltage source (e.g., an outlet or insulated wire).
- The multimeter will emit an audible beep and the NCV indicator will light up, with increasinkekerapan g apabila ia semakin hampir kepada voltage sumber.
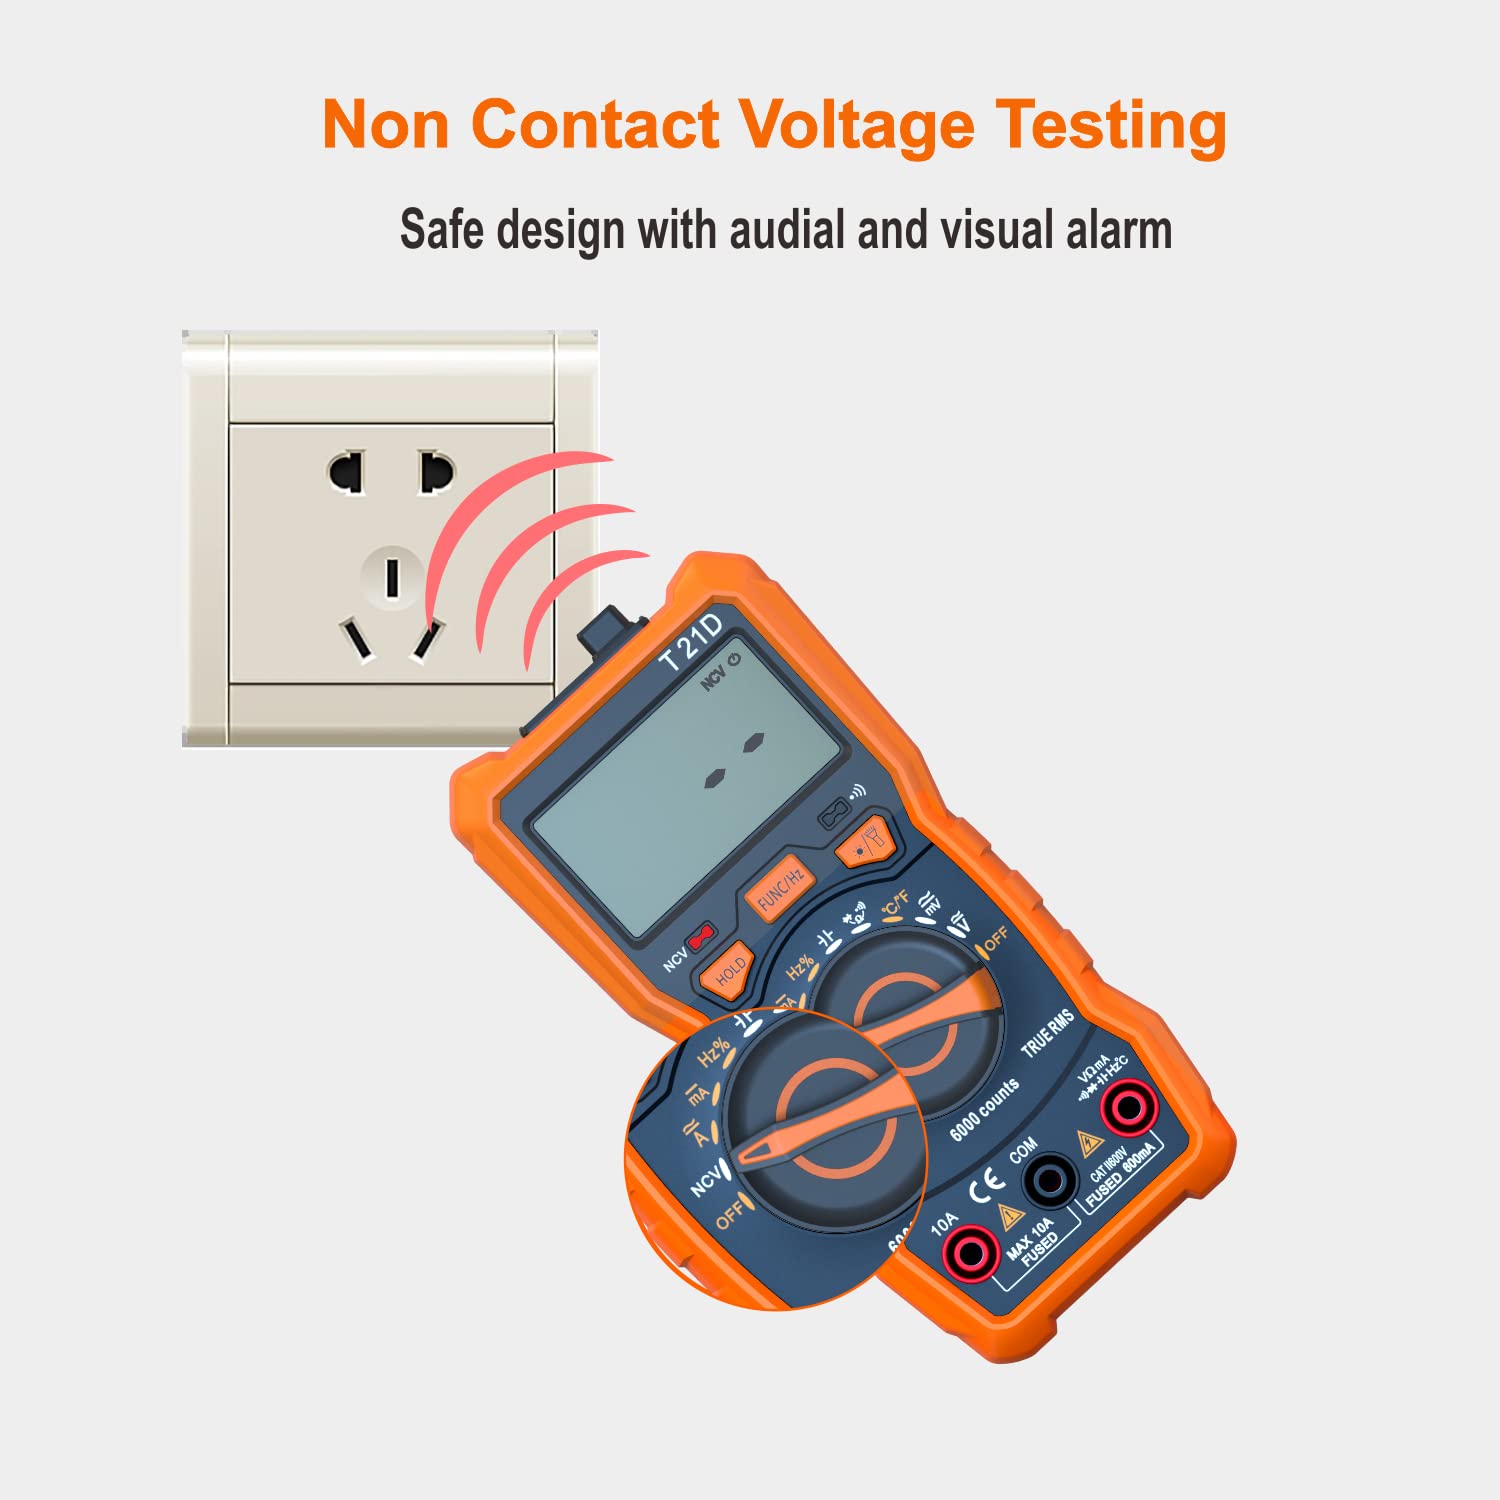
Image: The DEASOMIYE T21D multimeter detecting non-contact voltage near an electrical outlet, indicated by red arcs representing the detection field and the NCV symbol on the display.
4.3 Fungsi Khas
4.3.1 Pegangan Data
Tekan ke TAHAN butang untuk membekukan bacaan semasa pada paparan. Tekan sekali lagi untuk melepaskan fungsi tahan.
4.3.2 Lampu Latar
Press the backlight button (often combined with the flashlight button) to turn on the display backlight. This improves visibility in dimly lit areas. Press again to turn off.

Image: The DEASOMIYE T21D multimeter with its LCD display illuminated by a backlight, showing a clear reading in a low-light setting.
4.3.3 Lampu suluh
Press the flashlight button (often combined with the backlight button) to activate the built-in flashlight. This helps illuminate the work area. Press again to turn off.

Image: The DEASOMIYE T21D multimeter with its integrated flashlight turned on, illuminating a dark electrical panel, demonstrating its utility in low-light conditions.
5. Penyelenggaraan
Proper maintenance ensures the longevity and accuracy of your DEASOMIYE T21D multimeter.
5.1 Pembersihan
- Lap meter casing dengan iklanamp kain dan bahan pencuci ringan. Jangan gunakan pelelas atau pelarut.
- Keep the display clean and free from dust.
5.2 Penggantian Bateri
When the battery indicator appears on the display, replace the batteries promptly to ensure accurate readings. Refer to Section 3.1 for battery installation instructions.
5.3 Penggantian Fius
If the multimeter fails to measure current or shows an 'OL' (Overload) reading when measuring current, the fuse may be blown. This multimeter uses two fuses:
- F1: 500mA/600V fast-acting fuse for the VΩmA input.
- F2: 10A/600V fast-acting fuse for the 10A input.
Untuk menggantikan fius:
- Pastikan multimeter dimatikan dan semua kabel ujian diputuskan sambungannya.
- Open the battery compartment cover on the back of the multimeter.
- Tanggalkan fius lama dengan berhati-hati.
- Replace with new fuses of the exact specified type and rating. Using incorrect fuses can compromise safety and damage the meter.
- Tutup penutup petak bateri dengan selamat.

Image: The DEASOMIYE T21D multimeter with test leads connected to an electrical panel, illustrating its intelligent double protection feature with built-in 500mA/600V and 10A/600V explosion-proof fuse tubes for enhanced safety and reliability.
6. Penyelesaian masalah
If you encounter issues with your DEASOMIYE T21D multimeter, refer to the following common troubleshooting tips:
- Tiada Paparan/Paparan Samar: Check battery installation and replace batteries if low.
- Bacaan 'OL' (Beban Terlalu Tinggi): The measured value exceeds the selected range (if not in auto-ranging) or the maximum input limit. Ensure the correct function and input jacks are selected. For current measurements, a blown fuse may be indicated.
- Bacaan yang salah:
- Pastikan petunjuk ujian dimasukkan sepenuhnya dan tidak rosak.
- Verify the correct function mode is selected for the measurement.
- Check for proper connection to the circuit (series for current, parallel for voltagdan).
- For resistance/continuity, ensure the circuit is de-energized.
- Tiada Bip Kesinambungan: Check if the continuity function is active (continuity symbol on display). Ensure good contact with the circuit.
- NCV Tidak Mengesan: Ensure the NCV function is selected and the sensing area is close enough to a live AC voltage sumber.
Jika masalah berterusan, hubungi sokongan pelanggan untuk mendapatkan bantuan.
7. Spesifikasi
| Parameter | Nilai |
|---|---|
| Nombor Model | T21D |
| Paparan | 6000 Counts, True RMS |
| AC / DC Voltage | Sehingga 600V |
| AC / DC Semasa | Sehingga 10A |
| Rintangan | ya |
| Kapasitansi | ya |
| Kekerapan | ya |
| Suhu | Yes (-20°C to 1000°C / -4°F to 1832°F) |
| Ujian Diod | ya |
| Ujian Kesinambungan | ya |
| NCV (Voltage) | ya |
| Kitaran Tugas | ya |
| Sumber Kuasa | 3x Bateri AAA (termasuk) |
| Penilaian Keselamatan | CAT III 600V |
| Dimensi Produk | 2.68 x 5.51 x 1.69 inci |
| Berat Barang | 10.58 auns (300 Gram) |
| warna | Jingga dan Hitam |

Image: A visual comparison showing the DEASOMIYE T21D's 6000-count display offering a more accurate and higher resolution reading compared to a standard 2000-count display.
8. Waranti dan Sokongan
DEASOMIYE provides a 30-day manufacturer's guarantee for this product. Additionally, lifetime customer support is available to assist with any questions or issues you may encounter.
For support, please contact DEASOMIYE customer service. You can typically find contact information on the product packaging or the official DEASOMIYE webtapak.