
1. Pengenalan
Thank you for choosing the DEDRA MC0932 Mini Laser Distance Meter. This compact and precise device is designed for quick and accurate distance measurements in various indoor applications. Please read this manual carefully before using the device to ensure safe and proper operation.
1.1 Maklumat Keselamatan
WARNING: Laser Radiation
- This device emits Class II laser radiation. Do not stare directly into the laser beam or direct it towards other people's eyes.
- Jangan buka atau ubah suai peranti. Pengubahsuaian tanpa kebenaran boleh mengakibatkan pendedahan sinaran laser yang berbahaya.
- Jauhkan peranti daripada capaian kanak-kanak.
- Gunakan hanya bateri yang ditentukan. Jangan campurkan bateri lama dan baharu atau jenis bateri yang berbeza.
- Tanggalkan bateri jika peranti tidak akan digunakan untuk tempoh yang lama untuk mengelakkan kebocoran.
2. Kandungan Pakej
Carefully unpack the box and ensure all items listed below are present and in good condition:
- DEDRA MC0932 Mini Laser Distance Meter
- Kantung Pelindung
- Tali Pergelangan Tangan
- Bateri AAA (2x)

Image: The DEDRA MC0932 Mini Laser Distance Meter, its protective pouch, wrist strap, and two AAA batteries.
3. Produk Lebihview
3.1 Susun atur Peranti
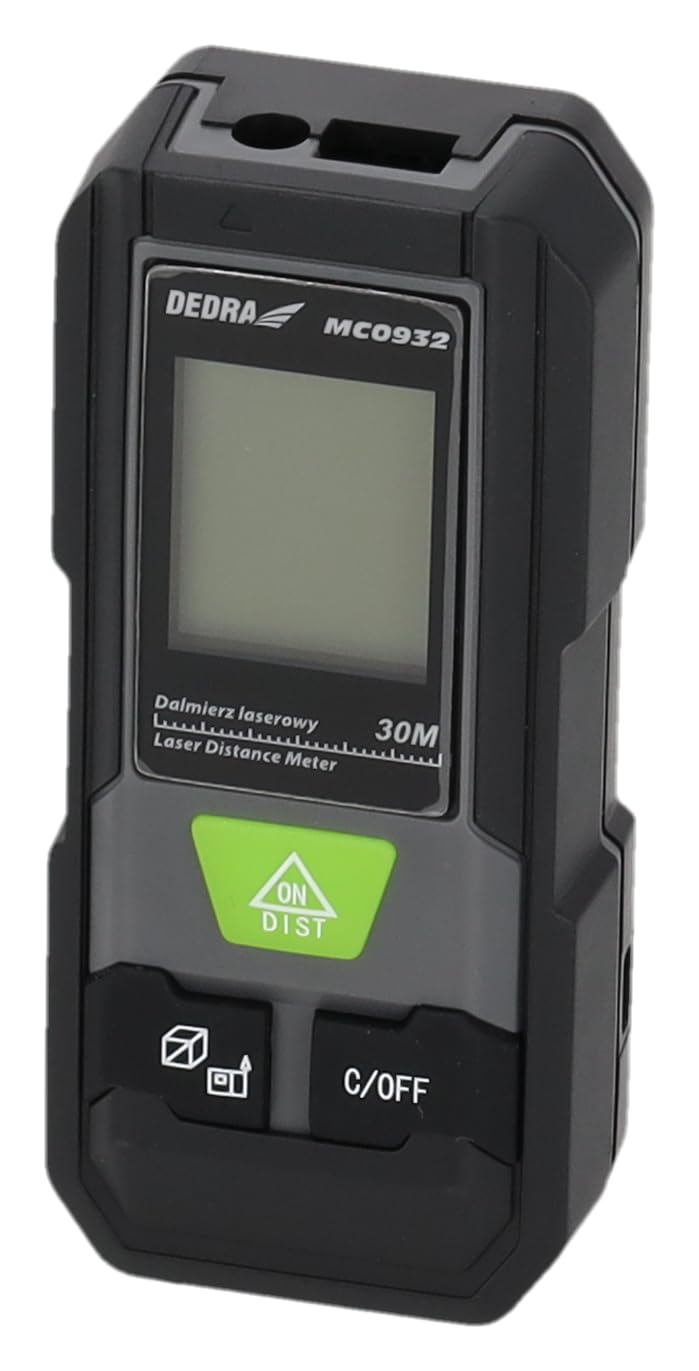
Imej: Depan view of the DEDRA MC0932 showing the display and control buttons.
- Kanta Pelepasan Laser
- Kanta Penerimaan Laser
- Skrin Paparan
- ON / DIST Button (Power On / Single Measurement / Continuous Measurement)
- C / OFF Button (Clear / Power Off)
- Function / Unit Button (Mode Selection / Unit Switching)
- Reference Point Button (Front/Rear Edge Measurement)

Imej: Belakang view of the DEDRA MC0932, highlighting the battery compartment.
- Petak Bateri
4. Persediaan
4.1 Pemasangan Bateri
- Cari penutup petak bateri di bahagian belakang peranti.
- Luncurkan penutup ke bawah untuk membuka petak.
- Masukkan dua (2) bateri AAA, pastikan kekutuban (+/-) betul seperti yang ditunjukkan di dalam petak.
- Tutup penutup petak bateri dengan menggelongsorkannya semula ke tempatnya sehingga ia berbunyi dengan selamat.
5. Arahan Operasi
5.1 Hidupkan/Mati Kuasa
- Untuk Menghidupkan: Tekan ke DI/DIST button once. The laser will activate, and the display will light up.
- Untuk Mematikan: Tekan dan tahan butang T/MATI button for approximately 2 seconds. The device will also automatically power off after 180 seconds of inactivity.
5.2 Pengukuran Jarak Tunggal
- Hidupkan peranti dengan menekan DI/DIST. The laser will activate.
- Halakan pancaran laser ke titik sasaran.
- Tekan ke DI/DIST button again. The measurement will be taken and displayed on the screen.
5.3 Pengukuran Berterusan (Penjejakan)
- Hidupkan peranti.
- Tekan dan tahan butang DI/DIST button for approximately 2 seconds. The device will enter continuous measurement mode, displaying real-time distance as you move the device.
- To stop continuous measurement, press the T/MATI button once. The last measured value will remain on the display.
5.4 Pengukuran Kawasan
- Hidupkan peranti.
- Tekan ke Function / Unit button repeatedly until the area icon (a square with 'm²' or 'ft²') appears on the display.
- Ukur sisi pertama (cth, panjang) dengan menekan DI/DIST.
- Ukur sisi kedua (cth, lebar) dengan menekan DI/DIST sekali lagi.
- Peranti akan mengira dan memaparkan kawasan secara automatik.
5.5 Pengukuran Isipadu
- Hidupkan peranti.
- Tekan ke Function / Unit button repeatedly until the volume icon (a cube with 'm³' or 'ft³') appears on the display.
- Ukur sisi pertama (cth, panjang) dengan menekan DI/DIST.
- Ukur sisi kedua (cth, lebar) dengan menekan DI/DIST sekali lagi.
- Measure the third side (e.g., height) by pressing DI/DIST kali ketiga.
- Peranti akan mengira dan memaparkan volum secara automatik.
5.6 Penukaran Unit
To change the measurement unit (meters, feet, inches), press and hold the Function / Unit button for approximately 2 seconds. The unit will cycle through m, ft, and in.
5.7 Penetapan Titik Rujukan
The device can measure from its front edge or its rear edge. To switch the reference point, press the Titik Rujukan button. An icon on the display will indicate whether the measurement is taken from the front or rear of the device.
6. Penyelenggaraan
6.1 Pembersihan
- Gunakan yang lembut, damp cloth to clean the device casing. Jangan gunakan pembersih atau pelarut yang melelas.
- Gently wipe the laser lenses with a clean, lint-free cloth. Avoid touching the lenses with your fingers.
6.2 Penyimpanan
- Store the device in its protective pouch in a cool, dry place, away from direct sunlight and extreme temperatures.
- Remove the batteries if the device will not be used for an extended period (e.g., more than one month) to prevent battery leakage and damage.
6.3 Penggantian Bateri
When the low battery indicator appears on the display, replace both AAA batteries with new ones following the instructions in Section 4.1.
7. Penyelesaian masalah
| Masalah | Kemungkinan Punca | Penyelesaian |
|---|---|---|
| Peranti tidak dihidupkan | Bateri mati atau tidak dimasukkan dengan betul. | Gantikan bateri atau semak polariti. |
| Mesej "Ralat" dipaparkan | Laser path is obstructed, target surface is too reflective/absorbent, or measurement range exceeded. | Ensure clear laser path, use a target plate if necessary, ensure target is within 0.03m-30m range. |
| Pengukuran yang tidak tepat | Lenses are dirty, device is unstable, or environmental interference. | Clean lenses, ensure device is stable during measurement, avoid strong light sources. |
| Paparan malap atau berkelip | Kuasa bateri rendah. | Gantikan bateri. |
8. Spesifikasi
| Julat Pengukuran | 0.03m - 30m |
| Ketepatan Pengukuran | ±2mm |
| Unit Pengukuran | m / ft / in |
| Kelas Laser | Kelas II |
| Jenis Laser | 635nm, <1mW |
| Laser Automatik Mati | 30 saat |
| Automatic Device Off | 180 saat |
| Jenis Bateri | 2 x AAA (Alkaline recommended) |
| Suhu Operasi | 0°C hingga 40°C (32°F hingga 104°F) |
| Suhu Penyimpanan | -20°C hingga 60°C (-4°F hingga 140°F) |
| Dimensi (Anggaran) | 100 x 35 x 20 mm (3.9 x 1.4 x 0.8 inci) |
| Berat (dengan bateri) | 200g (7.05 oz) |
| Penarafan IP | IP54 (Dilindungi daripada habuk dan percikan) |
9. Waranti dan Sokongan
DEDRA products are manufactured to high-quality standards. For warranty information, please refer to the warranty card included with your purchase or contact your local DEDRA dealer or the seller directly. For technical support or service inquiries, please reach out to the point of purchase or the official DEDRA customer service channels.