
pengenalan
This manual provides essential instructions for the safe operation, assembly, maintenance, and troubleshooting of your CUSHYBITE DP103L 10-inch 5-Speed Drill Press. Please read this manual thoroughly before operating the tool to ensure proper use and to prevent injury. Keep this manual for future reference.
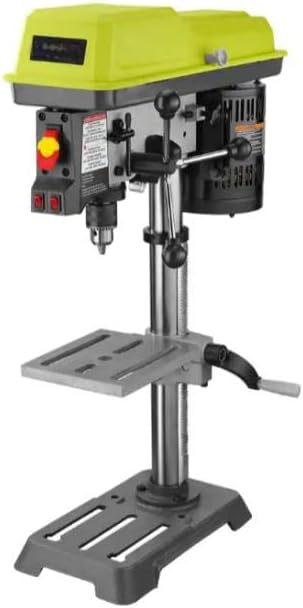
Rajah 1: CUSHYBITE DP103L 10-inch 5-Speed Drill Press. This image shows the complete drill press unit, highlighting its compact benchtop design and key components such as the motor housing, drill head, worktable, and base.
Arahan Keselamatan Penting
Sentiasa ikuti langkah berjaga-jaga keselamatan asas untuk mengurangkan risiko kebakaran, kejutan elektrik dan kecederaan diri.
- Pakai pelindung mata yang sesuai.
- Pastikan bahan kerja berada dalam keadaan selamatamped.
- Keep hands clear of the drilling area.
- Disconnect power before making adjustments or changing accessories.
- Kekalkan kawasan kerja yang bersih dan terang.
- Jangan beroperasi dalam damp atau keadaan basah.
- Use the correct speed for the material and drill bit.
Komponen Produk
Familiarize yourself with the main parts of your drill press.
- Perumahan Motor
- Kepala Gerudi
- Chuck
- Worktable (swivels 360°, tilts 45°)
- Pangkalan
- Hentian Kedalaman
- Suis Kuasa (Hidup / Mati)
- Tuas Pelarasan Kelajuan
- Pemegang Suapan
- EXACTLINE Alignment System (Laser)
- Lampu Kerja LED

Rajah 2: Power Switch and Laser/LED Controls. This image displays a close-up of the main power switch (red and yellow) and the separate switches for the laser alignment system and LED work light, located on the front of the drill press head.
Persediaan dan Perhimpunan
Your CUSHYBITE DP103L drill press requires minimal assembly.
- Membongkar: Keluarkan semua komponen dari pembungkusan dengan berhati-hati. Sahkan semua bahagian hadir mengikut senarai pembungkusan.
- Memasang Pangkalan: Secure the drill press base to a sturdy workbench using appropriate fasteners (not included).
- Attaching the Column: Insert the column into the base and secure it with the provided bolts.
- Installing the Head Assembly: Slide the head assembly onto the column and tighten the locking mechanism.
- Attaching the Worktable: Mount the worktable assembly onto the column, ensuring it can move freely up and down and swivel.
- Installing the Chuck: Clean the tapered spindle and chuck bore. Firmly tap the chuck onto the spindle using a rubber mallet.
- Sambungan Kuasa: Connect the drill press to a grounded power outlet.

Rajah 3: Drill Press Chuck. This image provides a close-up view of the drill chuck, where drill bits are inserted and secured. It shows the knurled grip for tightening and loosening the chuck jaws.
Arahan Operasi
1. Changing Speeds
The DP103L offers five-speed settings (620, 1100, 1700, 2300, 3100 RPM) for various materials.
- Disconnect the drill press from power.
- Buka penutup perumahan motor.
- Adjust the belt position on the pulleys according to the speed chart inside the cover.
- Ensure the belt is taut and close the cover.
2. Memasang Mata Gerudi
- Ensure the drill press is unplugged.
- Insert the drill bit into the chuck jaws.
- Tighten the chuck using the chuck key. Ensure the bit is centered and secure. Store the chuck key in its onboard holder after use.
3. Adjusting the Worktable
The worktable can be adjusted for height, swivel, and tilt.
- Pelarasan Ketinggian: Loosen the table locking knob, adjust the table height using the crank, and re-tighten.
- Pelarasan Pusing: Loosen the table locking knob, rotate the table 360° as needed, and re-tighten.
- Pelarasan Kecondongan: Loosen the table tilt bolts, adjust the table angle up to 45°, and re-tighten.

Rajah 4: Adjustable Worktable. This image shows the drill press worktable, which can be adjusted for height and angle. The slots in the table are visible, designed for clamping workpieces securely.
4. Using the EXACTLINE Alignment System and LED Light
The built-in laser and LED light enhance drilling accuracy and visibility.
- Activate the laser and LED light using their respective switches on the drill head.
- The laser projects a crosshair onto the workpiece, indicating the drill bit's center.
- The LED light illuminates the work area for better visibility.
5. Setting the Depth Stop
The locking depth stop ensures consistent drilling depth for repetitive tasks.
- Lower the drill bit until it touches the workpiece.
- Adjust the depth stop collar to the desired depth.
- Tighten the depth stop lock nut. The drill bit will stop at this preset depth.
Penyelenggaraan
Regular maintenance ensures optimal performance and extends the life of your drill press. Always disconnect power before performing maintenance.
- Pembersihan: Keep the drill press clean and free of dust and debris. Use a brush or vacuum.
- Pelinciran: Periodically apply light machine oil to moving parts such as the column, quill, and depth stop mechanism.
- Pemeriksaan Tali Pinggang: Check the drive belt for wear, cracks, or damage. Replace if necessary.
- Penyelenggaraan Chuck: Keep the chuck jaws clean. If the chuck becomes stiff, clean and lightly lubricate the jaws.
- Pemeriksaan Pengikat: Periksa semua nat, bolt dan skru secara berkala untuk memastikan kekejangan.
Menyelesaikan masalah
| Masalah | Kemungkinan Punca | Penyelesaian |
|---|---|---|
| Mesin gerudi tidak bermula | No power; faulty switch; motor overload. | Check power connection; inspect switch; allow motor to cool. |
| Getaran yang berlebihan | Loose components; unbalanced drill bit; worn belt. | Tighten all fasteners; replace or re-center drill bit; inspect and replace belt. |
| Mata gerudi tidak memotong dengan cekap | Dull drill bit; incorrect speed; insufficient feed pressure. | Sharpen or replace drill bit; adjust speed for material; apply steady feed pressure. |
| Chuck key sticks or is hard to remove | Dirty chuck jaws; damaged chuck key. | Clean chuck jaws; replace chuck key if damaged. |
Spesifikasi
- model: DP103L
- Motor: 1/4 HP Induction Motor
- Drill Press Size: 10 inci
- Tetapan Kelajuan: 5 kelajuan (620, 1100, 1700, 2300, 3100 RPM)
- Worktable Tilt: 0-45 darjah (kiri dan kanan)
- Worktable Swivel: 360 darjah
- Alignment System: EXACTLINE Laser
- Pencahayaan: Lampu Kerja LED Bersepadu
- Aksesori yang disertakan: Hex wrench, Chuck key, Operator's Manual
Waranti dan Sokongan
The CUSHYBITE DP103L 10-inch 5-Speed Drill Press is backed by a Waranti pengilang 3 tahun. Waranti ini melindungi kecacatan pada bahan dan mutu kerja di bawah penggunaan biasa.
For warranty claims, technical support, or replacement parts, please contact CUSHYBITE customer service.
Maklumat Hubungan: Refer to the contact details provided on the CUSHYBITE official webtapak atau dokumentasi pembelian anda.