
CUSHYBITE PBLSV716B
User Manual: CUSHYBITE HP 18V Cordless Pet Stick Vacuum
Model: PBLSV716B
1. Pengenalan
Thank you for choosing the CUSHYBITE HP 18V Cordless Pet Stick Vacuum, model PBLSV716B. This manual provides essential information for the safe operation, maintenance, and troubleshooting of your new vacuum cleaner. Please read this manual thoroughly before using the product and keep it for future reference.
This cordless stick vacuum is designed for efficient floor-to-ceiling cleaning, featuring HP Technology for powerful suction. It is ideal for tackling pet hair, dirt, and debris on various surfaces including hard floors, carpets, and rugs.
2. Maklumat Keselamatan Penting
Sentiasa ikuti langkah berjaga-jaga keselamatan asas apabila menggunakan peralatan elektrik untuk mengurangkan risiko kebakaran, renjatan elektrik atau kecederaan.
- Baca semua arahan sebelum menggunakan perkakas.
- Jangan biarkan vakum tanpa pengawasan apabila dipasang. Cabut plag dari alur keluar apabila tidak digunakan dan sebelum diservis.
- Jangan gunakan di luar atau di permukaan basah.
- Jangan biarkan digunakan sebagai mainan. Perhatian yang rapi diperlukan apabila digunakan oleh atau berhampiran kanak-kanak.
- Gunakan hanya seperti yang diterangkan dalam manual ini. Gunakan hanya lampiran yang disyorkan pengilang.
- Jangan gunakan dengan kord atau palam yang rosak. Jika perkakas tidak berfungsi sebagaimana mestinya, telah terjatuh, rosak, ditinggalkan di luar rumah, atau terjatuh ke dalam air, kembalikannya ke pusat servis.
- Jangan tarik atau bawa dengan kord, gunakan kord sebagai pemegang, tutup pintu pada kord, atau tarik kord di sekeliling tepi atau sudut yang tajam. Jangan jalankan perkakas di atas kord. Jauhkan kord dari permukaan yang dipanaskan.
- Jangan cabut plag dengan menarik kord. Untuk mencabut palam, pegang palam, bukan kordnya.
- Jangan pegang palam atau perkakas dengan tangan yang basah.
- Jangan letakkan sebarang objek ke dalam bukaan. Jangan gunakan dengan mana-mana bukaan yang disekat; jauhkan daripada habuk, serabut, rambut dan apa sahaja yang boleh mengurangkan aliran udara.
- Jauhkan rambut, pakaian longgar, jari dan semua bahagian badan daripada bukaan dan bahagian yang bergerak.
- Jangan ambil apa-apa yang terbakar atau berasap, seperti rokok, mancis, atau abu panas.
- Gunakan lebih berhati-hati semasa membersihkan di tangga.
- Jangan gunakan untuk mengambil cecair mudah terbakar atau mudah terbakar, seperti petrol, atau gunakan di kawasan yang mungkin terdapat.
- Jangan ambil bahan toksik, seperti peluntur klorin, ammonia atau pembersih longkang.
- Jangan gunakan tanpa cawan habuk dan/atau penapis di tempatnya.
- This product is compatible with all RYOBI 18V batteries. Ensure the battery is fully charged before use.
3. Komponen Produk
Familiarize yourself with the parts of your CUSHYBITE HP 18V Cordless Pet Stick Vacuum.
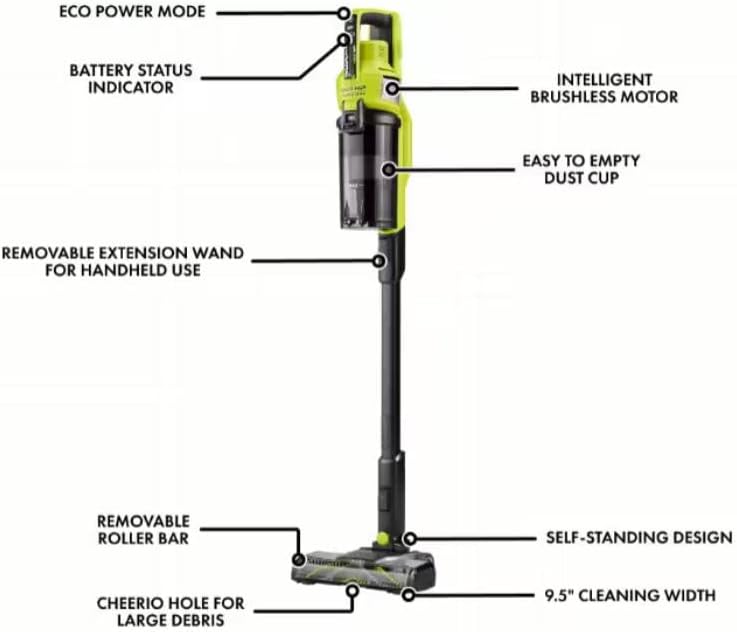
Rajah 3.1: Labeled components of the vacuum cleaner.
- ECO Power Mode Button: For energy-efficient cleaning.
- Penunjuk Status Bateri: Menunjukkan baki hayat bateri.
- Intelligent Brushless Motor: Provides powerful and efficient suction.
- Easy to Empty Dust Cup: For convenient debris disposal.
- Removable Extension Wand: Allows conversion to handheld use.
- Removable Roller Bar: Untuk pembersihan dan penyelenggaraan yang mudah.
- Cheerio Hole for Large Debris: Designed to pick up larger particles.
- 9.5" Cleaning Width: Wide cleaning path for efficiency.
- Self-Standing Design: Allows the vacuum to stand upright on its own.
The vacuum also includes a crevice tool and a brush for specialized cleaning tasks.
4. Persediaan dan Pemasangan
Your CUSHYBITE HP 18V Cordless Pet Stick Vacuum requires minimal assembly.
- Bongkar: Keluarkan semua komponen daripada pembungkusan dengan berhati-hati. Pastikan semua bahagian yang disenaraikan dalam Bahagian 3 ada.
- Pasang Tongkat Sambungan: Masukkan tongkat sambungan ke dalam badan vakum utama sehingga ia klik dengan selamat di tempatnya.
- Pasang Kepala Lantai: Connect the floor head to the bottom of the extension wand, ensuring it locks firmly.
- Masukkan Bateri: Insert a charged RYOBI 18V battery into the battery slot on the main vacuum body. Ensure it clicks into place.
- Pertuduhan Pertama: For optimal performance, fully charge the battery before first use.
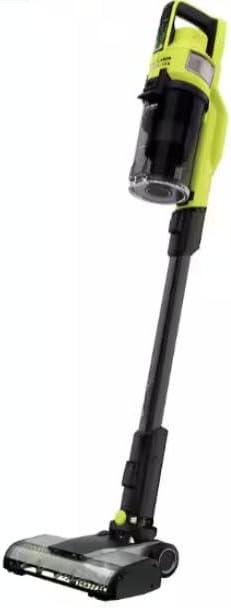
Rajah 4.1: The vacuum fully assembled and ready for use.
5. Arahan Operasi
Your vacuum offers versatile cleaning options.
5.1. Standard Stick Vacuum Mode
- Ensure the vacuum is fully assembled with the extension wand and floor head attached.
- Tekan butang kuasa untuk menghidupkan vakum.
- Use the ECO Power Mode button to switch between power settings as needed for different surfaces or debris levels.
- The LED lights on the roller bar will illuminate, helping to spot dirt and debris on the floor.
- Maneuver the vacuum across hard floors, carpets, and rugs. The 9.5" cleaning width ensures efficient coverage.
- The self-standing design allows you to pause cleaning and leave the vacuum upright without support.
5.2. Mod Vakum Genggam
For cleaning cars, stairs, upholstery, and tight spaces:
- Detach the extension wand from the main vacuum body by pressing the release button.
- Attach the desired accessory (crevice tool or brush) directly to the main vacuum body.
- Turn on the vacuum and use it for targeted cleaning.
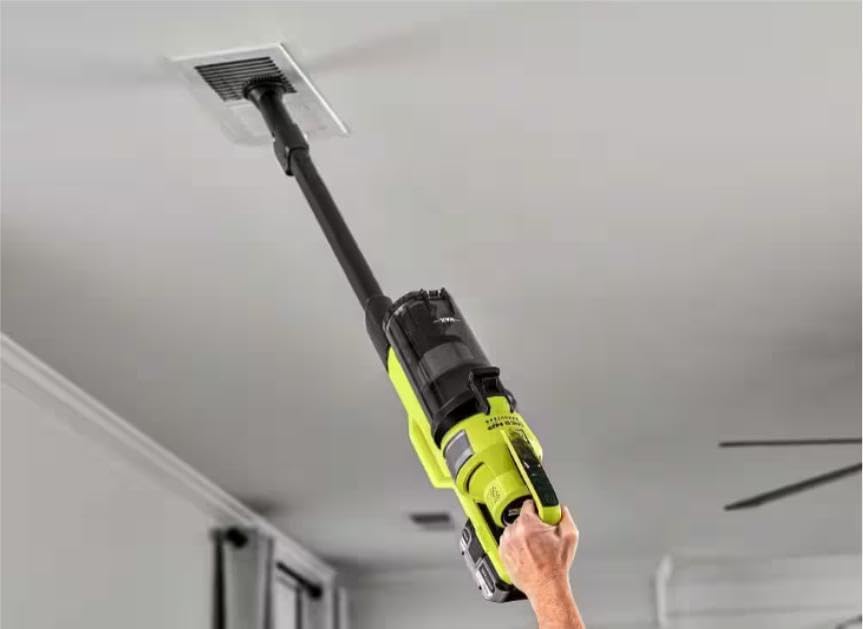
Rajah 5.1: Using the vacuum in handheld mode for high-reach cleaning.
6. Penyelenggaraan
Penyelenggaraan tetap memastikan prestasi optimum dan memanjangkan hayat vakum anda.
6.1. Mengosongkan Dust Cup
- Pastikan vakum dimatikan dan bateri ditanggalkan.
- Locate the dust cup release button and press it to detach the dust cup from the main body.
- Pegang cawan habuk di atas tong sampah dan buka kepak bawah untuk mengosongkan kandungannya.
- Close the flap and reattach the dust cup to the vacuum until it clicks securely.
6.2. Membersihkan Penapis
It is recommended to clean the filters regularly, especially if you notice a decrease in suction power.
- Remove the dust cup as described above.
- Carefully remove the filters from inside the dust cup.
- Tap the filters over a trash bin to remove loose dirt and debris.
- If necessary, rinse the filters with cold water. Ensure they are completely dry before reinserting them into the vacuum. Do not use hot water or detergents.
- Pasang semula penapis dan cawan habuk.
6.3. Cleaning the Roller Bar
Periodically check the roller bar for tangled hair or debris.
- Ensure the vacuum is off and the battery is removed.
- Detach the floor head from the extension wand.
- Locate the release mechanism for the roller bar (refer to Figure 3.1) and remove the roller bar.
- Use scissors or a brush to remove any tangled hair, string, or debris from the roller bar.
- Reinsert the roller bar until it clicks into place.
7. Penyelesaian masalah
Rujuk bahagian ini untuk isu biasa dan penyelesaiannya.
| Masalah | Kemungkinan Punca | Penyelesaian |
|---|---|---|
| Vakum tidak dihidupkan. | Bateri tidak dicas atau tidak dimasukkan dengan betul. | Ensure the RYOBI 18V battery is fully charged and securely inserted. |
| Kehilangan sedutan. | Dust cup is full; Filters are clogged; Obstruction in nozzle or hose; Roller bar is tangled. | Empty the dust cup. Clean or replace filters. Check for and remove any obstructions. Clean the roller bar. |
| Roller bar not spinning. | Obstruction in roller bar; Roller bar not properly installed. | Remove any tangled hair or debris from the roller bar. Ensure the roller bar is correctly reinserted. |
| Vakum mengeluarkan bunyi yang luar biasa. | Obstruction in air path; Damaged component. | Check for and remove any obstructions in the dust cup, filters, or air path. If noise persists, contact customer support. |
8. Spesifikasi
| Ciri | Perincian |
|---|---|
| Nombor Model | PBLSV716B |
| Jenama | CUSHYBITE |
| Sumber Kuasa | 18V Battery (RYOBI compatible) |
| Jenis Motor | Brushless (HP Technology) |
| Lebar Pembersihan | 9.5 inci |
| Konfigurasi | Up to 8 cleaning configurations (stick and handheld) |
| Ciri Khas | Self-standing design, LED lights on roller bar, Easy-to-empty dust cup, Removable roller bar |
9. Waranti dan Sokongan
For warranty information or technical support, please refer to the documentation included with your purchase or contact CUSHYBITE customer service.
For best results and proper fitment, always compare the product's image and listed dimensions before purchase.
Pengeluar: CUSHYBITE
Tarikh Mula-mula Tersedia: 22 Januari 2025
Ask a question about this manual
Ask about setup, troubleshooting, compatibility, parts, safety, or missing instructions. Manuals+ will review the question and use this page’s manual context to help answer it.